SupremeRAID™ is the most powerful, high-speed data protection solution specially designed for NVMe SSDs. SupremeRAID™ driver installs a virtual NVMe controller onto the operating system and integrates a high-performance, GPU-based PCIe RAID card into the system to manage the RAID operations of the virtual NVMe controller.
This document explains how to install the SupremeRAID™ software package for Linux and how to manage the RAID components using the command-line interface.
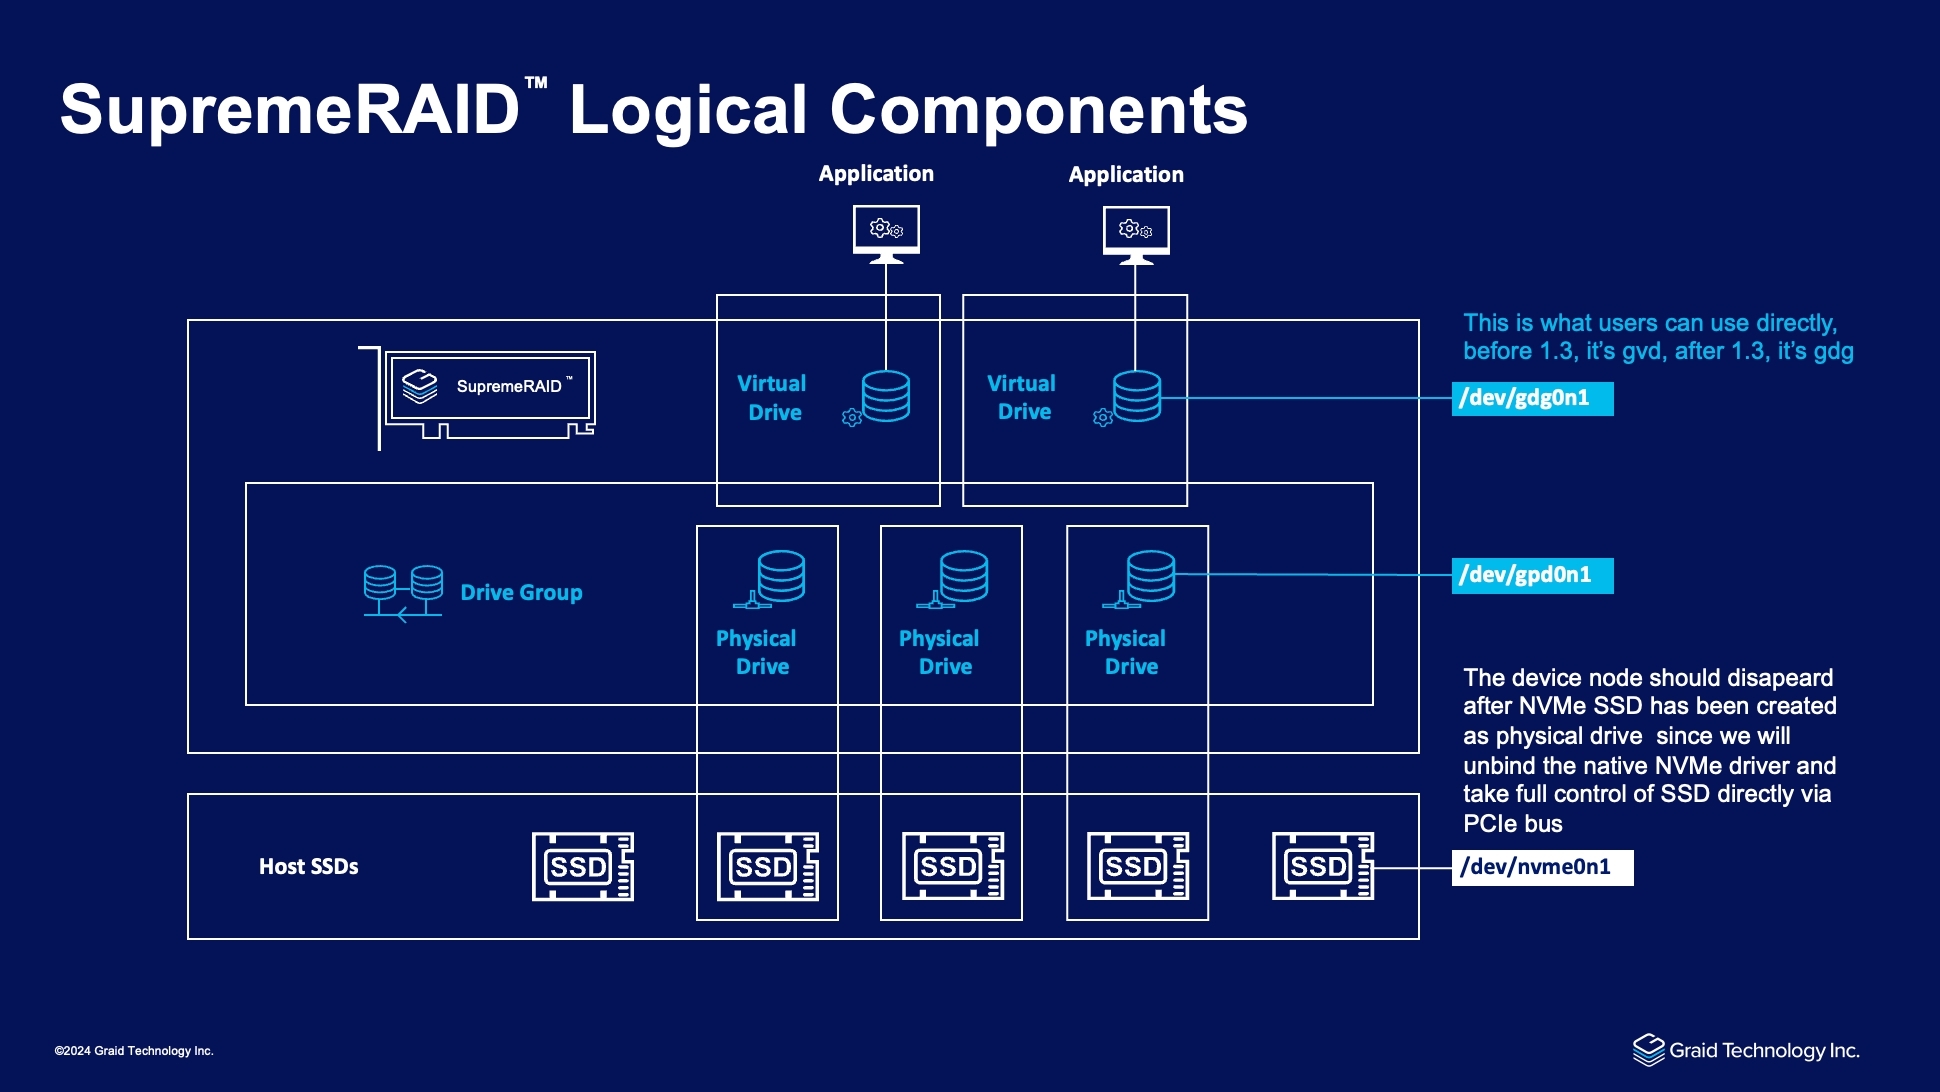
Since NVMe drives are not directly attached to the SupremeRAID™ controller, you must tell the controller which SSDs can be managed. After an SSD is created as a physical drive, the SupremeRAID™ driver unbinds the SSD from the operating system, meaning the device node (/dev/nvmeX) disappears and is no longer accessible. At the same time, the SupremeRAID™ driver creates a corresponding device node (/dev/gpdX). You can check the SSD information, such as SSD model or SMART logs, using this device node. To control and access the SSD using /dev/nvmeXn1, you must first delete the corresponding physical drive.
SupremeRAID™ supports 32 physical drives, regardless of whether the physical drives are created from a native NVMe SSD, a drive connected through NVMe-oF, or a SAS/SATA disk.
The main component of RAID logic is a RAID group. When the drive group is created, the SupremeRAID™ driver initializes the physical drives with the corresponding RAID mode to ensure that the data and parity are synchronized.
There are two types of initialization processes.
Fast Initialization: When all the physical drives in the drive group (DG) support the de-allocate dataset management command, the SupremeRAID™ driver performs fast initialization by default, which optimizes the drive group state immediately.
Background Initialization: Performance is slightly affected by the initialization traffic, but you can still create the virtual drive and access the virtual drive during a background initialization. SupremeRAID™ supports eight drive groups, with a maximum of 32 physical drives in one drive group.
The virtual drive is equivalent to the RAID volume. You can create multiple virtual drives in the same drive group for multiple applications. The corresponding device node (/dev/gdgXnY) appears on the operating system when you create a virtual drive, and you can make the file system or running application directly on this device node. Currently, the SupremeRAID™ driver supports a maximum of 1023 virtual drives in each drive group.
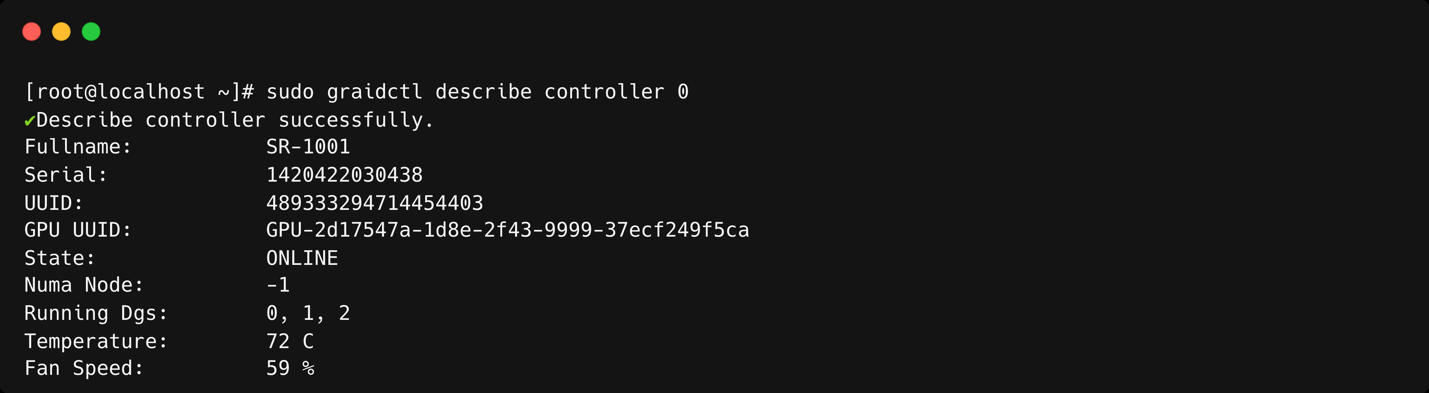
The controller is the core component of the RAID system. It provides detailed hardware information such as GPU serial number, temperature, and fan speed. RAID management relies on the controller, so the controller's state directly affects the underlying drive group operations.
In the Linux driver, users can have dual controllers in the system and manage them separately. By enabling the high-availability function in a drive group, the backup controller will take over drive group management if the primary controller fails or goes missing. Additionally, you can set up drive groups on a specified controller or within the same NUMA node as the controller to minimize negative influences.
Note
If you upgrade from version 1.2.x to version 1.6.x of the SupremeRAID™ driver, the device path changes from /dev/gvdXn1 to /dev/gdgXnY.
The SupremeRAID™ presents a range of features that facilitate convenient data storage methods and incorporate diverse protection mechanisms to ensure data integrity. The following will outline key features that contribute to achieving our objectives and fostering a foundational understanding of our services.
The SupremeRAID™ is designed to provide high reliability and data integrity levels. A key feature that enables this is the consistency check function.
The consistency check function allows administrators to ensure that the data stored on the SupremeRAID™ system is intact and uncorrupted. These checks can be performed on a regular schedule or manually initiated as needed. While running the consistency check, the system compares the data on each disk to identify any discrepancies or errors.
Depending on the settings chosen by the administrator, the consistency check function can either automatically fix any errors that are found or stop the check and alert the administrator to any detected errors. This feature provides administrators with flexibility and control over how the system responds to errors.
The consistency check function is not supported on SupremeRAID™ systems configured in RAID0 mode because RAID0 does not provide data redundancy and does not require data consistency checks.
This feature enables the SupremeRAID™ system to automatically fail over to another SupremeRAID™ card when one SupremeRAID™ card experiences an issue without any interruption in service. This increased reliability and availability ensures that the system remains operational even in the event of a single card failure.
SupremeRAID™ supports dual-controller configurations in two modes: dual-active and active-passive. This enhances our RAID solution with comprehensive protection and security. Additionally, the high availability (HA) functionality remains unaffected by the root complex. Whether within the same root complex or across different root complexes, we have implemented failover mechanisms to ensure high availability.
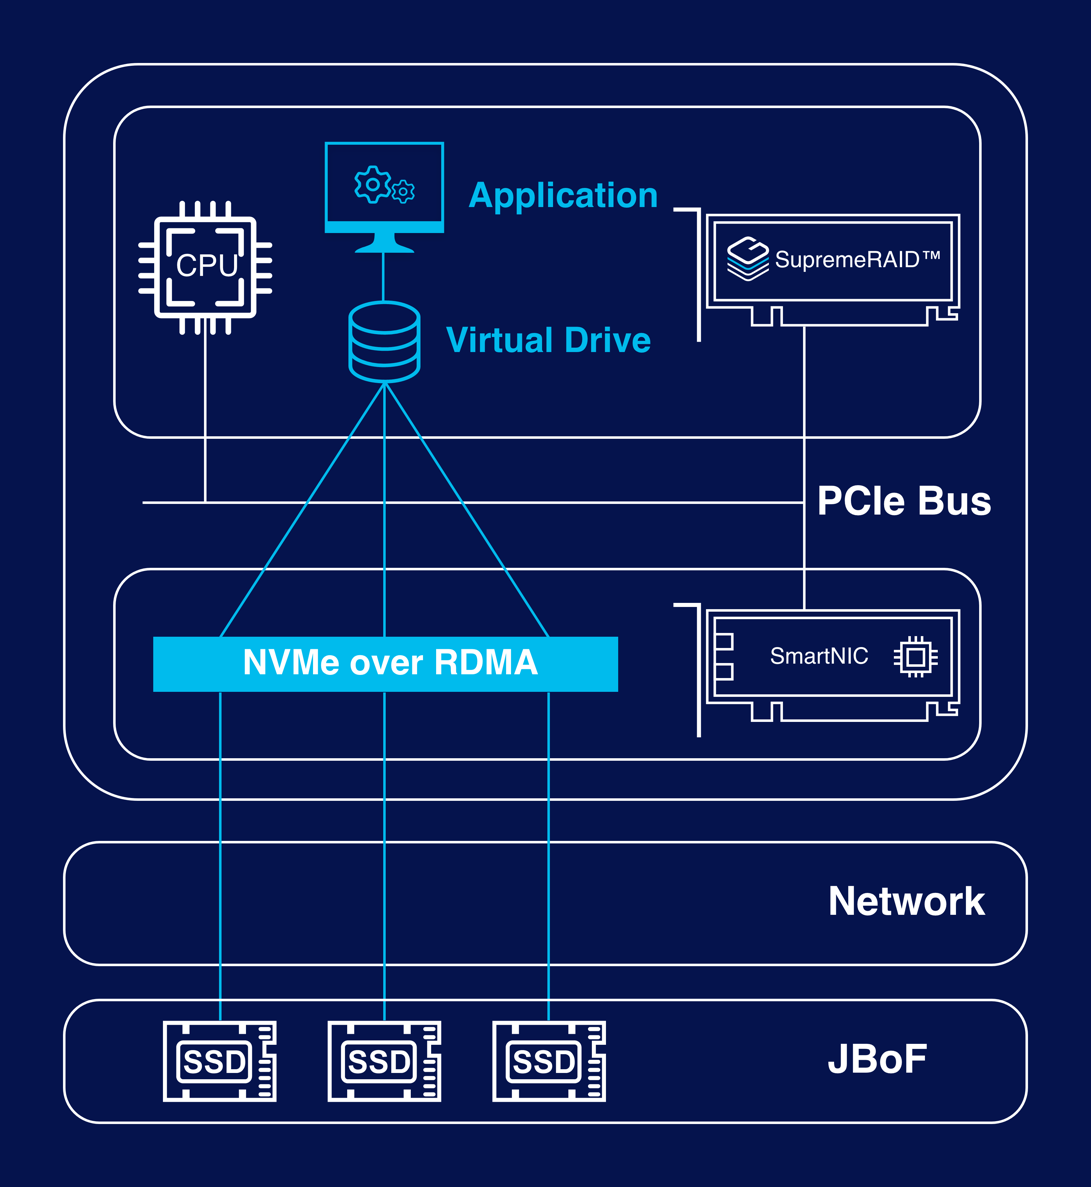
The SupremeRAID™ allows you to easily manage a remote target server or storage pool that uses NVMe-over-Fabrics (NVMe-oF) technology. Both TCP and RDMA connections are supported, providing flexibility and compatibility with a wide range of systems. With the SupremeRAID™, you can create a virtual volume with RAID capabilities without the need for reconfiguration or re-cabling on the host server. This allows you to take advantage of the benefits of NVMe-oF, including increased capacity and improved data protection.
For detailed information about the commands for managing the NVMe-oF initiator, please refer to Managing NVMe-oF Remote Targets.
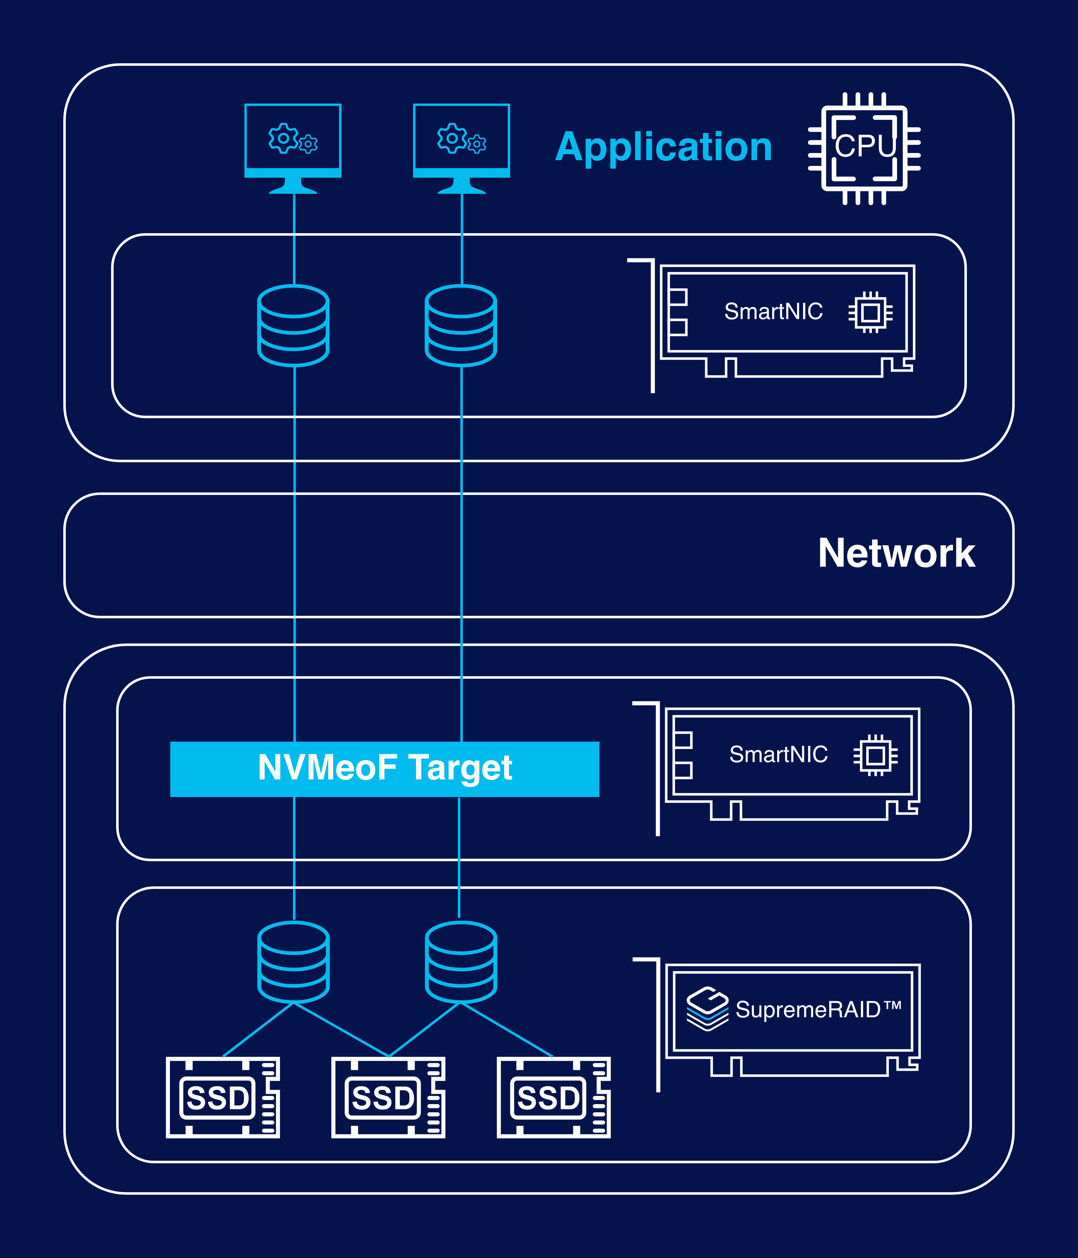
The SupremeRAID™ allows you to easily compose local NVMe devices into a RAID array and share that array as an NVMe-over-Fabrics (NVMe-oF) target server. By using a SmartNIC to accelerate data transfer, you can achieve low latencies and high performance for your remote NVMe-oF clients.
For detailed information about the commands for managing the NVMe-oF target, please refer to Managing NVMe-oF Export Target.
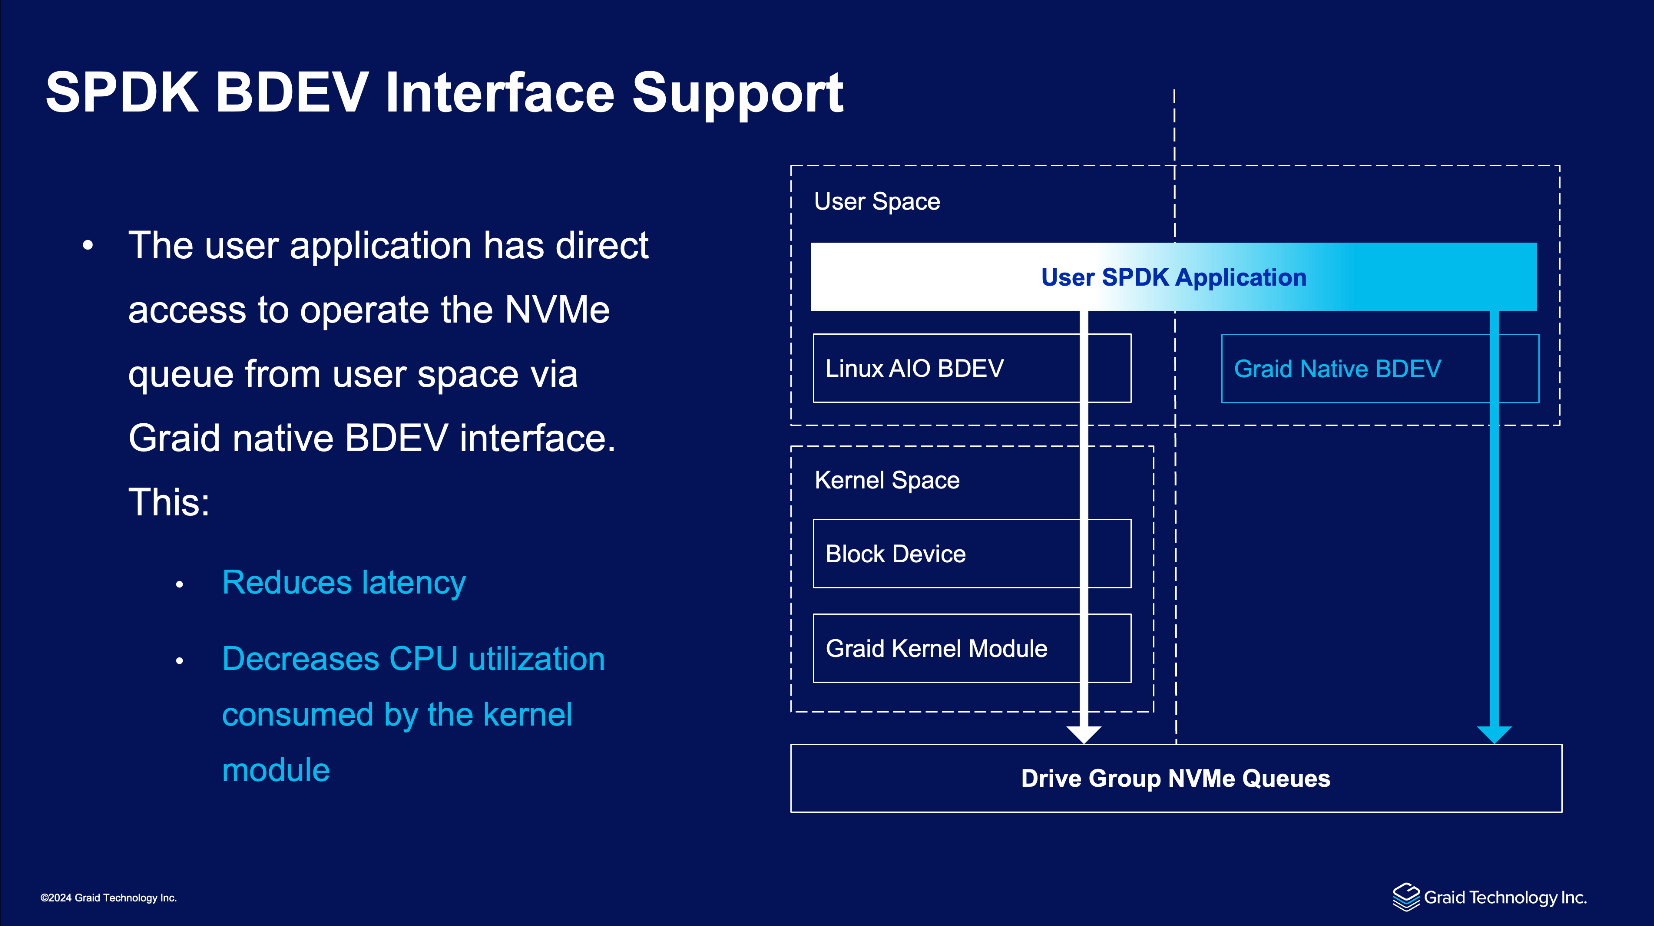
The SupremeRAID™ software incorporates SPDK (Storage Performance Development Kit) feature, enabling direct access to operate the NVMe queue from user space through the SupremeRAID™ BDEV (Block Device) interface. This interface is compatible with the SPDK block device layer, often simply called bdev. This integration offers significant benefits that enhance the overall performance and efficiency of the system.
The SPDK feature facilitates direct user application access to NVMe queues from user space. This minimizes data access and processing latency, resulting in enhanced system responsiveness through reduced overhead and fewer context switches. Moreover, this direct access eliminates the necessity for data transfers between user space and kernel space, thereby decreasing CPU utilization caused by kernel module activity.
SupremeRAID™ incorporates a distributed journaling mechanism specifically designed to safeguard data during abnormal shutdowns in double-failure scenarios. This system ensures data integrity by logging data in a dedicated journaling space before writing it to the storage area, any incomplete I/O operations are replayed upon service restart to maintain data consistency.
This journaling feature is automatically enabled in degraded mode to uphold data integrity. Additionally, users still have the flexibility to bypass journaling space reservation when creating a drive group.
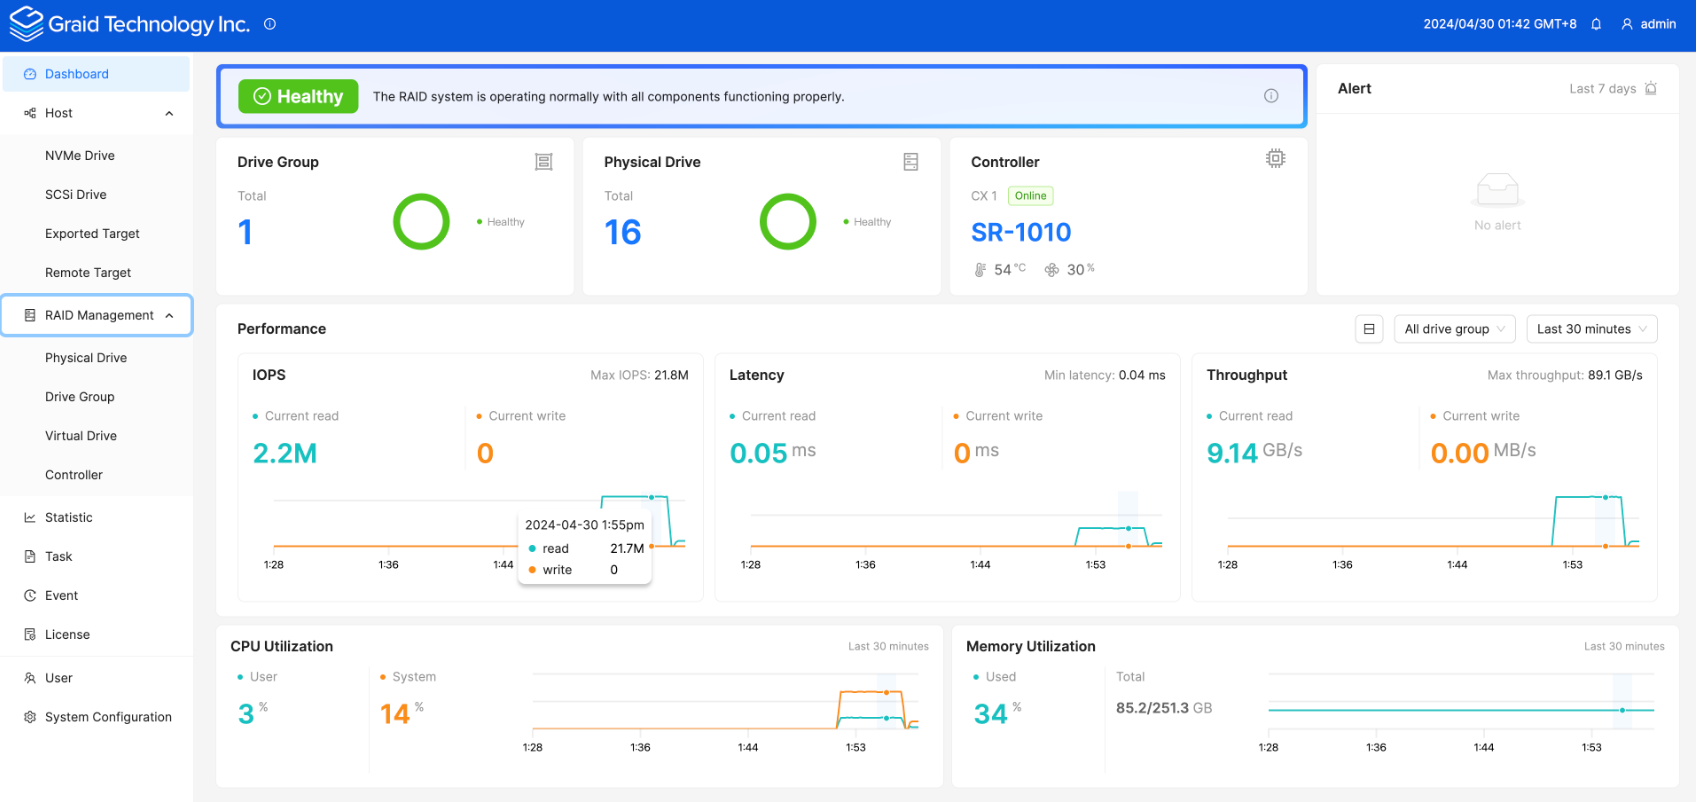
To enhance the SupremeRAID™ management tool, we offer an intuitive graphical console. Users can effortlessly navigate through the console using the navigation bar, which includes sections for Dashboard, Hosts, RAID Management, Events, and Statistics to display system workloads. Additionally, administrators have access to Licenses, User Management, and Email Notification sections.
The system offers a comprehensive suite of features designed to enhance user experience and system management. The Dashboard and Statistics page provides an overview of system efficiency and health status, allowing users to monitor RAID utility performance and resource utilization. For hands-on management, the Host and RAID Management interface facilitates the conversion of storage devices into RAID resources.
Advanced features cater to administrator needs: the License Management function tracks SupremeRAID™ license status, while User Management allows for the creation and modification of user accounts with varying permission levels. To ensure timely alerts, administrators can configure SMTP settings in the Email Notification page and enable mail functions for specific users, thereby maintaining a robust notification system for critical events.
With the release of Linux driver 1.6.1, the SupremeRAID™ driver introduces support for the NVMe DSM deallocate (trim) command on virtual drives, improving the efficiency of unused storage space management on NVMe SSDs. This feature allows filesystems or applications to issue deallocate commands on virtual drives, which are then translated by the driver and sent directly to the SSDs. By enabling the drives to manage deallocated blocks internally, this reduces write amplification, optimizes storage efficiency, and enhances overall performance.
When a discard command is issued to a virtual drive, it triggers a corresponding deallocate command to the underlying NVMe SSDs. The system supports a minimum discard range of 4KB, aligned with the logical block addressing (LBA) size, and can handle a maximum deallocate range of approximately 400 GiB per command. For larger discard operations, the filesystem and block layer handle the process seamlessly.
This feature is automatically enabled on NVMe SSDs that support the deallocate command and guarantee that deallocated blocks return zeros. For SSDs without this guarantee, the system defaults to a "write zeros" command to ensure data consistency. This flexible approach ensures broad compatibility across different SSDs while optimizing their individual capabilities.
To ensure the filesystem can take advantage of this capability and issue discard commands when files are deleted, it must be mounted with the discard option.
With the release of Linux driver 1.7.0, the SupremeRAID™ driver introduces the error retry mechanism. The error retry mechanism enhances data resiliency by mitigating transient failures in physical drives before they escalate into critical issues. It detects and retries failed operations, preventing drives from being prematurely marked as degraded, and reduces the likelihood of premature drive failures caused by temporary read/write issues. Without this mechanism, drives may be wrongly identified as failed, leading to unnecessary rebuilds and increased system downtime. With the retry mechanism in place, transient errors are managed more efficiently, enhancing drive lifespan and overall system stability.
Before proceeding with the installation, make sure the system meets the following requirements:
Minimum system requirements
CPU: 2 GHz or faster with at least 8 cores
RAM: 16 GB
Supported operating system: see Latest Linux Release Notes on our website.
An available PCIe Gen3 or Gen4 x16 slot
The SupremeRAID™ card must be installed into a PCIe x16 slot.
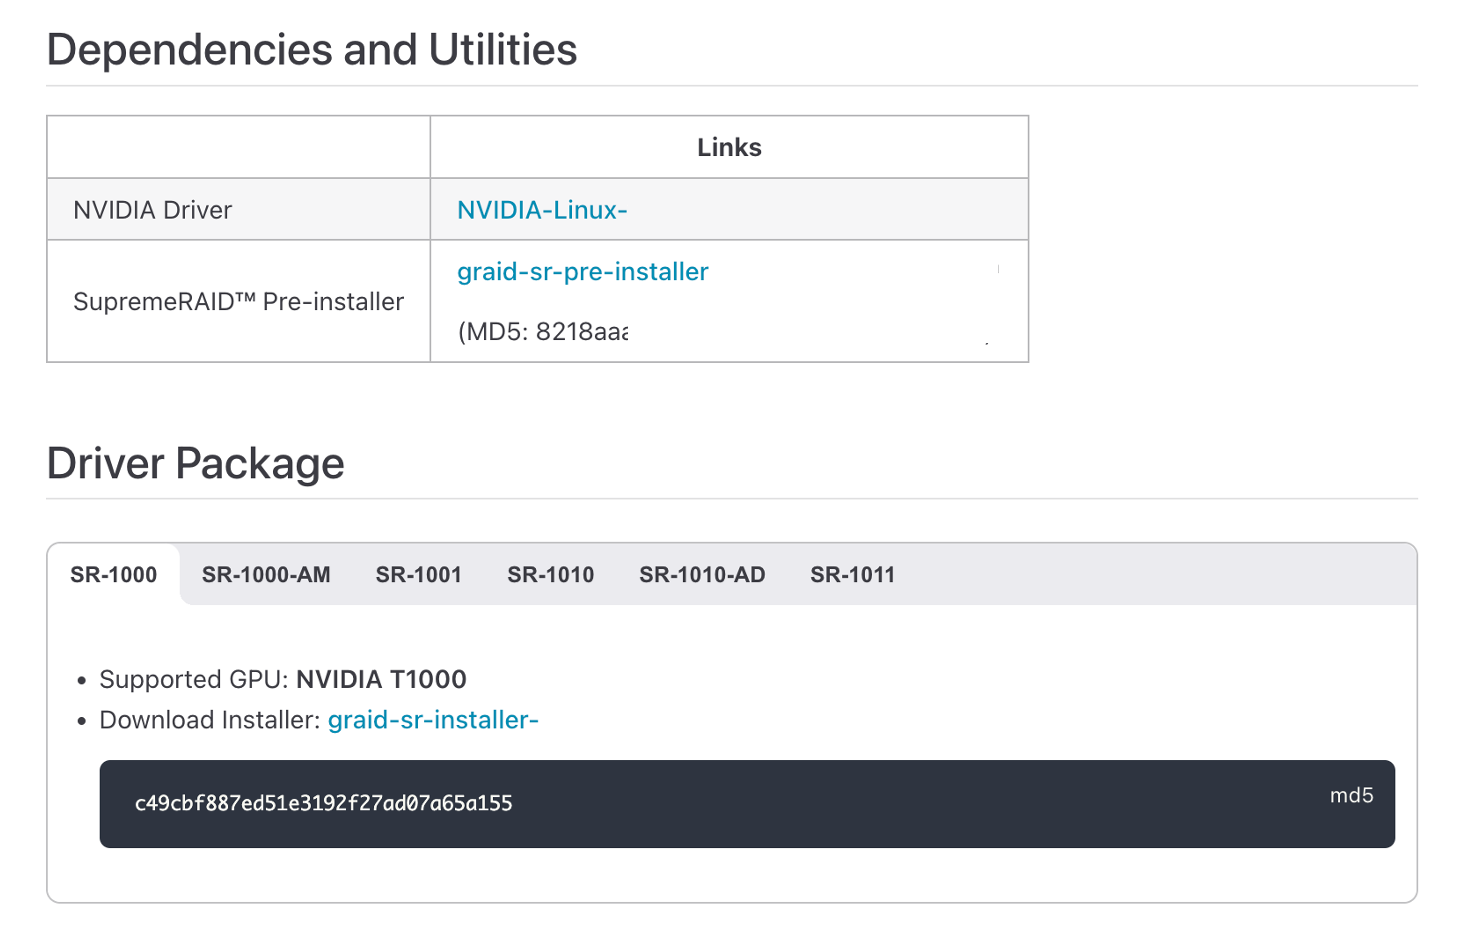
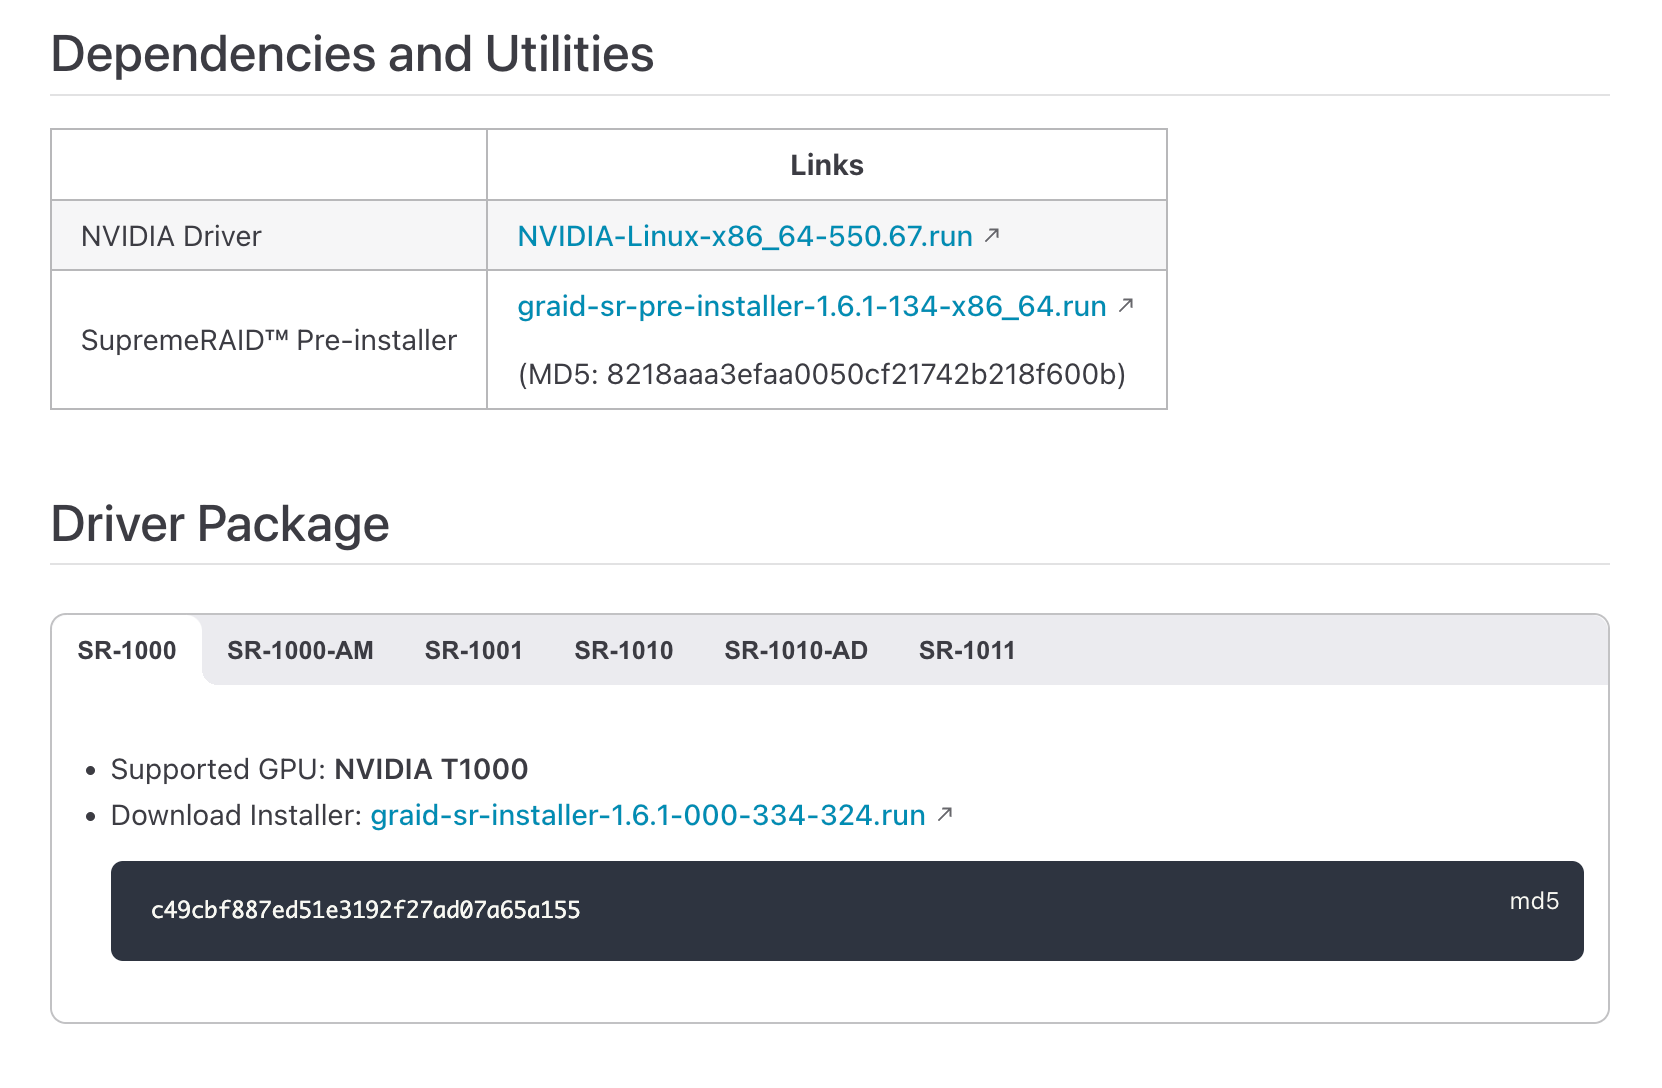
The SupremeRAID™ software package, which includes the Pre-Installer and Installer, can be downloaded directly from the Graid Technology website. The Pre-Installer configures all necessary dependencies and environment settings automatically prior to installing the SupremeRAID™ driver. The Installer contains the SupremeRAID™ driver package and will automatically detect your Linux distributions and install the appropriate files.
Make sure a SupremeRAID™-compatible SSD drive is being used. For a list of compatible drives, see the Drivers & Documentation section on our website.
System suspension and hibernation are currently unsupported due to a limitation in the NVIDIA driver.
[OPTIONAL] It is recommended to disable the IOMMU function (AMD) or VT-d function (Intel) in the system BIOS, typically on the BIOS Advanced page.
[OPTIONAL] It is highly recommended to disable the UEFI Secure Boot function on the BIOS security page. If UEFI Secure Boot is not applicable in your system, you will need to sign the NVIDIA kernel module. For further information and troubleshooting, please refer to the NVIDIA website.
Electronic components and circuits are sensitive to Electrostatic Discharge (ESD). When handling any circuit board assemblies including Connect Tech carrier assemblies, it is recommended that ESD safety precautions be observed. ESD safe best practices include, but are not limited to:
Leaving circuit boards in their antistatic packaging until they are ready to be installed.
Using a grounded wrist strap when handling circuit boards, at a minimum you should touch a grounded metal object to dissipate any static charge that may be present on you.
Only handling circuit boards in ESD safe areas, which may include ESD floor and table mats, wrist strap stations and ESD safe lab coats.
Avoiding handling circuit boards in carpeted areas.
Try to handle the board by the edges, avoiding contact with components.
Perform the following procedure to install SupremeRAID™ into your system.
Step 1 Power down your system.
Step 2 Unplug the power cord from the AC power source.
Step 3 Remove the side panel from your system to gain access to the motherboard.
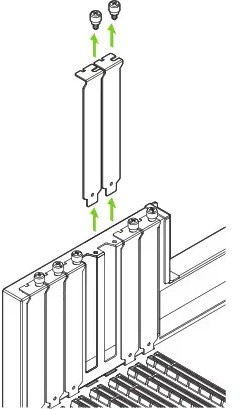
Step 4 If your system has a PCIe card, remove it. If a retention bar is holding the card in place, remove the screw securing the card. If there is no existing PCIe card, remove the access covers from the primary x16 PCI express slot.
Remove PCIe Slot Cover
Note
The SupremeRAID™ SR-1010 is dual-slot card and requires you to remove two adjacent slot covers. The SupremeRAID™ SR-1000, SR-CORE-AM, SR-PRO-AM, SR-ULTRA-AD and SR-1001 are single-slot cards and require only a single-slot.
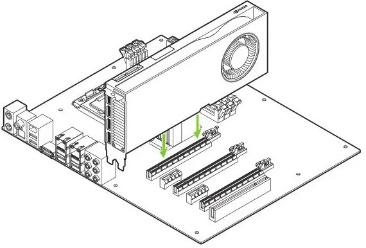
Step 5 Install the card into the primary x16 PCI Express slot. Press gently on the card until it is seated securely in the slot and reattach the SupremeRAID™ card bracket retention mechanism.
Install SupremeRAID Card PCIe Slot
Note
Install the SupremeRAID™ card into the primary x16 PCI Express slot. The SupremeRAID™ SR-1010 is dual-slot card and covers the adjacent slot. The SupremeRAID™ SR-1000, SR-CORE-AM, SR-PRO-AM, SR-ULTRA-AD and SR-1001 are single-slot cards. For more information, see NVIDIA RTX Ampere Architecture-Based Graphics Card User Guide.
Step 6 Secure the card to the system frame using the screw(s) you removed in step 4.
Step 7 Install the side panel you removed in step 3.
The recommended and quickest way to install the SupremeRAID™ software is by using the pre-installer script and installer described below.
However, if you prefer to install the software manually or your environment lacks Internet access, follow the manual installation procedure to configure the environment settings and install the SupremeRAID™ driver manually. If you have already installed the software and only wish to upgrade it, please refer to the instructions for the upgrade configuration.
The SupremeRAID™ pre-installer is an executable file that contains the required dependencies and a setup script that installs the NVIDIA driver. The script makes it easy to prepare the environment and install the SupremeRAID™ driver in every supported Linux distribution. Use the following steps to prepare the environment and install the SupremeRAID™ driver using the pre-installer in supported Linux distributions.
Note
To run the pre-installer, the system must have internet access to download the required dependencies from the official mirror.
Note
Replace bracketed values such as [download-url], [package-file], [host-ip], and [LICENSE_KEY] with the values for your environment.
Step 1 Go to the Graid Technology website, download the latest version of the pre-installer from the Latest Linux Release Notes, and make it executable.
Step 5 Execute the installer and follow the provided steps to complete the installation.
$ sudo ./[package-file]
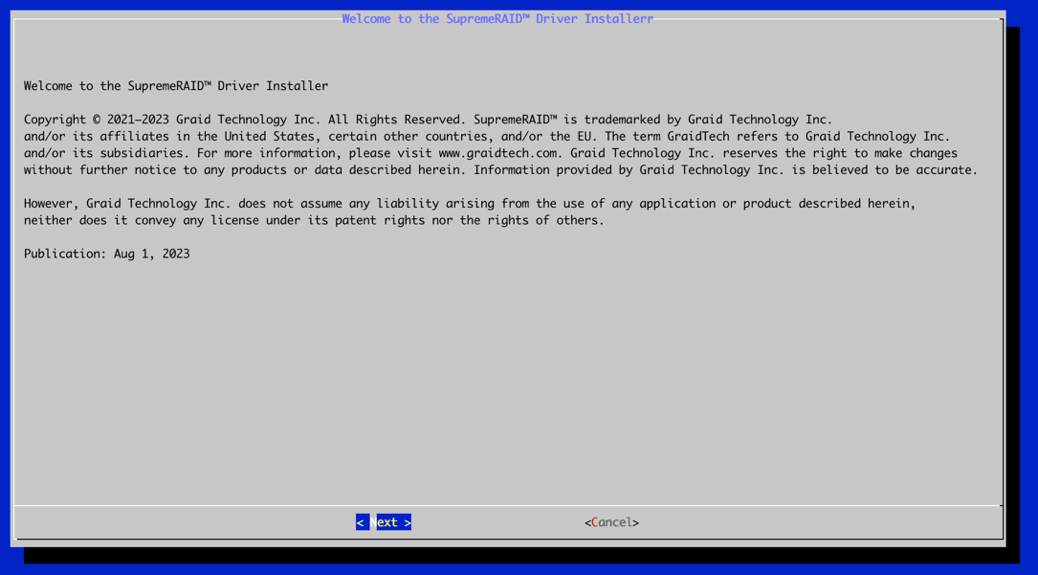
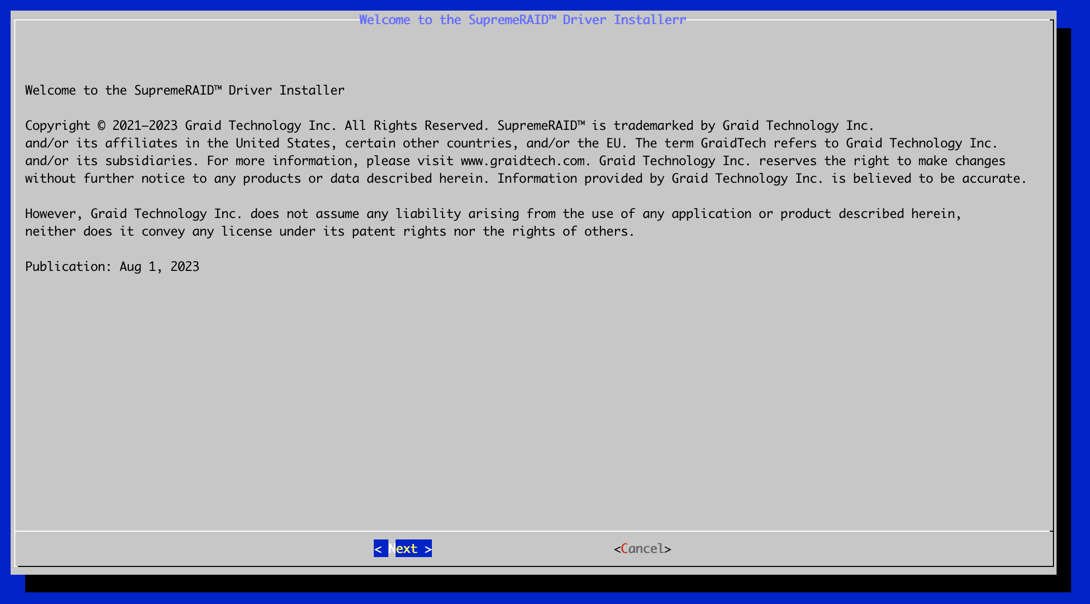
A. At the Welcome page, select Next and press Enter to view the end-user license agreement.
Installer Welcome Screen
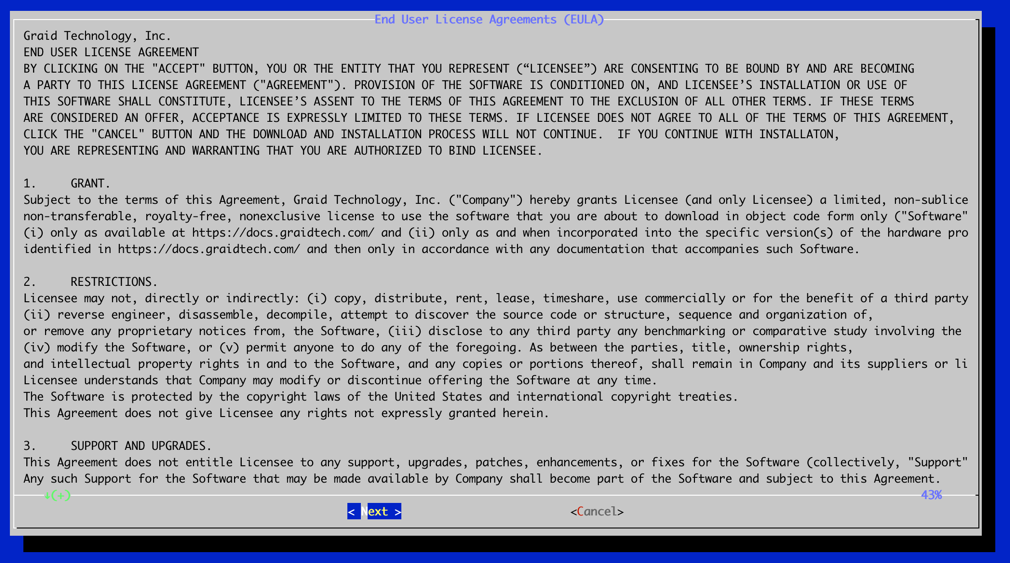
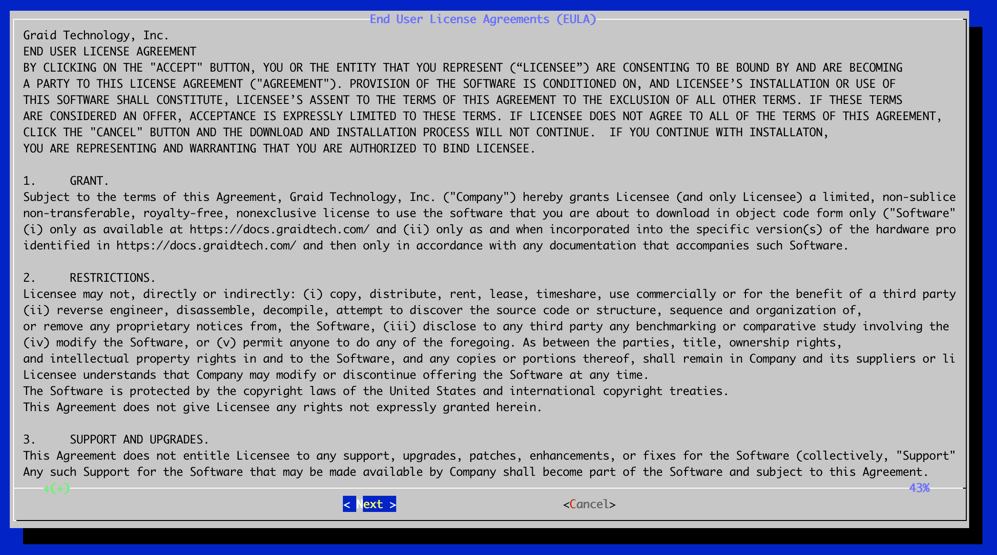
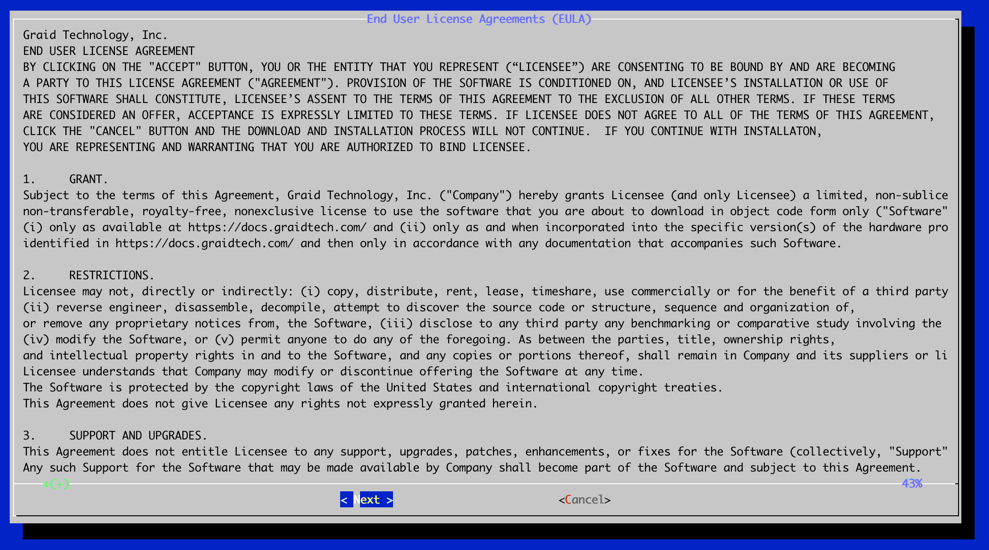
B. In the end-user license agreement page, use the spacebar to scroll down the content. After you review the license, select Next and press Enter.
Installer License Agreement Screen
C. Type Accept, click tab, select Next, and press Enter to accept the license agreement.
Installer License Acceptance Screen
D. Confirm the installation package, and then select Next to continue with the installation.
Installer Package Confirmation Screen
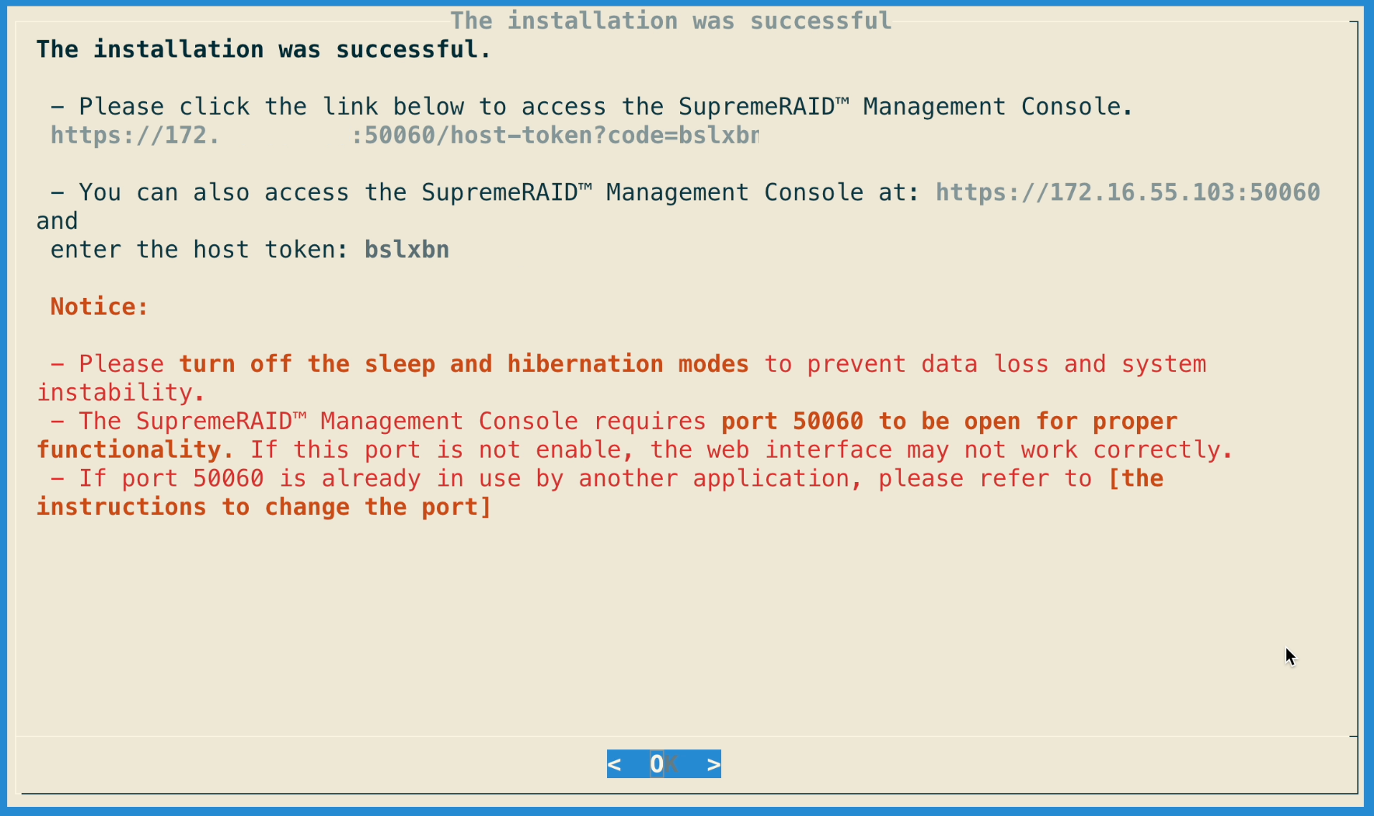
E. Complete the installation. You can access the SupremeRAID™ Management Console at https://[host-ip]:50060. If port 50060 is occupied by another application, please refer to the instructions for changing the port.
Installer Complete Management Console Screen
If port 50060 is occupied by another application, you can set up your own port and IP. Please edit the configuration file /etc/graidmgr/service.conf. For example, if you want to set the port and IP to 8888 and 172.16.12.34 respectively, it would look as follows:
[common]web_port=8888web_addr="172.16.12.34"
If you have lost the host token, please use the following command to retrieve the host token.
$ sudo graid-mgr host_token gen
Step 6 To activate the software, apply the SupremeRAID™ license key.
This section is designed for users who require mass deployment and may be designing scripts for installation. However, we strongly recommend using the GUI installation process for the best user experience and comprehensive configuration options.
Step 1 Please follow the steps from the previous section to download the pre-installer and installer, make them executable, and use the pre-installer to install the dependencies required by the SupremeRAID™ service.
$ sudochmod +x [package-file]
Step 2 To install pre-installer without interactive mode, add “--yes” while executing the pre-installer.
$ sudo ./[package-file]--yes
Step 3 To install the driver directly with the ULAs license acceptance, simply add the command --accept-license in the end when executing the installer.
$ sudo ./[package-file] --accept-license
Silent Installer Accept License Screen
Step 4 To log in to the SupremeRAID™ Management Console, please generate a host token and enter it.
$ sudo graid-mgr host_token gen
Step 5 To activate the software, apply the SupremeRAID™ license key.
The following procedure describes how to manually install the SupremeRAID™ software on various operating systems. The reference for packages and dependencies for each operating system is provided below.
For systems without internet access, download required dependencies from official repositories. See the distribution section below for details. Only perform manual installation if necessary or if the pre-installer fails. For most cases, check Supported Operating Systems on our website and use the automated pre-installer script to install the SupremeRAID™ software.
Graid Technology, Inc. recommends referring to Latest Linux Release Notes on our website and using the pre-installer to configure the environmental settings.
Step 1 Install the package dependencies and build for Dynamic Kernel Module Support (DKMS) based on your operating system.
For CentOS, Rocky Linux, and AlmaLinux: issue the following commands.
Step 2 Add the kernel option. This step prevents the Nouveau driver from loading during installation and disables IOMMU in the system BIOS.
$ sudovim /etc/default/grub
Step 3 Append the command line parameters and then update the grub configuration based on your operating system.
For RHEL8, 9 and above versions, append iommu=pt and nvme_core.multipath=Y to GRUB_CMDLINE_LINUX_DEFAULT.
For RHEL7.9, append iommu=pt to ‘GRUB_CMDLINE_LINUX_DEFAULT’.
$ sudo grub2-mkconfig -o /boot/grub2/grub.cfg
Step 4 Append blacklist nouveau and options nouveau modeset=0 to the end of the file /etc/modprobe.d/graid-blacklist.conf to disable the Nouveau driver and update initramfs.
$ sudo update-initramfs -u
Nouveau Blacklist Config Example
Step 5
For CentOS, Rocky Linux, and AlmaLinux: Find the latest version of the kernel and assign it to –kver.
Step 8 The Nouveau driver is now disabled. Reboot and install the NVIDIA driver before proceeding with the installation.
$ sudoreboot
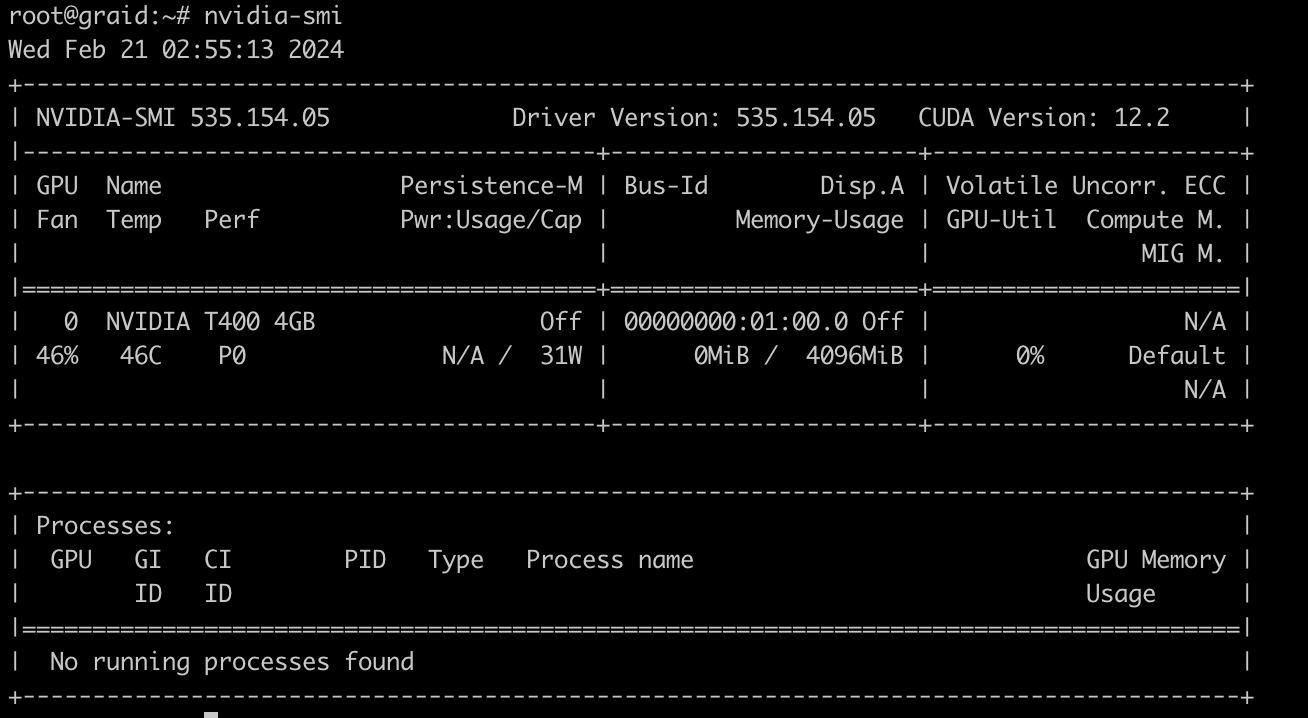
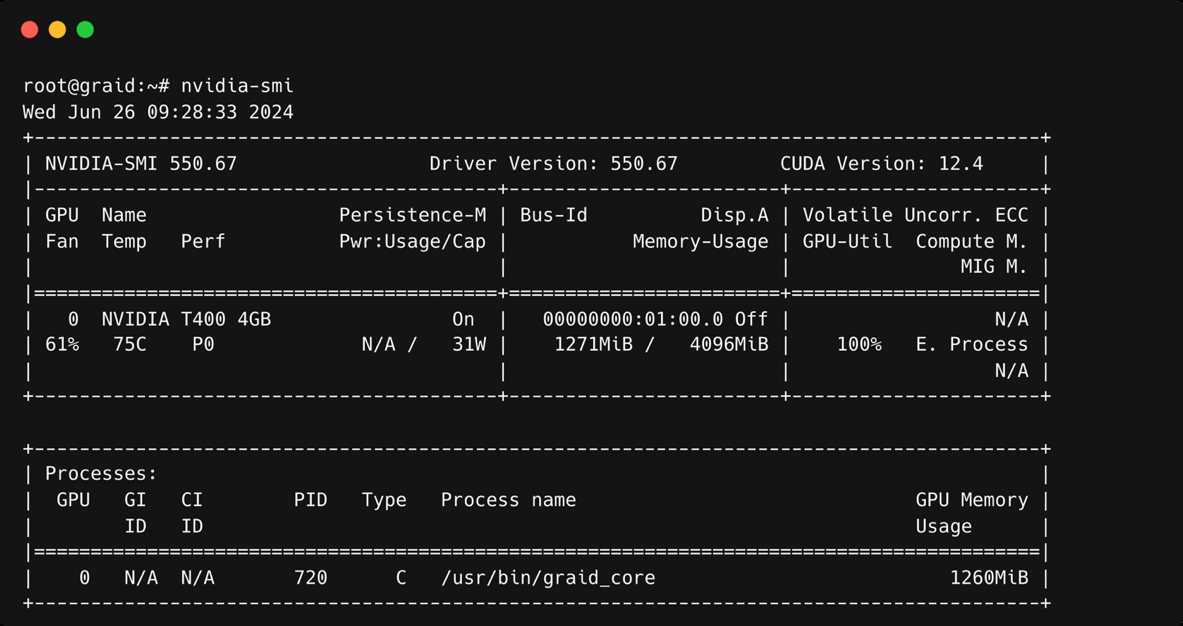
Step 9 Use the nvidia-smi command to confirm that the NVIDIA GPU is working. The following figure shows an output example of a successful installation.
CentOS RHEL NVIDIA SMI Output
Step 10 From the Graid Technology website, download the latest version of the installer and make it executable.
Step 1 Graid Technology, Inc. recommends referring to Latest Linux Release Notes on our website and using the pre-installer to configure the environmental settings.
Step 2 Install the package dependencies and build for DKMS.
Step 4 Add the kernel option. This step prevents the Nouveau driver from loading during installation and disables IOMMU in the system BIOS.
$ sudovim /etc/default/grub
Step 5 Append iommu=pt and nvme_core.multipath=Y to GRUB_CMDLINE_LINUX_DEFAULT, and then update the grub configuration.
$ sudoupdate-grub
Step 6 Append blacklist nouveau and options nouveau modeset=0 to the end of the /etc/modprobe.d/graid-blacklist.conf file to disable the Nouveau driver and update initramfs.
$ sudo update-initramfs -u
Ubuntu Nouveau Blacklist Config Example
Note
You might need to manually create the /etc/modprobe.d/graid-blacklist.conf file and append blacklist nouveau and options nouveau modeset=0.
Step 7 Reboot the system and make sure the grub configuration was applied. You can check /proc/cmdline for the grub configuration in use. For example:
Ubuntu GRUB cmdline Example
Step 8 Install the NVIDIA driver (The following is a sample. For the latest NVIDIA driver version, please refer to the Release Notes).
Note
For GPUs with NVLink/NVSwitch, please refer to the Knowledge Base for guidance on installing the NVIDIA Fabric Manager.
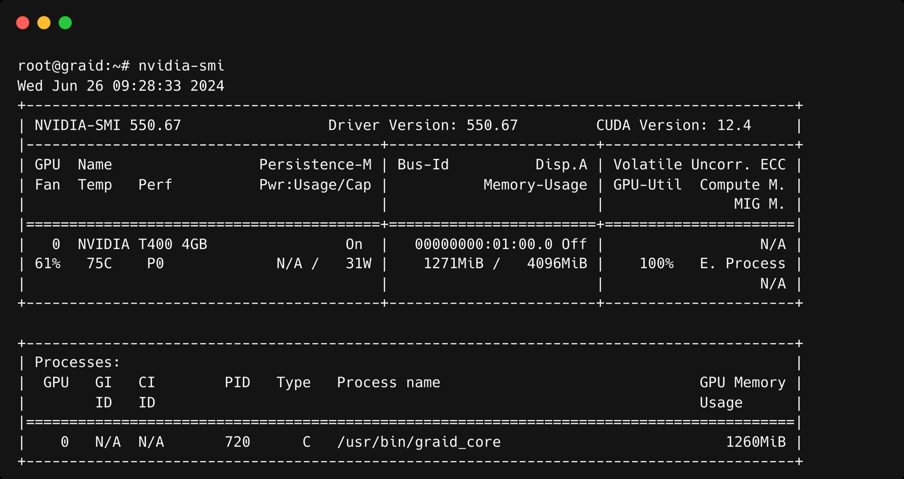
Step 9 Use the nvidia-smi command to confirm that the NVIDIA GPU is working. The following figure shows an output example of a successful installation.
Ubuntu NVIDIA SMI Output
Step 10 Go to the Graid Technology website to download the latest version of the pre-installer and make it executable, please download the package in Latest Linux Release Notes.
Graid Technology, Inc. recommends referring to Latest Linux Release Notes on our website and using the pre-installer to configure the environmental settings.
Step 1 Install openSUSE and select all online repositories.
Step 2 Install the package dependencies and build for DKMS.
Step 3 Add the kernel option. This step prevents the Nouveau driver from loading during installation and disables IOMMU in the system BIOS.
$ sudovim /etc/default/grub
Step 4 Append iommu=pt and nvme_core.multipath=Y to GRUB_CMDLINE_LINUX_DEFAULT, and then update the grub configuration.
$ sudo grub2-mkconfig -o /boot/grub2/grub.cfg
Step 5 Append ‘blacklist nouveau’ to the end of the /etc/modprobe.d/graid-blacklist.conf file to disable the Nouveau driver. You might need to manually create the /etc/modprobe.d/graid-blacklist.conf file and append blacklist nouveau and options nouveau modeset=0.
openSUSE Nouveau Blacklist Config Example
Step 6 Set the allow_unsupported_modules option to 1 in the /etc/modprobe.d/10-unsupported-modules.conf file and update initrd.
$ sudo mkinitrd
Step 7 Reboot the system and make sure the grub configuration was applied. You can check /proc/cmdline for the grub configuration in use. For example:
Step 9 The Nouveau driver is now disabled. Reboot and install the NVIDIA driver before proceeding with the installation.
$ sudoreboot
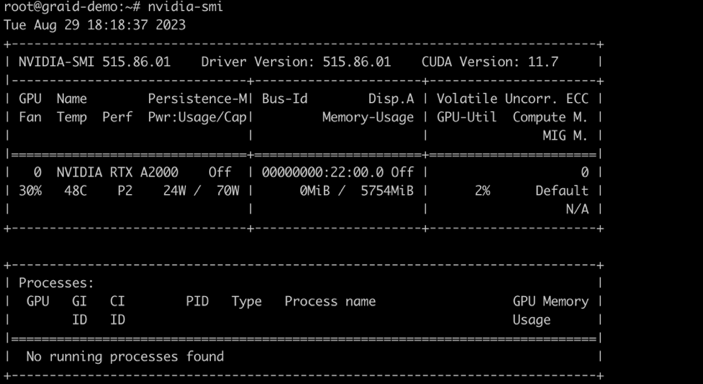
Step 10 Use the nvidia-smi command to confirm that the NVIDIA GPU is working. The following figure shows an output example of a successful installation.
openSUSE NVIDIA SMI Output
Step 11 Go to the Graid Technology website to download the latest version of the pre-installer and make it executable, please download the package in Latest Linux Release Notes.
Graid Technology, Inc. recommends referring to Latest Linux Release Notes on our website and using the pre-installer to configure the environmental settings.
Step 1 Install SLES with the following extensions and modules:
SUSE Package Hub 15 SP3 x86_64
Desktop Applications Module 15 SP3 x86_64
Development Tools Module 15 SP3 x86_64
Step 2 Install the package dependencies and build for DKMS.
Step 3 Add the kernel option. This step prevents the Nouveau driver from loading during installation and disables IOMMU in the system BIOS.
$ sudovim /etc/default/grub
Step 4 Append iommu=pt and nvme_core.multipath=Y to GRUB_CMDLINE_LINUX_DEFAULT, and then update the grub configuration:
$ sudo grub2-mkconfig -o /boot/grub2/grub.cfg
Step 5 Append blacklist nouveau to the end of the /etc/modprobe.d/graid-blacklist.conf file to disable the Nouveau driver. You might need to manually modify the configuration file.
SLES Nouveau Blacklist Config Example
Step 6 Set the allow_unsupported_modules option to 1 in the /etc/modprobe.d/10-unsupported-modules.conf file and update initrd.
$ sudo mkinitrd
Step 7 Reboot the system and make sure the grub configuration was applied. You can check /proc/cmdline for the grub configuration in use. For example:
Step 9 The Nouveau driver is now disabled. Reboot and install the NVIDIA driver before proceeding with the installation.
$ sudoreboot
Step 10 Use the nvidia-smi command to confirm that the NVIDIA GPU is working. The following figure shows an output example of a successful installation.
SLES NVIDIA SMI Output
Step 11 Go to the Graid Technology website to download the latest version of the pre-installer and make it executable, please download the package in Latest Linux Release Notes.
Step 1 Execute the installer and follow the provided steps to complete the installation.
$ sudo ./[package-file]
Step 2 At the Welcome page select Next and click Enter to view the end-user license agreement.
Manual Installer Welcome Screen
Step 3 In the end-user license agreement, use the spacebar to scroll through the content. When you complete your review, select Next and click Enter to proceed.
Manual Installer License Review Screen
Step 4 Type accept, click tab, select Next, and click Enter to accept the license agreement.
Manual Installer License Acceptance Screen
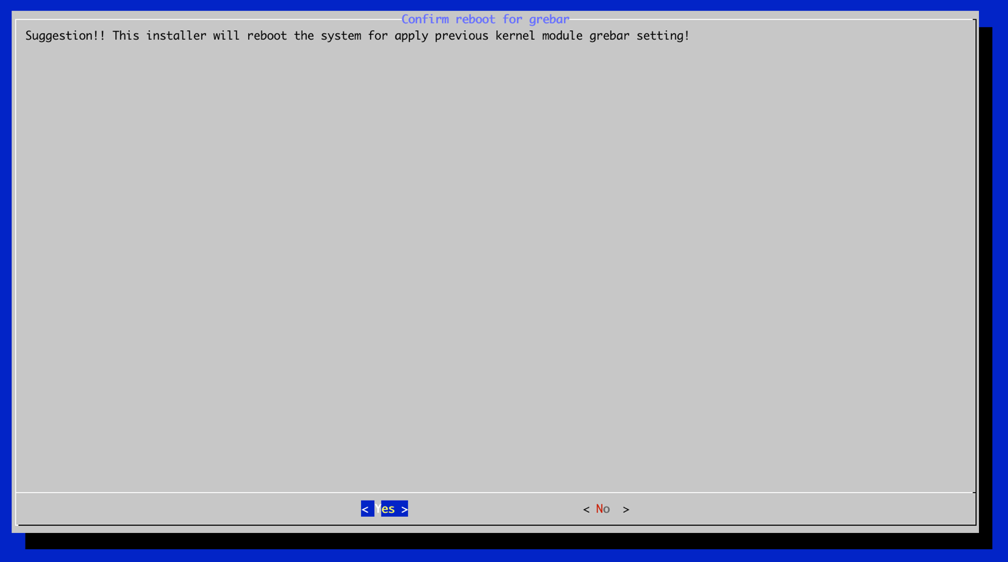
Step 5 Complete the installation, and the installer will reboot the system.
Manual Installer Complete Screen
Step 6 To activate the software, apply the SupremeRAID™ license key. Please note that if you have installed driver version 2.0, a 2.0 license key is required.
SupremeRAID™ offers a graphical management console for users to control RAID resources through a web portal. This intuitive interface streamlines the process and improves day-to-day administration.
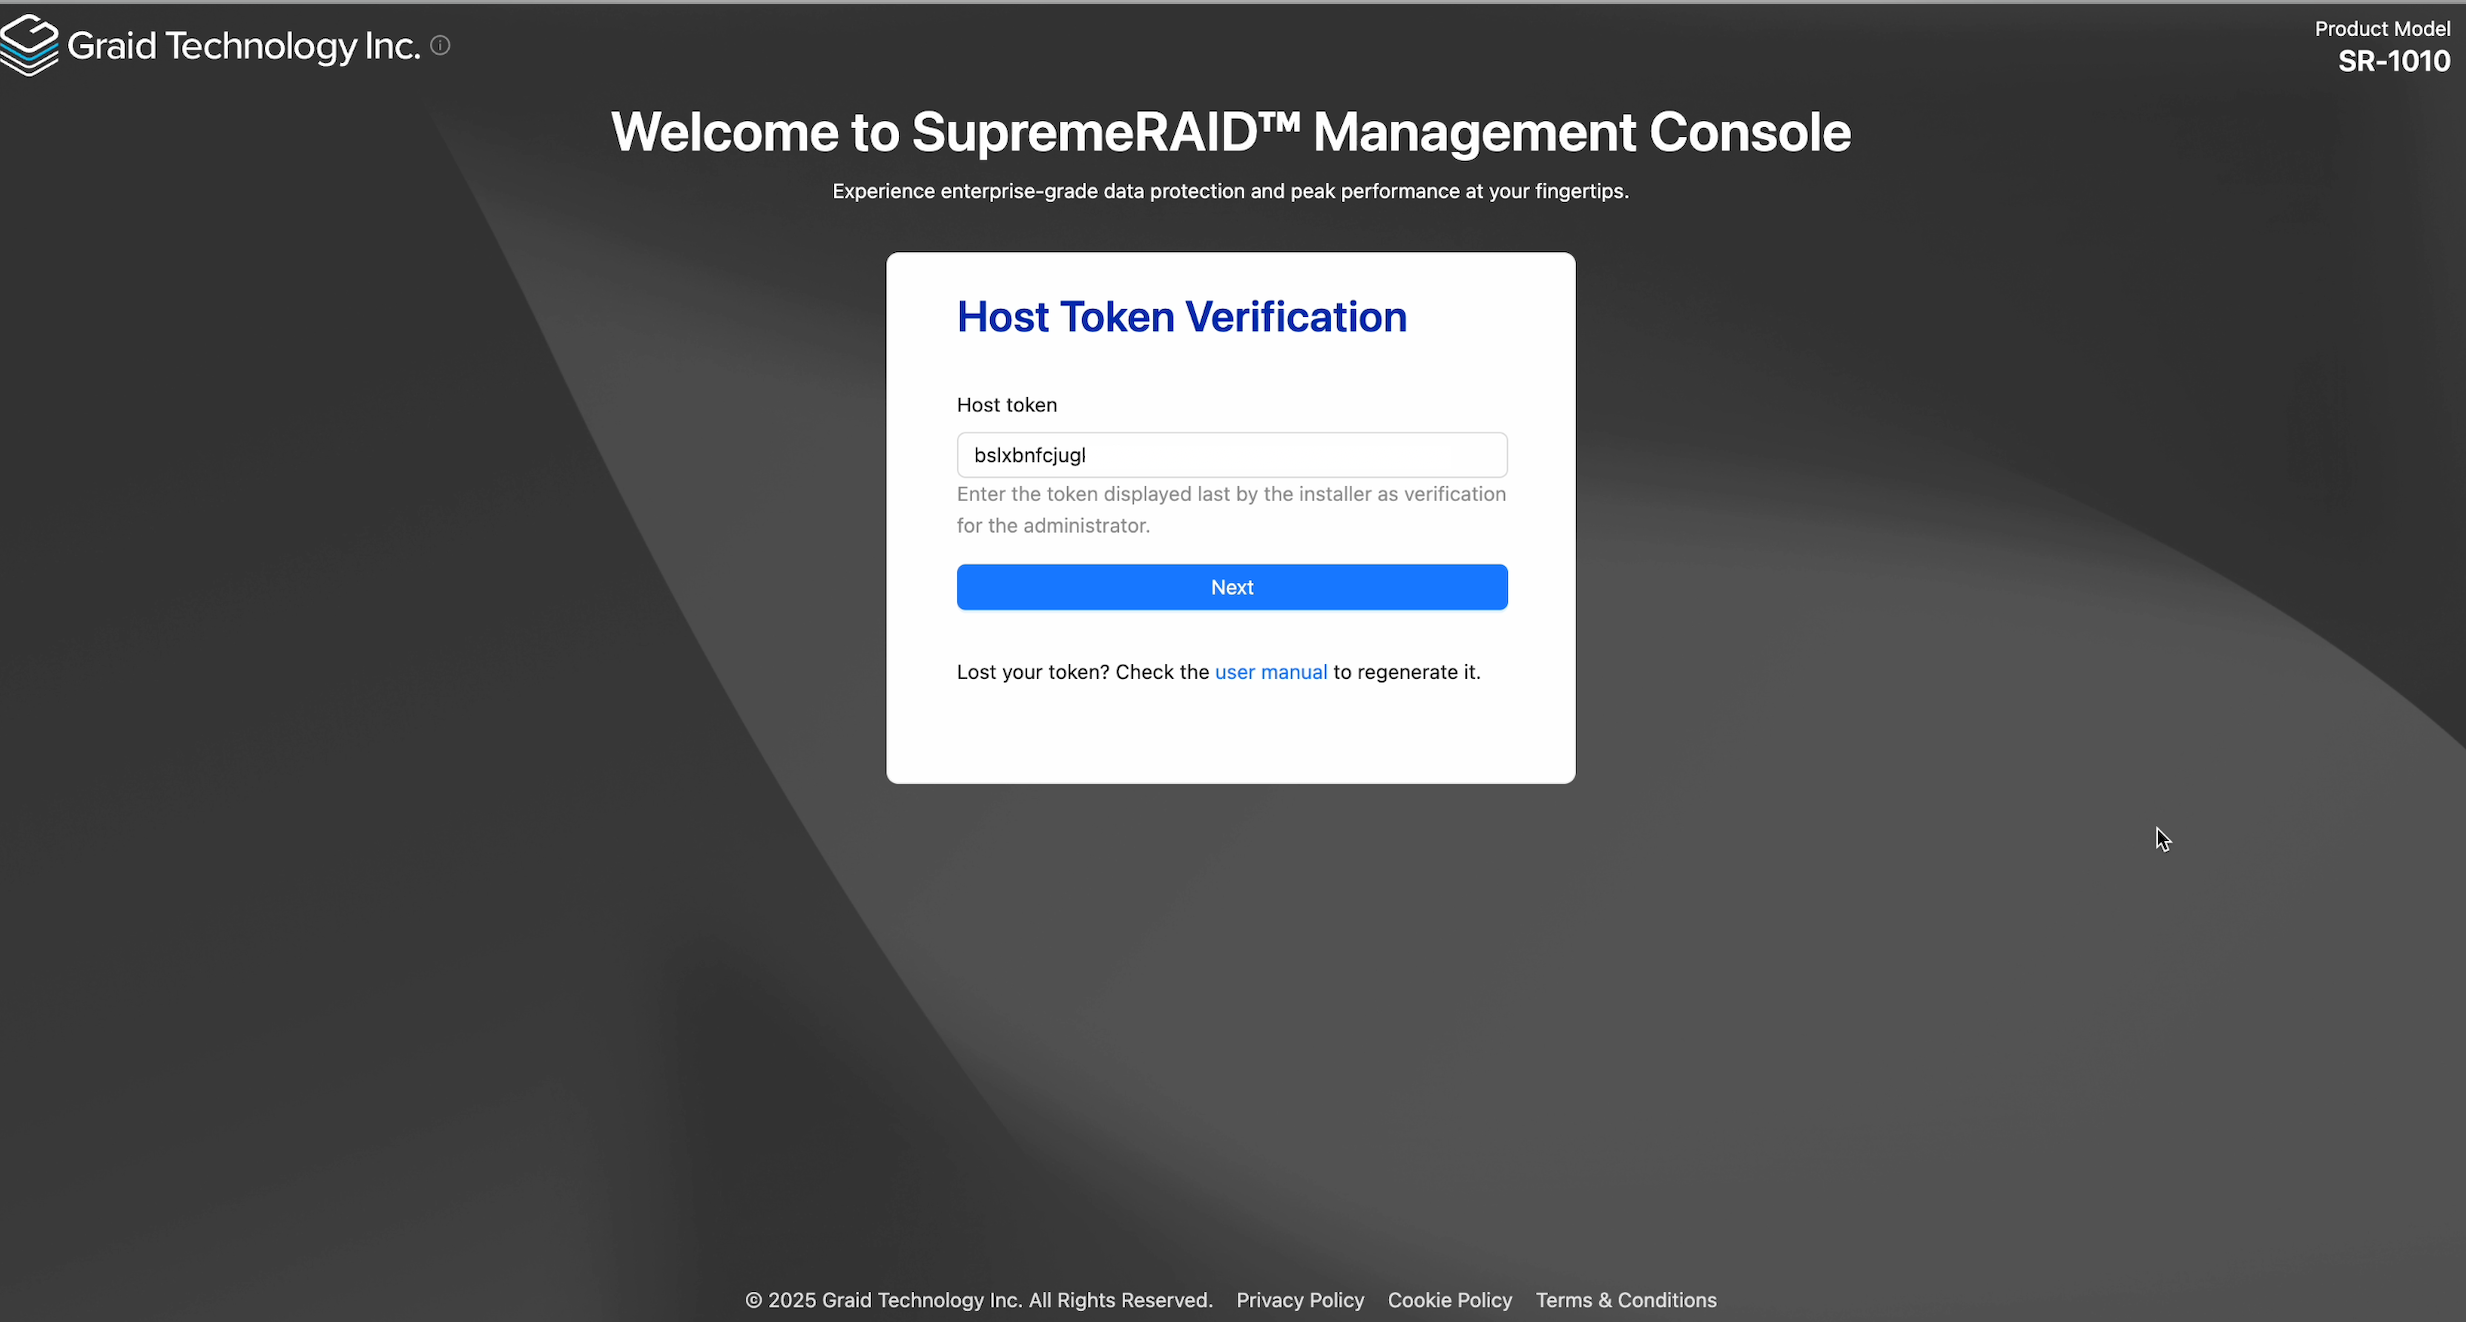
Step 5 Open a web browser, go to https://[host-ip]:50060, log in with the default account, and enter the host token in the SupremeRAID™ SE Management Console.
Management Console Host Token Login
If you have lost the host token, please use the following command to retrieve the host token.
$ sudo graid-mgr host_token gen
Step 6 Set up a password. You can also use the following command to set up the admin password.
$ sudo graid-mgr set admin password
Management Console Set Admin Password
Note
The default account for graphical management console is ‘admin’.
To set up your own port and IP, please edit the configuration file /etc/graidmgr/service.conf. For example, if you want to set the port and IP to 8888 and 172.16.12.34 respectively, it would be as follows:
This section describes how to use the basic functions of SupremeRAID™. It consists of step-by-step examples and command instructions that guide you to accessing all SupremeRAID™ features.
When you install the SupremeRAID™ driver, you must activate the SupremeRAID™ service by applying a license key obtained from your vendor before using the service. After activation, you can create drive groups, create virtual drives, and perform the other management operations described in this guide.
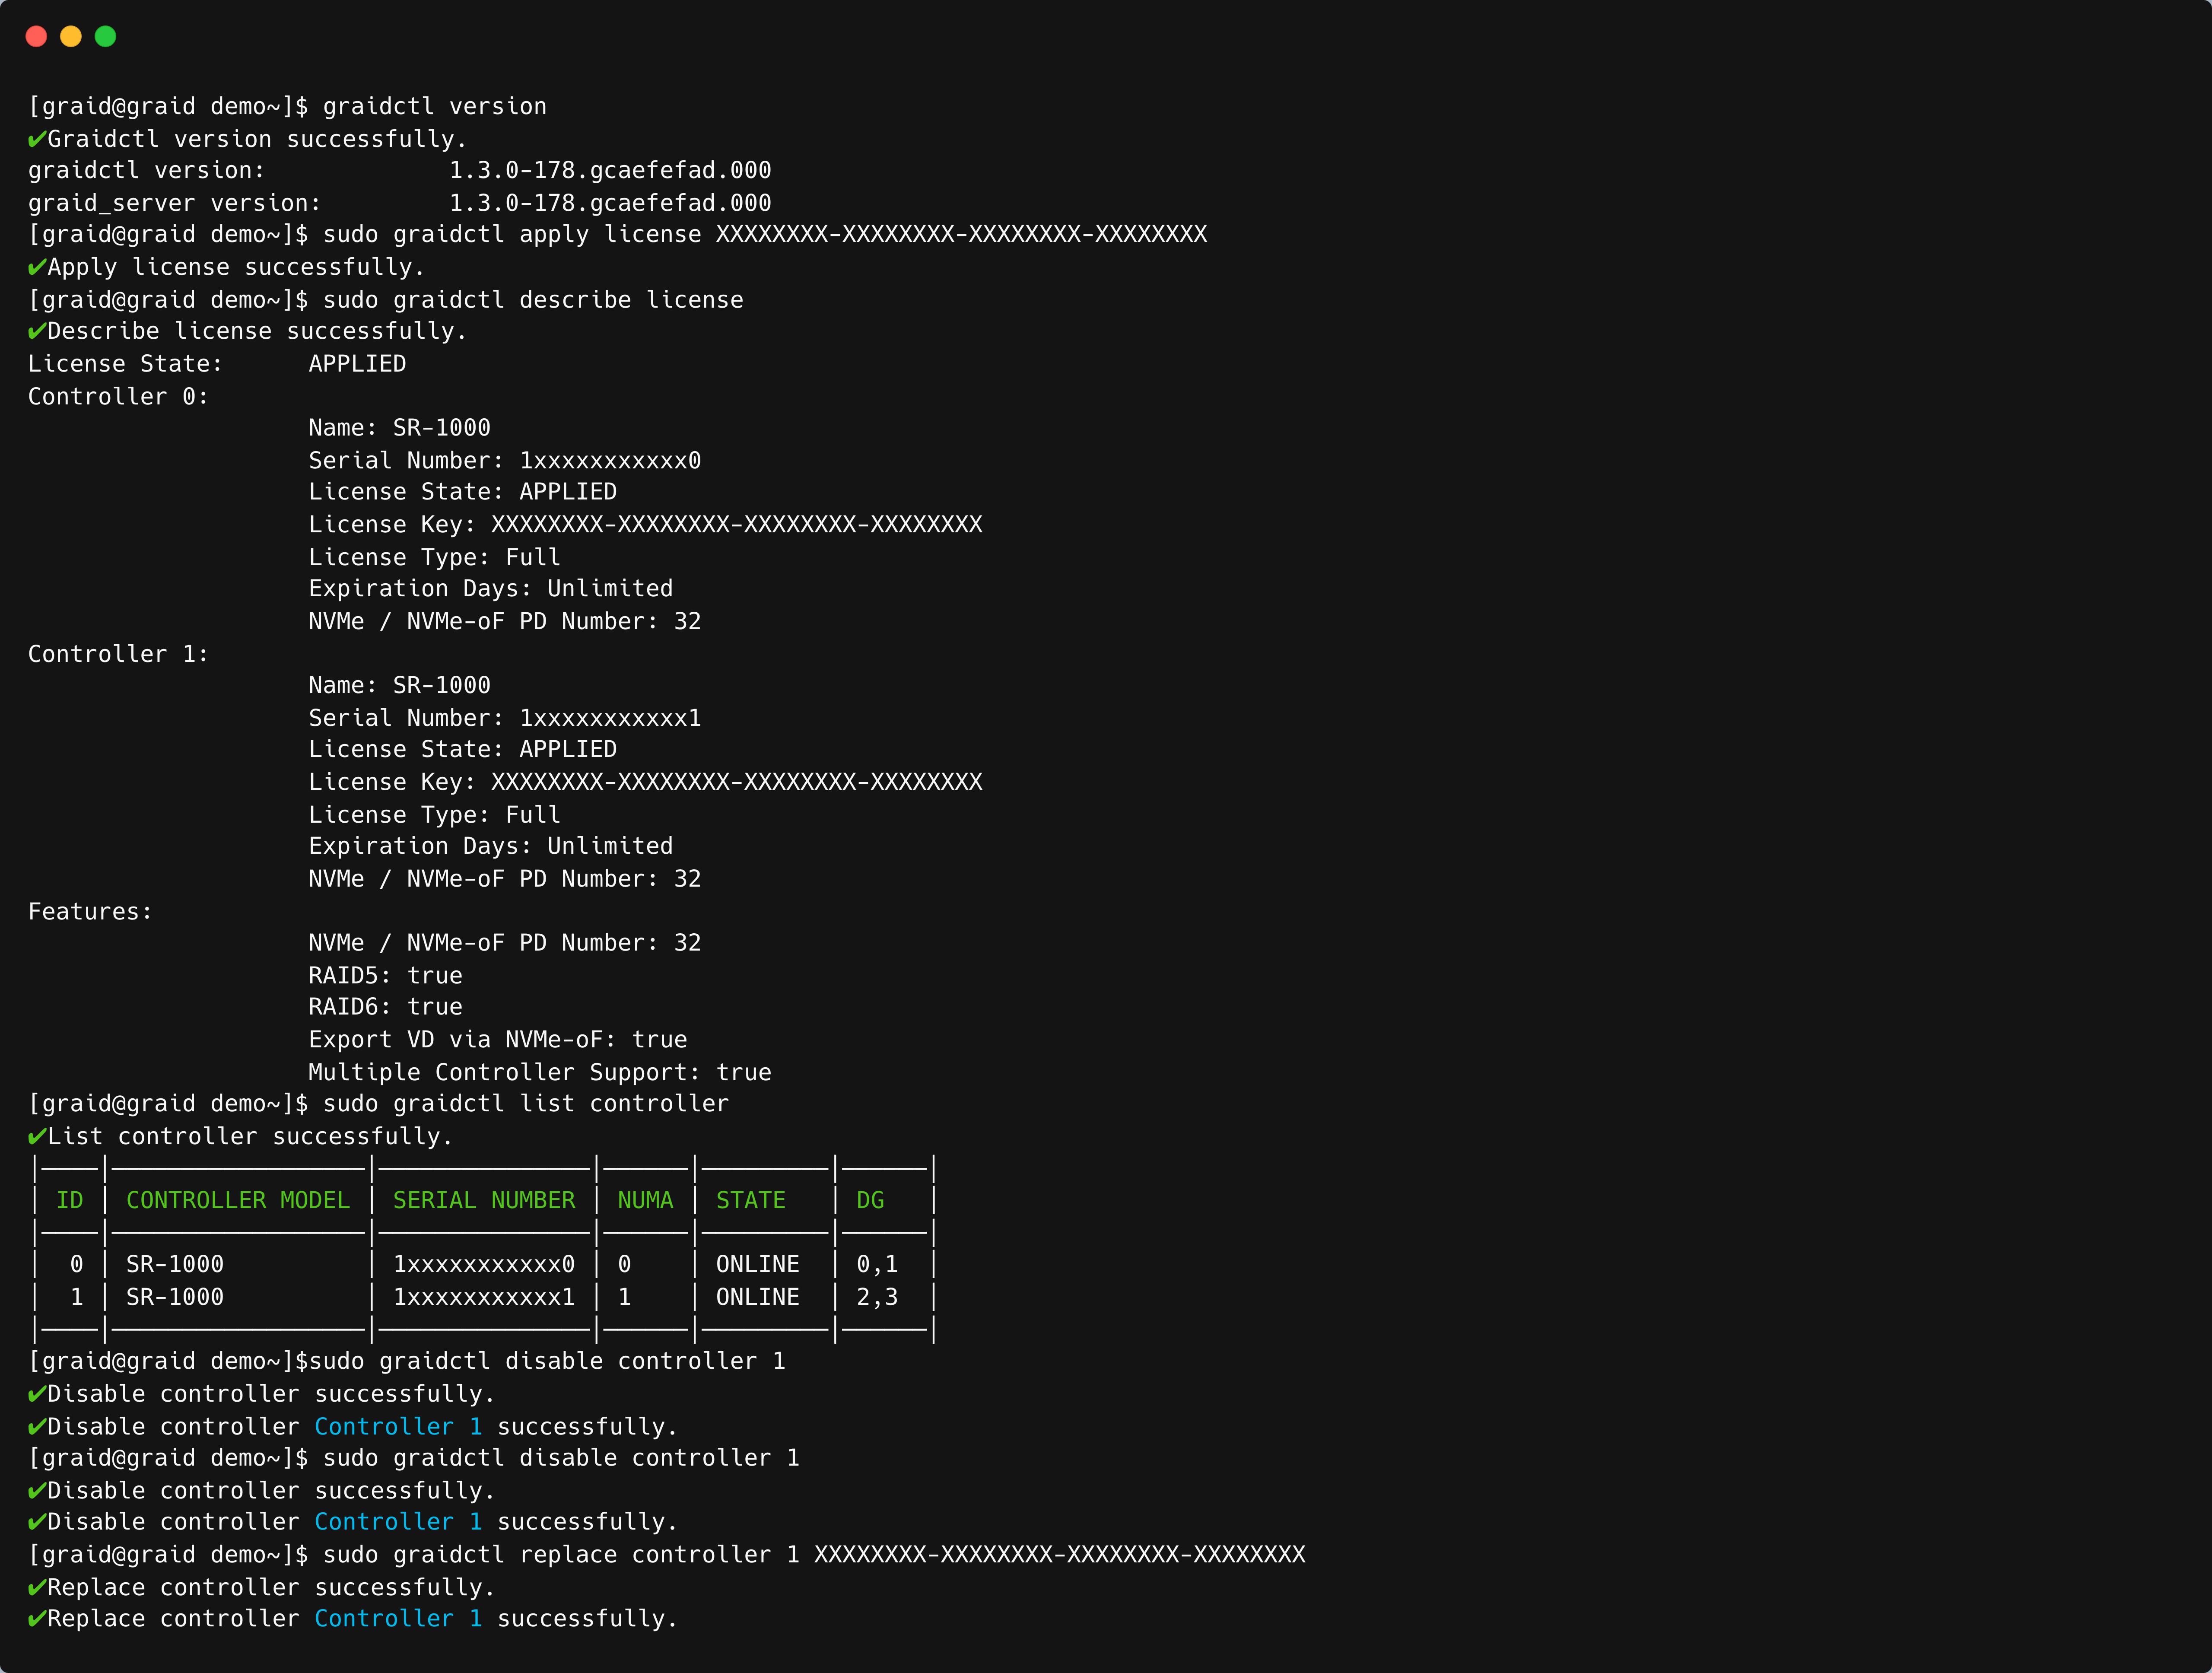
To check the SupremeRAID™ driver version, issue:
$ sudo graidctl version
To activate the SupremeRAID™ software, issue:
$ sudo graidctl apply license [LICENSE_KEY]
To check the license information, issue:
$ sudo graidctl describe license
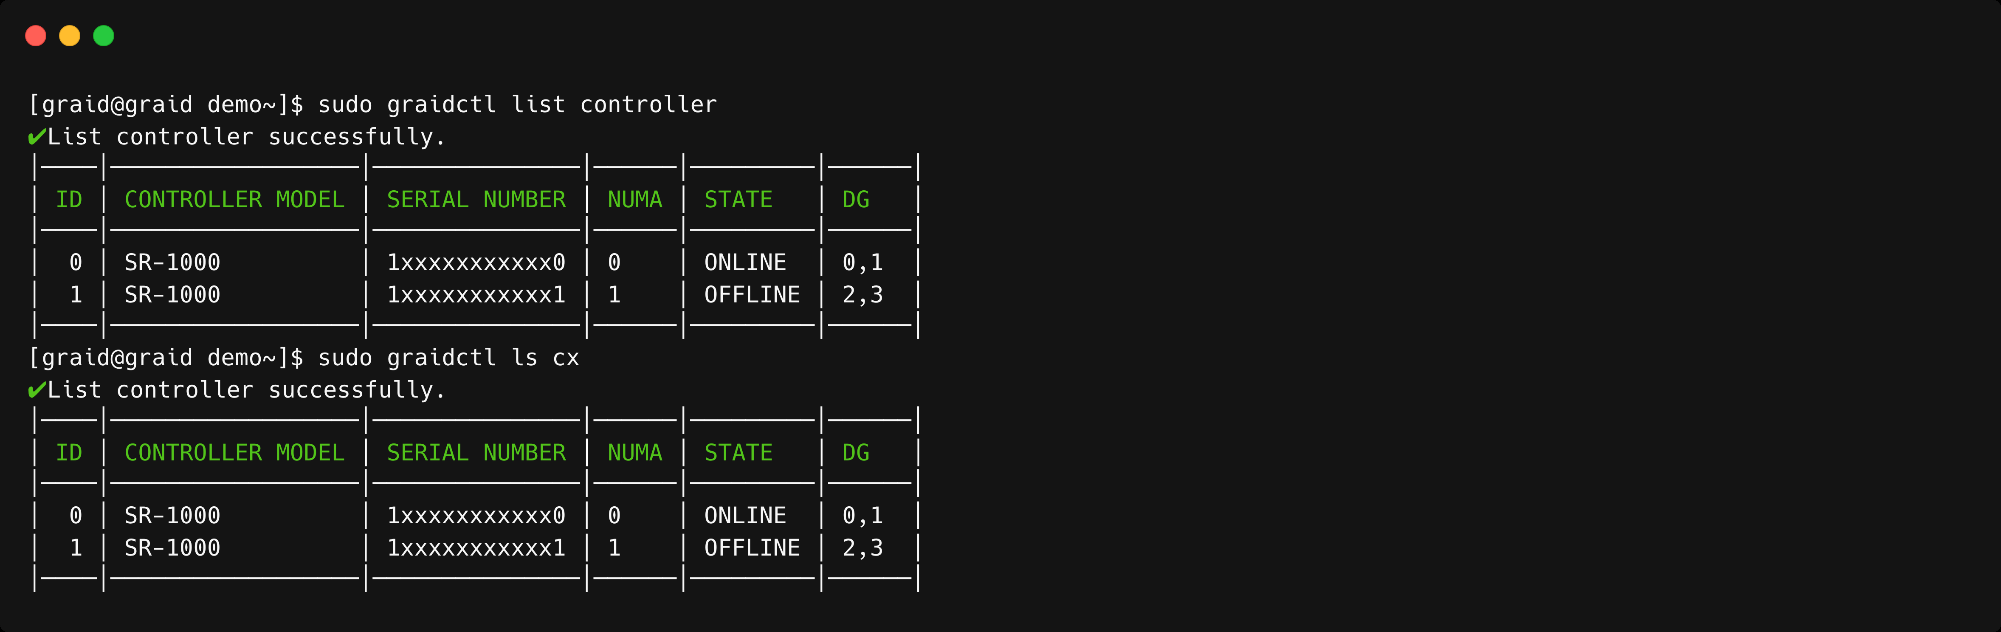
To check the controller status, issue:
$ sudo graidctl list controller
To replace a new controller with the same model of the controller when the old controller is failure or missing, issue:
If two controllers are activated in the graid.conf system configuration file, the SupremeRAID™ service prevents you from activating any additional controllers until one of the existing controllers is removed. This safeguard prevents conflicts and ensures proper system operation. Exercise caution and consult the software documentation or seek professional assistance if needed.
To replace the SSD that is nearly worn-out or broken:
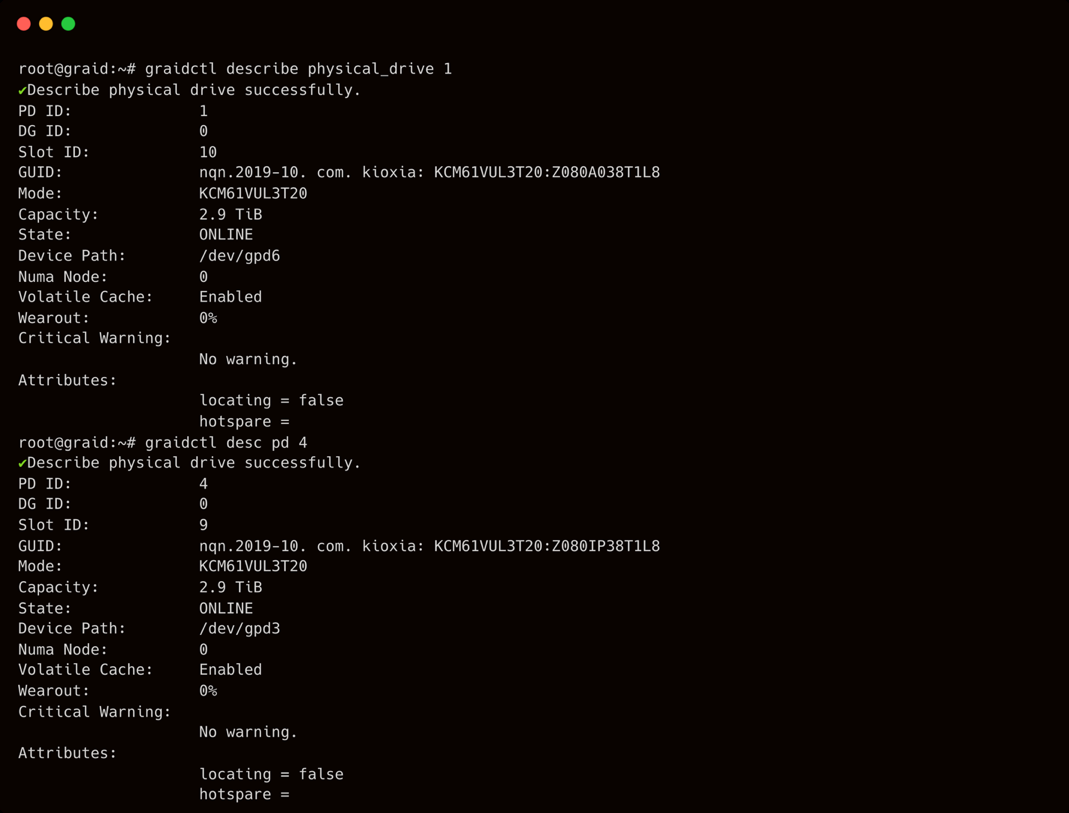
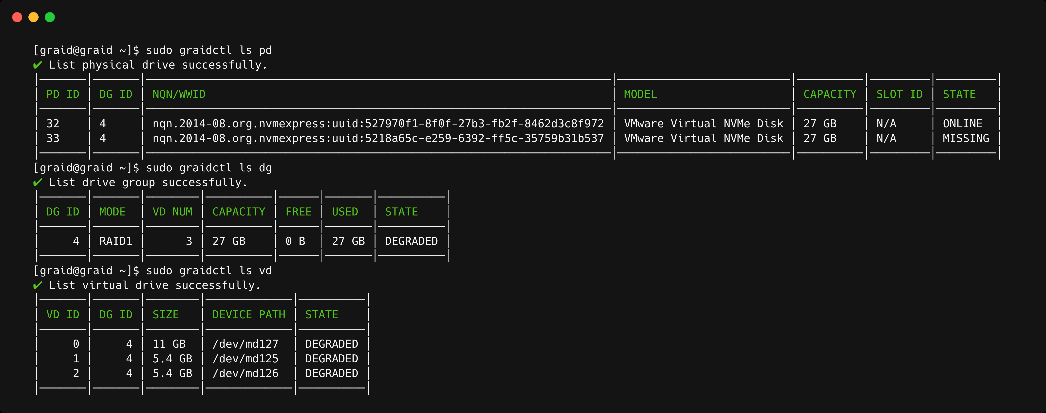
Step 1 Check the status of the physical drive. If the drive is already displaying as MISSING or another abnormal status, you can skip step 2 and go directly to step 3.
$ sudo graidctl list pd
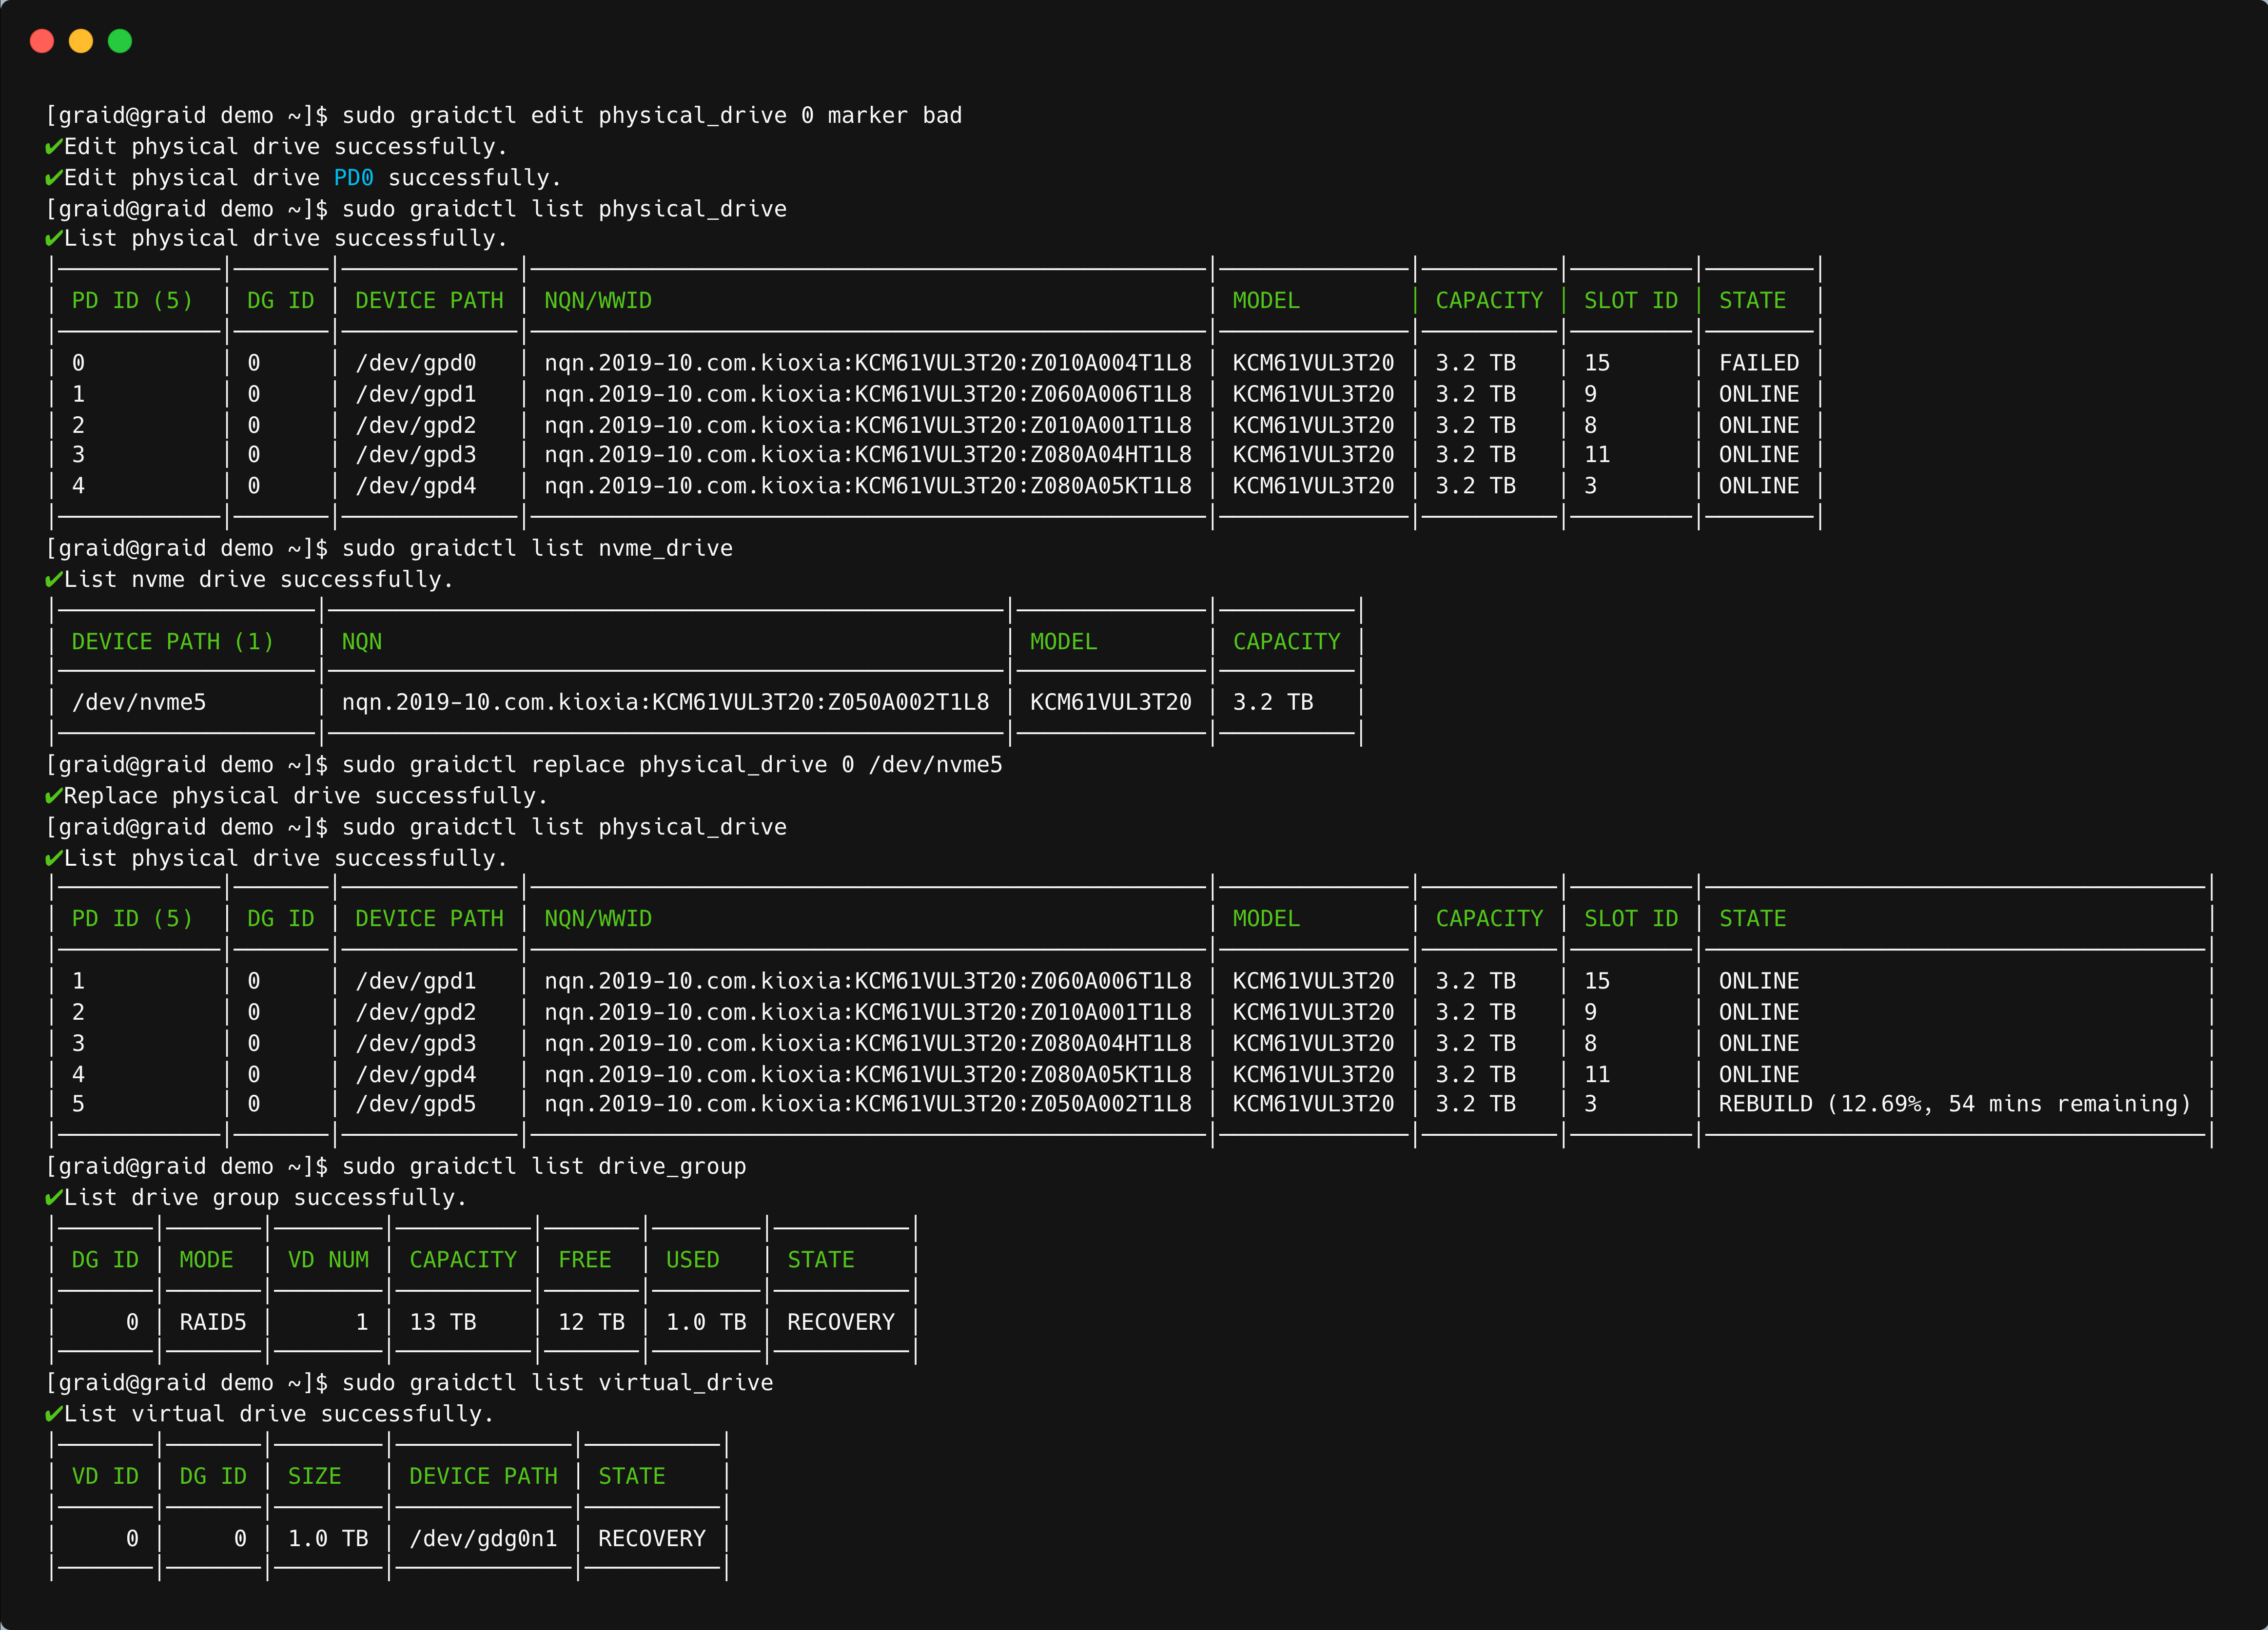
Step 2 If the physical drive status is “online”, mark the physical drive as BAD.
$ sudo graidctl edit pd [OLD_PD_ID] marker bad
Step 3 Replace the NVMe SSD. The state of the previous physical drive will indicate FAILED.
To activate the HA feature, you need two SupremeRAID™ cards installed in your server model and have the service activated. One drive group can only run on one controller. However, the number of drive groups assigned to each controller does not need to be equal.
If one controller fails and the auto-failover function is turned on (it is enabled by default), the drive group under the failed controller fails over immediately to the functioning controller. To ensure data integrity, the drive group statuses that failover switch to Resync mode.
Step 1 Activate two cards to enable the HA feature.
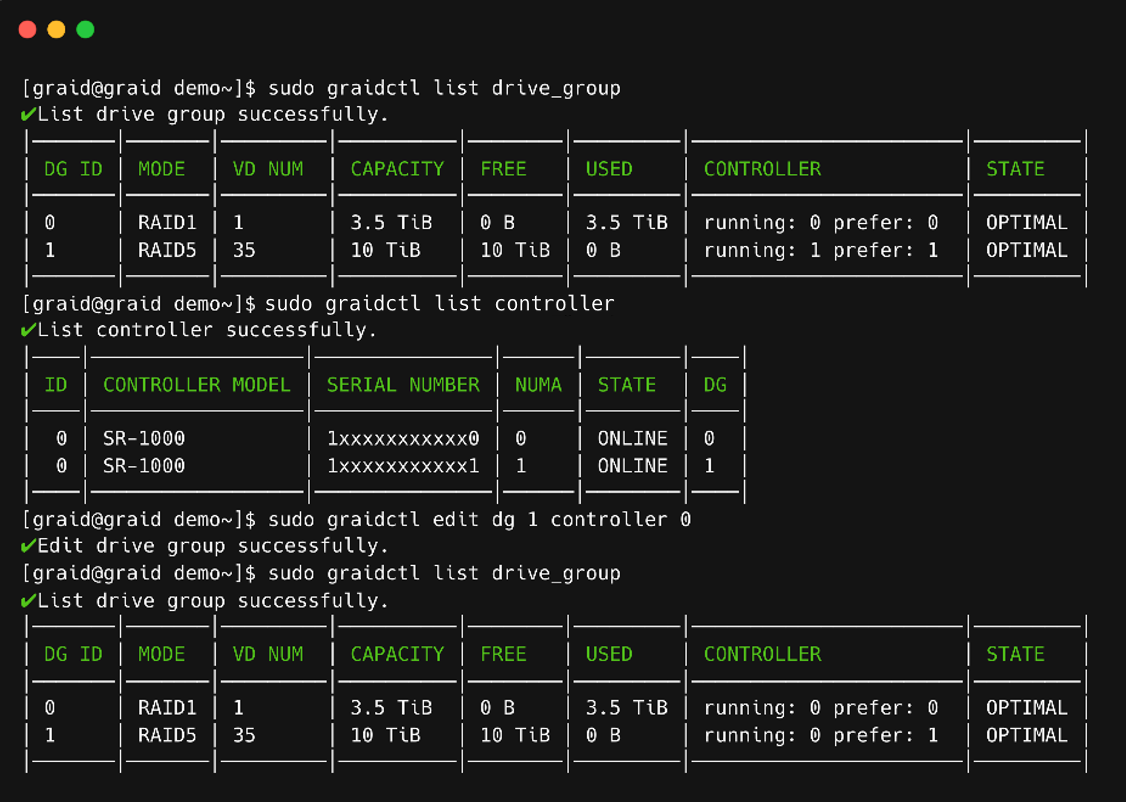
Typically, there is no need to set the controller manually while creating a drive group because SupremeRAID™ selects the optimal controller automatically based on the chosen physical drive. However, it is possible to adjust the controller manually for the drive group by making edits to it.
To upgrade the Linux Driver, we offer two methods: silent upgrade and manual setup. Please follow the steps below for your preferred method. Perform the following procedure exactly as described. If you encounter any abnormal failure messages during the driver upgrade, please collect the logs and contact Graid Technical Support team.
In the SupremeRAID™ Linux Driver, if you have already installed the SupremeRAID™ driver, there's no need to uninstall it. Simply run the pre-installer and installer then include ‘--accept-license’ in the upgrade command to automatically apply the license key to the new software.
Step 1 Stop all applications running on the virtual drive.
Step 2 Stop the management service. If you have already enabled the graphical management console, please ensure to disable it as well.
If your current driver version is 1.7.2 update 67 or later (e.g., 1.7.2 Update 70), please follow the steps below to upgrade the software. Please note that a V2 license key is required to activate driver version 2.0. To obtain a V2 license key, please contact our sales department.
Step 1 Please ensure that the VD and DG are in an optimal state first and stop all applications running on the virtual drive.
Step 2 Apply the V2 license key
$ sudo graidctl apply license [LICENSE_KEY]
Step 3 Stop the management service. If you have already enabled the graphical management console, please ensure to disable it as well.
Step 4 Please uninstall the 1.7.2 update 67 driver or later first. Refer to the Uninstalling the Software Driver section for detailed instructions.
Step 5 Download the 2.0 driver package (Pre-installer & Installer) and make it executable.
Step 6 Run the 2.0 Pre-installer first, it will automatically check the required dependencies and install the NVIDIA driver.
$ sudo ./[package-file]--yes
Step 7 Run the 2.0 installer and add ‘accept-license’ to automatically apply the license key.
$ sudo ./[package-file] --accept-license
Step 8 Check the driver version to ensure the upgrade is successful.
$ sudo graidctl version
Step 9 Use nvidia-smi to check the serial number of the SupremeRAID™ Card. (If the license has already been applied, this step can be skipped). Please note that a 2.0 license key is required to activate driver version 2.0.
If your current driver version is earlier than 1.7.2 Update 67 (for example, 1.7.2 Update 61), you must first upgrade to version 1.7.2 Update 67 before proceeding to version 2.0. Please follow the steps below to upgrade the software. A V2 license key is required to activate driver version 2.0. To obtain a V2 license key, please contact our sales department.
Step 1 Stop all applications running on the virtual drive.
Step 2 Stop the management service. If you have already enabled the graphical management console, please ensure to disable it as well.
Step 8 After successfully installing driver version 1.7.2 Update 67, at this stage the VD and DG may temporarily enter a transforming state. Please wait until both the VD and the DG reach an optimal state before proceeding the next step.
Step 9 Apply the V2 license key
$ sudo graidctl apply license [LICENSE_KEY]
Step 10 Uninstall the 1.7.2 Update 67 driver. Please refer to the Uninstalling the Software Driver section for detailed instructions.
Step 11 Download the 2.0 driver package (Pre-installer & Installer) and make it executable (repeat Step 4 to Step 7). Please note that a 2.0 license key is required to activate driver version 2.0.
Step 3 Make sure the SupremeRAID™ kernel module is unloaded.
$ sudo rmmod graid_nvidia graid
Step 4 Check the NVIDIA driver DKMS status.
$ sudo dkms status nvidia
Step 5 The version of the NVIDIA driver installed in the kernel must match the SupremeRAID™ driver version. If they do not match, perform the following steps to uninstall the NVIDIA driver.
A. Dracut the initramfs (Centos, Rocky Linux, AlmaLinux, and RHEL).
Step 6 Uninstall the package using the command appropriate for your operating system.
For Centos, Rocky Linux, AlmaLinux, RHEL, openSUSE, and SLES:
$ sudorpm-e graid-sr
For Ubuntu:
$ sudo dpkg -r graid-sr
Step 7 Confirm that the SupremeRAID™ module is unloaded. There should not be any output.
$ sudo lsmod \|grep graid
Step 8 Confirm that the SupremeRAID™ package is uninstalled using the command appropriate for your operating system. The output should be empty.
For Centos, Rocky Linux, AlmaLinux, RHEL, openSUSE, and SLES:
$ sudorpm-qa\|grep graid
For Ubuntu:
$ sudo dpkg -l\|grep graid
Step 9 Go to the Graid Technology website to download the latest version of the pre-installer and make it executable. Please download the package in Latest Linux Release Notes.
If your current driver version is 1.7.2 update 67 or later (e.g., 1.7.2 Update 70), please follow the steps below to upgrade the software. Please note that a V2 license key is required to activate driver version 2.0. To obtain a V2 license key, please contact our sales department.
Step 1 Please ensure that the VD and DG are in an optimal state first and stop all applications running on the virtual drive.
Step 2 Apply the V2 license key.
$ sudo graidctl apply license [LICENSE_KEY]
Step 3 Stop the management service. If you have already enabled the graphical management console, please ensure to disable it as well.
Step 4 Make sure the SupremeRAID™ kernel module is unloaded.
$ sudo rmmod graid_nvidia graid
Step 5 Check the NVIDIA driver DKMS status.
$ sudo dkms status nvidia
Step 6 The version of the NVIDIA driver installed in the kernel must match the SupremeRAID™ driver version. If they do not match, perform the following steps to uninstall the NVIDIA driver.
A. Dracut the initramfs (Centos, Rocky Linux, AlmaLinux, and RHEL).
Step 7 Uninstall the package using the command appropriate for your operating system.
For Centos, Rocky Linux, AlmaLinux, RHEL, openSUSE, and SLES:
$ sudorpm-e graid-sr
For Ubuntu:
$ sudo dpkg -r graid-sr
Step 8 Confirm that the SupremeRAID™ module is unloaded. There should not be any output.
$ sudo lsmod \|grep graid
Step 9 Confirm that the SupremeRAID™ package is uninstalled using the command appropriate for your operating system. The output should be empty.
For Centos, Rocky Linux, AlmaLinux, RHEL, openSUSE, and SLES:
$ sudorpm-qa\|grep graid
For Ubuntu:
$ sudo dpkg -l\|grep graid
Step 10 Go to the Graid Technology website to download the 2.0 version of the Pre-installer and make it executable. Please download the package in Latest Linux Release Notes.
If your current driver version is earlier than 1.7.2 Update 67 (for example, 1.7.2 Update 61), you must first upgrade to version 1.7.2 Update 67 before proceeding to version 2.0. Please follow the steps below to upgrade the software. A V2 license key is required to activate driver version 2.0. To obtain a V2 license key, please contact our sales department.
Step 1 Stop all applications running on the virtual drive.
Step 2 Stop the management service. If you have already enabled the graphical management console, please ensure to disable it as well.
Step 3 Make sure the SupremeRAID™ kernel module is unloaded.
$ sudo rmmod graid_nvidia graid
Step 4 Check the NVIDIA driver DKMS status.
$ sudo dkms status nvidia
Step 5 The version of the NVIDIA driver installed in the kernel must match the SupremeRAID™ driver version. If they do not match, perform the following steps to uninstall the NVIDIA driver.
A. Dracut the initramfs (Centos, Rocky Linux, AlmaLinux, and RHEL).
Step 6 Uninstall the package using the command appropriate for your operating system.
For Centos, Rocky Linux, AlmaLinux, RHEL, openSUSE, and SLES:
$ sudorpm-e graid-sr
For Ubuntu:
$ sudo dpkg -r graid-sr
Step 7 Confirm that the SupremeRAID™ module is unloaded. There should not be any output.
$ sudo lsmod \|grep graid
Step 8 Confirm that the SupremeRAID™ package is uninstalled using the command appropriate for your operating system. The output should be empty.
For Centos, Rocky Linux, AlmaLinux, RHEL, openSUSE, and SLES:
$ sudorpm-qa\|grep graid
For Ubuntu:
$ sudo dpkg -l\|grep graid
Step 9 Go to the Graid Technology website to download the 1.7.2 update 67 version of the Pre-installer and make it executable. Please download the package in Linux Release Notes.
Step 11 After successfully installing driver version 1.7.2 update 67, at this stage the VD and DG may temporarily enter a transforming state. Please wait until both the VD and the DG reach an optimal state before proceeding with next step.
Step 12 Apply the V2 license key.
$ sudo graidctl apply license [LICENSE_KEY]
Step 13 Uninstall the 1.7.2 update 67 driver. Please refer to the Uninstalling the Software Driver section for detailed instructions.
Step 14 Download the 2.0 driver package (Pre-installer & Installer) and make it executable (repeat Step 9 to Step 10). Please note that a 2.0 license key is required to activate driver version 2.0.
Step 4 Make sure the SupremeRAID™ kernel module is unloaded.
$ sudo rmmod graid_nvidia graid
Step 5 Check the NVIDIA driver DKMS status.
$ sudo dkms status nvidia
Note
The NVIDIA driver version installed in the kernel must match the SupremeRAID™ driver version. Perform step 5 if the versions do not match.
Step 6 Uninstall the package using the command appropriate for your operating system:
For Centos, Rocky Linux, AlmaLinux, RHEL, openSUSE, and SLES:
$ sudorpm-e graid-sr
For Ubuntu:
$ sudo dpkg -r graid-sr
Step 7 Confirm that the SupremeRAID™ module is unloaded, the output should be empty.
$ sudo lsmod \|grep graid
Step 8 Confirm that the SupremeRAID™ package is uninstalled using the command appropriate for your operating system, the output should be empty.
Centos, Rocky Linux, AlmaLinux, RHEL, openSUSE, and SLES:
$ sudorpm-qa\|grep graid
Ubuntu:
$ sudo dpkg -l\|grep graid
Step 9 Power-off the server, and then install the new card into the server.
Step 10 Power-on the server.
Step 11 Go to the Graid Technology website to download the latest version of the pre-installer and make it executable, please download the package in Latest Linux Release Notes.
If you are replacing a card in the system, deleting any inactive or invalid licenses associated with the old card is essential. Failing to do so may prevent other cards from becoming active, which is key for multi-controller systems.
where command, OBJECT_TYPE, OBJECT_ID, and flags are:
command: Specifies the operation to perform on one or more resources (for example create, list, describe, and delete).
OBJECT_TYPE: Specifies the object type. Object types are case-sensitive (for example license, physical_drive, and drive_group).
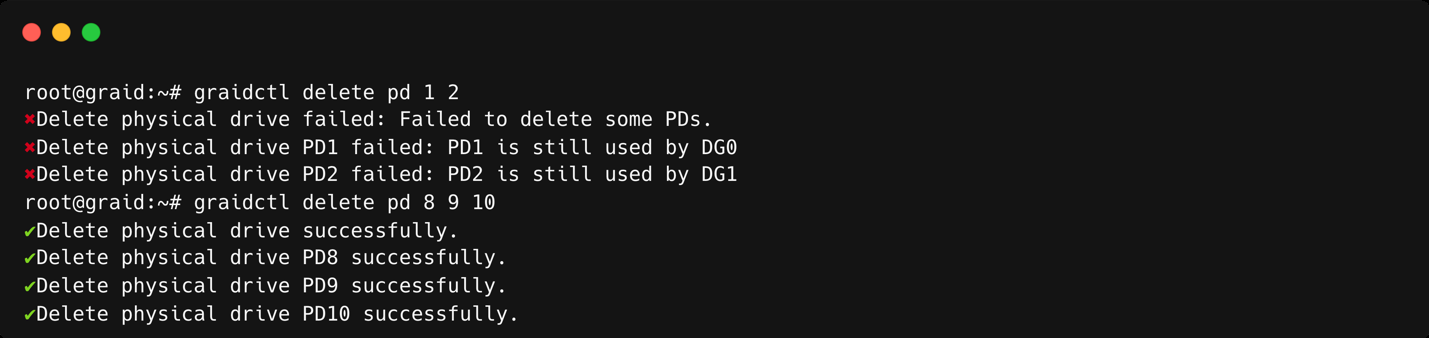
OBJECT_ID: Specifies the object ID. Some commands support simultaneous operations on multiple objects. You can specify the OBJECT_ID individually or use a dash to describe an OBJECT_ID range. For example, to delete physical drives 1, 3, 4, and 5 simultaneously, issue the command:
$ sudo graidctl delete physical_drive 13-5
flags: Specifies optional flags. For example:
-force forces the deletion of a physical drive.
$ sudo graidctl delete physical_drive 0 –force
-json prints output in JSON format. This flag can also assist with API implementation.
$ sudo graidctl list virtual_drive --format json
For help, run graidctl help from the terminal window.
$ sudo graidctl c pd [DEVICE_PATH\|NQN\|WWID][flag]
Related command flags:
Flag
Description
-h, --help
Help for physical_drive
-c, --current-sid string
Current SID password of the SEDs. Can be used with either --sed-take-ownership or --sed-import-key
-i, --sed-import-key
Import the ‘’SED key” of the Self-Encrypting Drives (SEDs). It will ask for the current SID password, which must also be the admin’s password. The password will be saved as the SED key of the drive
-k, --new-sed-key string
Set a new SED key of the drives. Can only be used with --sed-take-ownership
-n, --no-current-sid
Indicates that Block SID authentication is currently disabled on the SEDs. Can only be used with --sed-take-ownership
-o, --sed-take-ownership
Take ownership of the SEDs with the specified new SED key. Can be used with one of --no-current-sid, --new-sed-key, and --psid to specify the authentication method
-p, --psid string
Physical Secure ID (PSID) of SEDs. Can only be used with --sed-take-ownership
Flag
Description
-p, --confirm-to-erase
Confirm to erase all data on the SED supporting physical drives forcibly
-w, --wipe-metadata
Wipe metadata forcibly
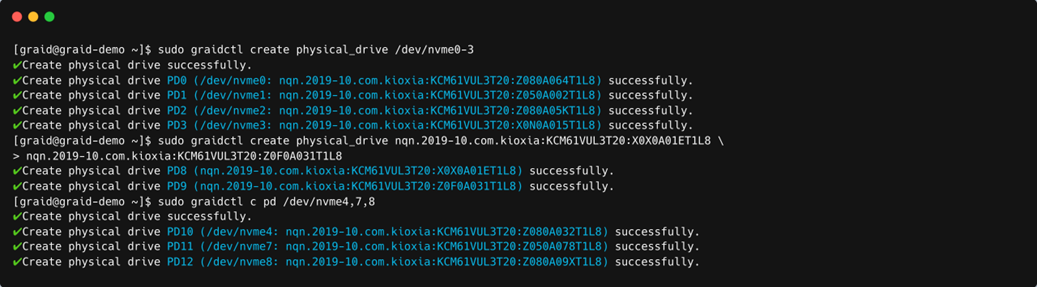
The following figure shows an output example when creating multiple physical drives simultaneously with the device path and NQN.
Create Physical Drive Output
Note
Be sure the system or other applications are not on the physical drive before creating or replacing the drive.
To list all the physical drives, issue the following command:
$ sudo graidctl list physical_drive [flag]
OR
$ sudo graidctl ls pd [flag]
Related command flags:
Flag
Description
-h, --help
Help for the list physical_drive command
-d, --dg-id
[int32] Filter result by drive group ID Default: -1
-f, --free
List unused PDs
-l, --locating
List locating PDs
-n, --numa-node
[int32] Filter by NUMA node Default: -1
Note
The serial number will only be displayed when using --format json.
Output example:
Output content:
Field
Description
SLOT ID
Slot ID of the corresponding NVMe/SAS/SATA drive. The PD ID is not related to the SLOT ID. To set the physical drives, use the PD ID.
DG ID
Drive group ID of the physical drive
PD ID
PD ID. The PD ID is a unique ID provided by the SupremeRAID™ driver when the physical drive is created. It is not related to any SSD information such as slot ID or NQN. The PD ID is used for all further operations.
NQN/WWID
NQN or WWID of corresponding NVMe/SAS/SATA drive
MODEL
Model number of the corresponding NVMe/SAS/SATA drive
Field
Description
CAPACITY
Capacity of corresponding NVMe/SAS/SATA drive
NODE
NUMA NODE of the corresponding NVMe/SAS/SATA drive
STATE
State of the physical drive (see the following table).
Physical drive state:
State
Description
ONLINE
Physical drive was added to a drive group and is ready to work.
HOTSPARE
Physical drive is configured as a hot spare drive.
FAILED
Physical drive is detected, but it is not operating normally.
OFFLINE
Physical drive is marked as offline.
REBUILD
Physical drive is being rebuilt.
MISSING
Physical drive cannot be detected.
UNCONFIGURED_GOOD
Physical drive did not join a drive group.
UNCONFIGURED_BAD
Physical drive did not join a drive group and is not operating normally.
COPYBACK
Physical drive is performing copyback.
If an (!) appears after the state mentioned above, it represents a critical warning.
Make sure the system or other applications are not on the physical drive before creating or replacing the drive.
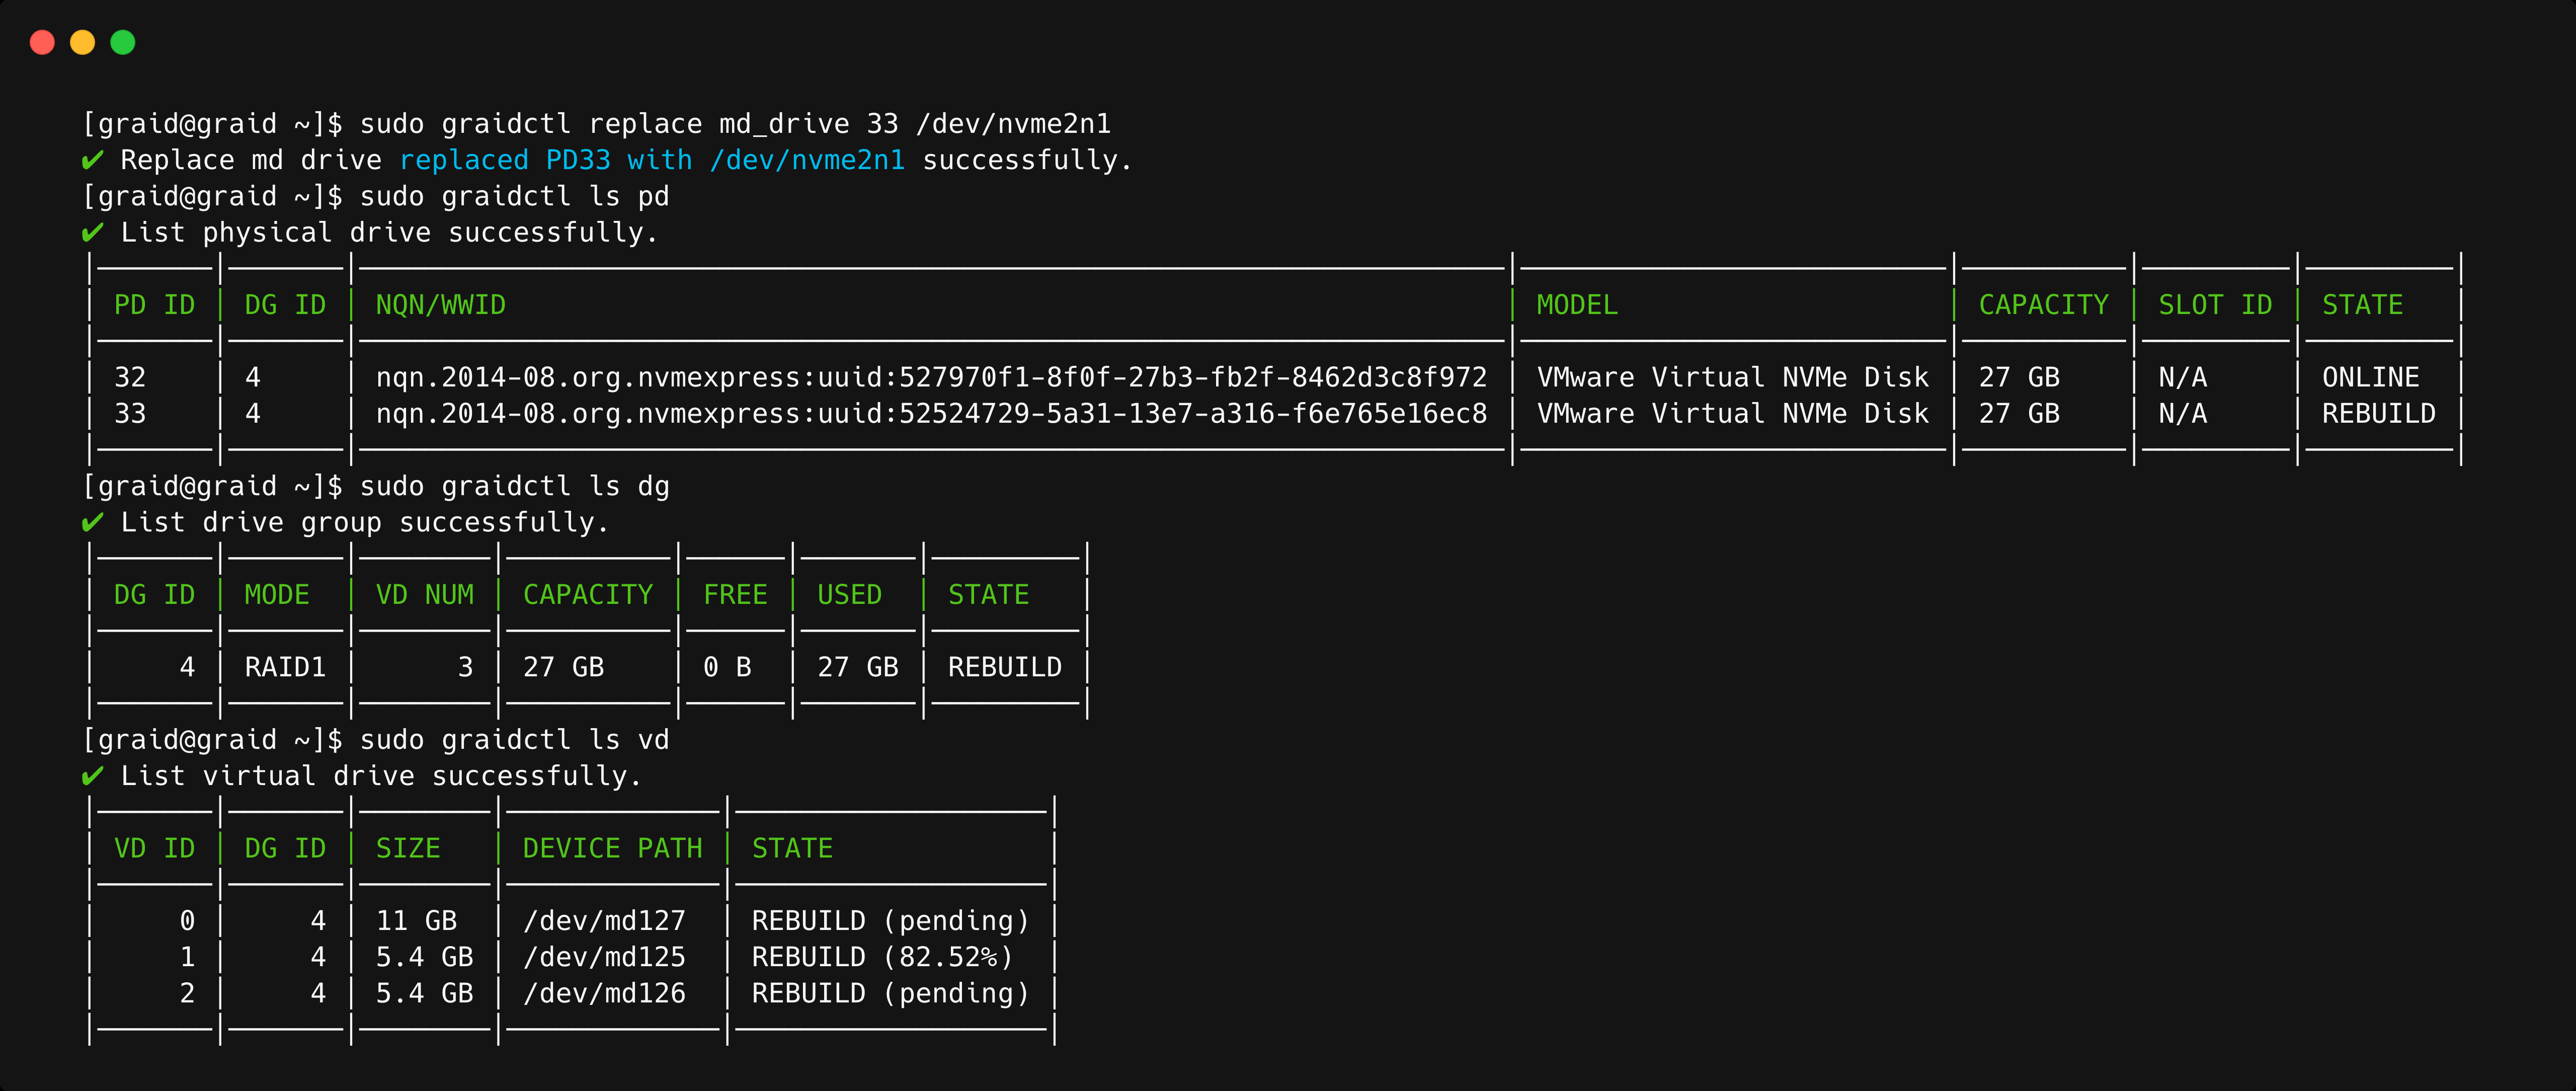
To replace a nearly worn-out or broken SSD:
Step 1 If the physical drive is in the MISSING or other abnormal state, skip this step. Otherwise, issue the following command to mark the physical drive as bad:
$ sudo graidctl edit pd [OLD_PD_ID] marker bad
Step 2 Replace the NVMe SSD. The state of the prior physical drive indicates FAILED.
RAID mode of the drive group. Entries must be all uppercase or all lowercase. For example, RAID6 or raid6 are both correct.
PD_IDs
ID of the physical drive joining the drive group.
Optional parameters:
Option
Description
Behavior
--background-init, -b
Default option. Use standard methods to initialize the drive group. When all the physical drives in the drive group support the de-allocate dataset management command, it is used to synchronize the data, or parity, between the physical drives during drive group creation.
An I/O-capable device path similar to /dev/gdg0n1 is created.
--foreground-init, -z
Foreground initialization. This method writes zeros to the entire drive.
The virtual drive appears in the system after initialization is complete. Use sudo graidctl list drive_group to check the initialization progress.
--controller, -c
Specific controller to control this drive_group. Default: -1, [Int32]
The drive group is controlled by the specified controller.
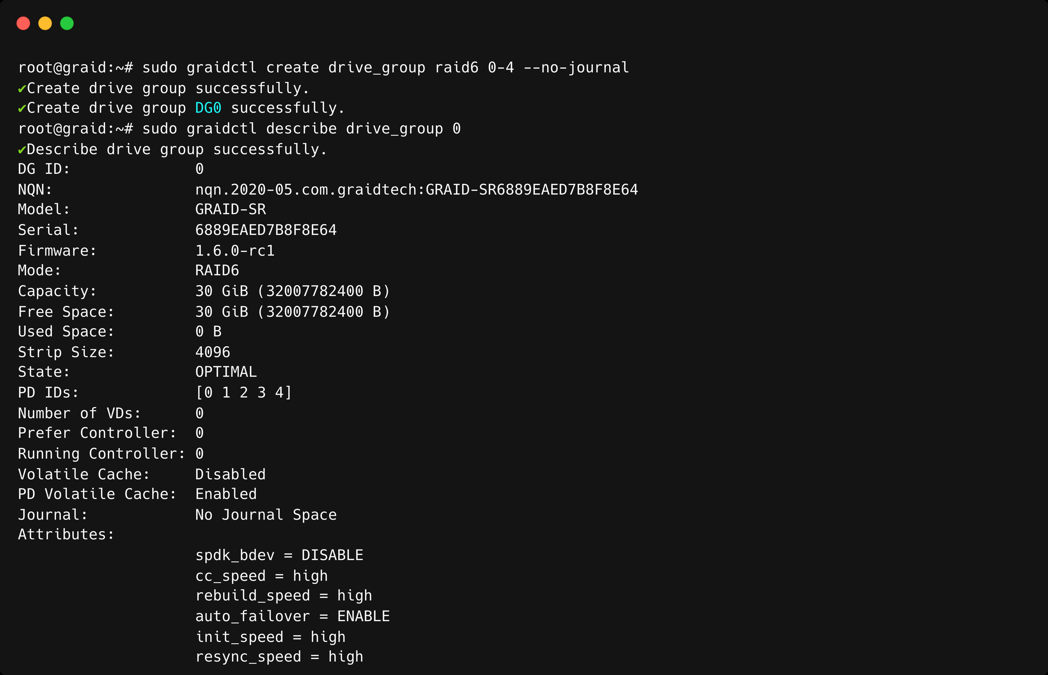
--no-journal
Bypass the creation of journal space in the drive group.
The drive group will not create journal space.
--strip-size, -s
Strip size of the drive_group. [RAID0, RAID10] Values: 4, 8, 16, 32, 64, 128 Default: 4, [Int32]
Adjust RAID0/RAID10 strip size to a specific size: 4K, 8K, 16K, 32K, 64K, or 128K.
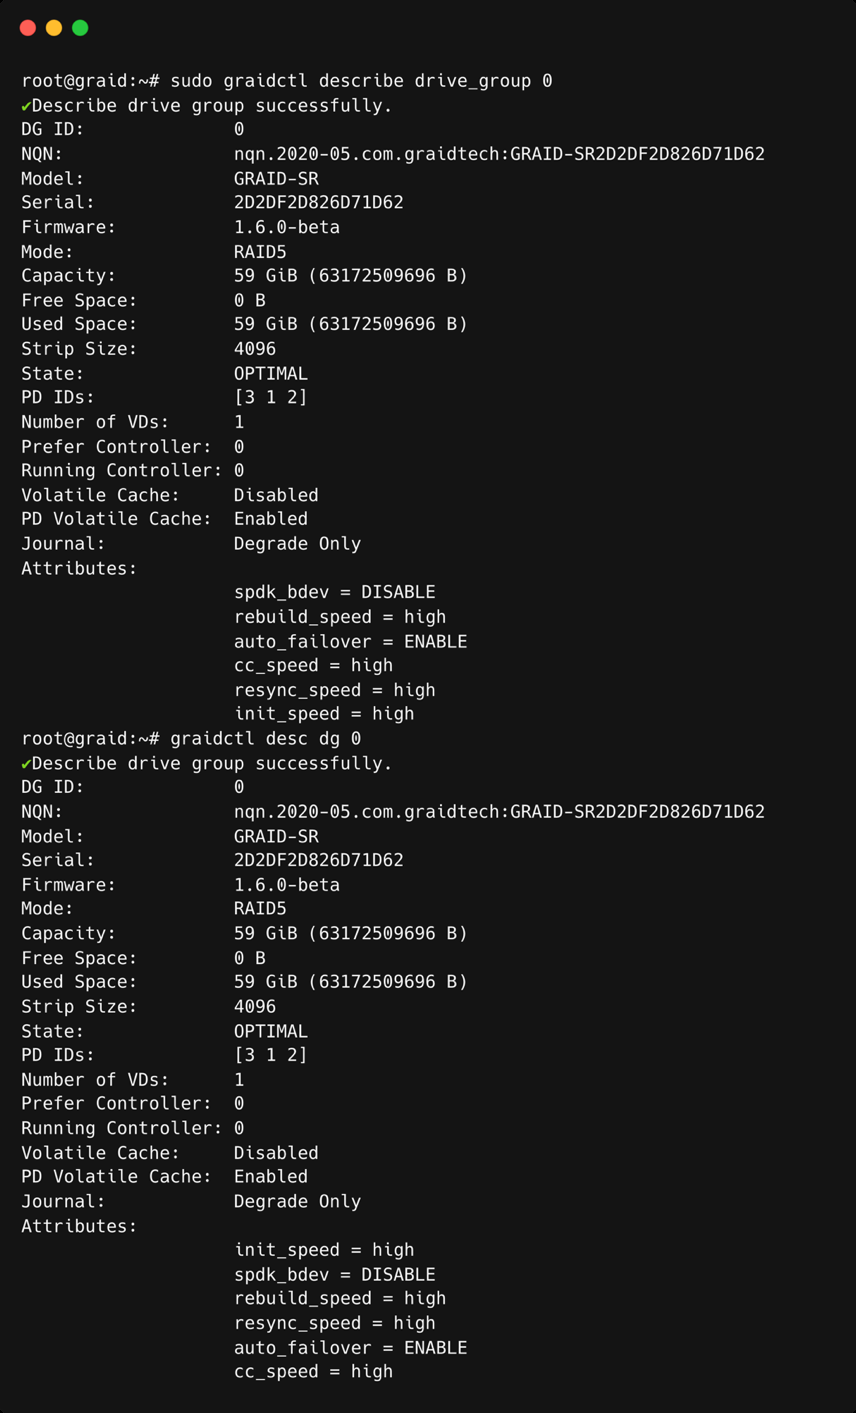
Wait for the drive group initialization to complete. DO NOT power-off or reboot the system when the drive_group state is INIT, RESYNC, or RECOVERY. To check the drive_group state, issue the following command:
$ sudo graidctl list drive_group
OR
$ sudo graidctl ls dg
Output content:
Flag
Description
DG ID
Drive group ID
MODE
Drive group RAID mode
VD NUM
Number of virtual drives in the drive group
CAPACITY
Total usable capacity of the drive group
FREE
Unused space of the drive group
USED
Used space of the drive group
CONTROLLER
Drive group controlled by the specific controller
STATE
Drive group state (see the following table)
Drive group state:
State
Description
OFFLINE
Drive group is not working properly. This condition usually occurs when the number of damaged physical drives exceeds the limit.
OPTIMAL
Drive group is in optimal state.
OPTIMAL (!)
Drive group is in optimal state but found inconsistency data.
OPTIMAL (cc)
Drive group is in optimal state and the consistency check task is ongoing.
OPTIMAL (cp)
Drive group is in optimal state and the copyback task is ongoing.
OPTIMAL (cc!)
Drive group is in optimal state and the consistency check task is ongoing but found inconsistent data.
DEGRADED
Drive group is available and ready for use, but the number of missing or failed physical drives has reached the limit.
PARTIALLY_DEGRADED
Drive group is available and ready for use, but some physical drives are missing or failed.
RECOVERY
Drive group is recovering
FAILED
Drive group is not working normally.
INIT
Drive group is initializing.
RESYNC
Drive group is resynchronizing and remains available and ready for use. This condition usually occurs when the system encounters an abnormal crash. Do not replace the physical drive in this state until the resynchronization process completes.
RESCUE
Drive group is in rescue mode and can only be read.
If multiple drive groups require simultaneous recovery, the drive groups recover individually. If multiple physical drives in the same drive group require rebuilding, the physical drives are rebuilt simultaneously.
If a damaged drive group is initialized or a recovering drive group encounters an abnormal system crash, the data integrity of the drive group is affected. In this event, the drive group is forced offline to prevent data from being written to the drive group. To read the data for the drive group, force the drive group to go online using Rescue mode.
Note
A drive group in Rescue mode is read-only. Rescue mode cannot be disabled.
To enter rescue mode, issue the following command:
$ sudo graidctl edit drive_group [DG_ID] rescue_mode on
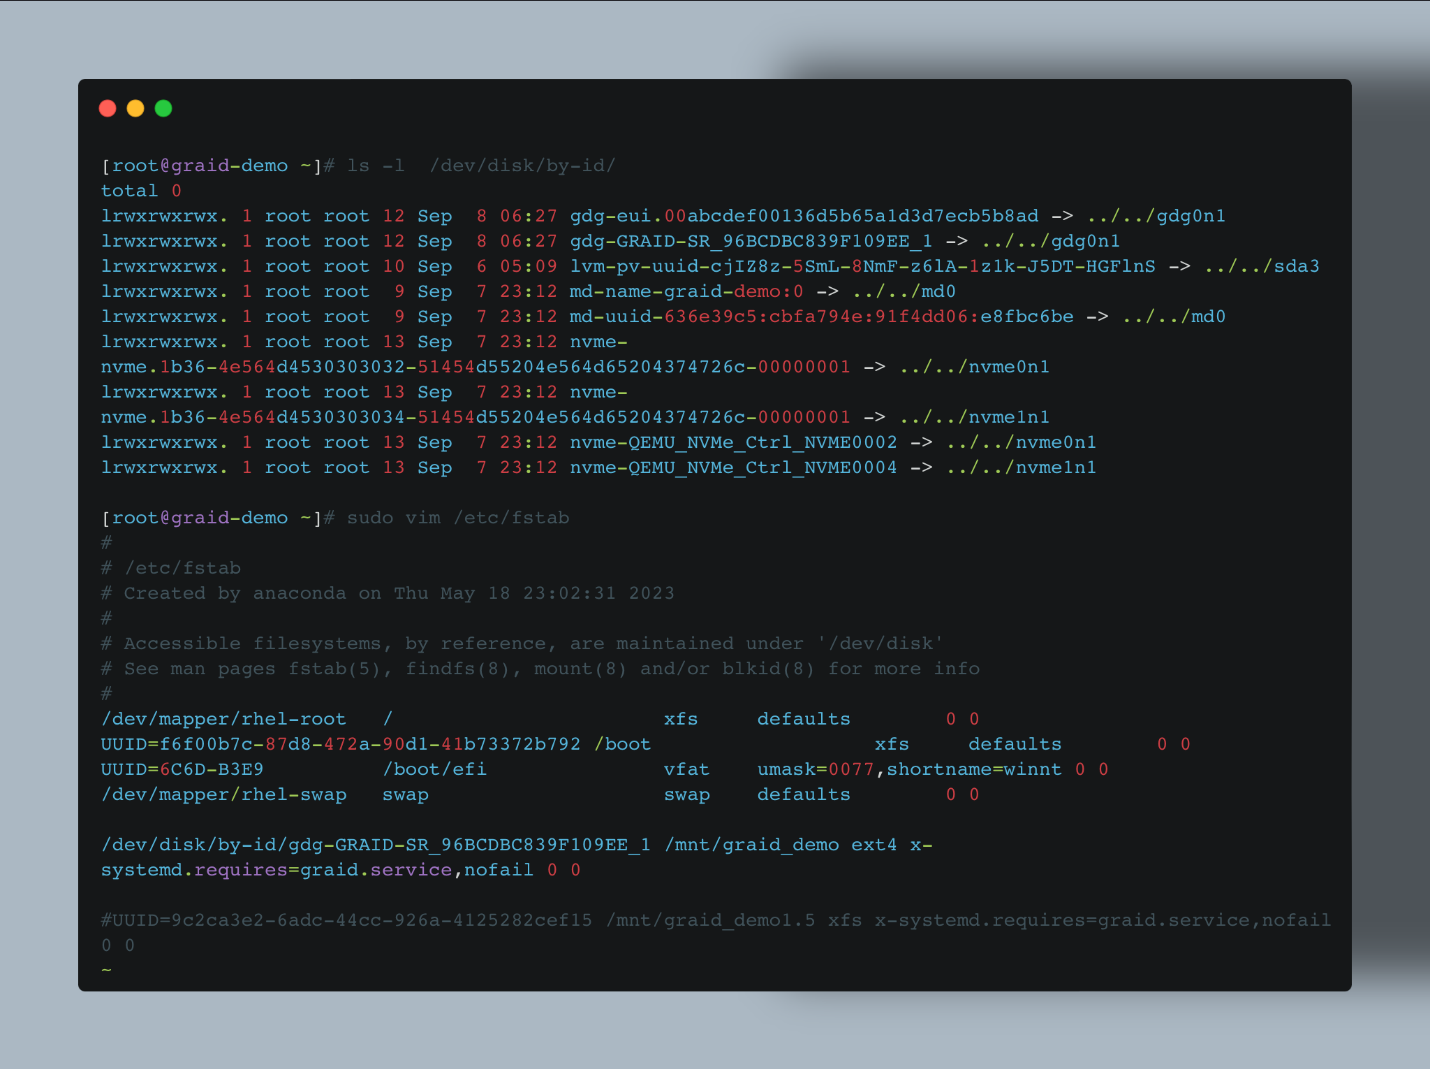
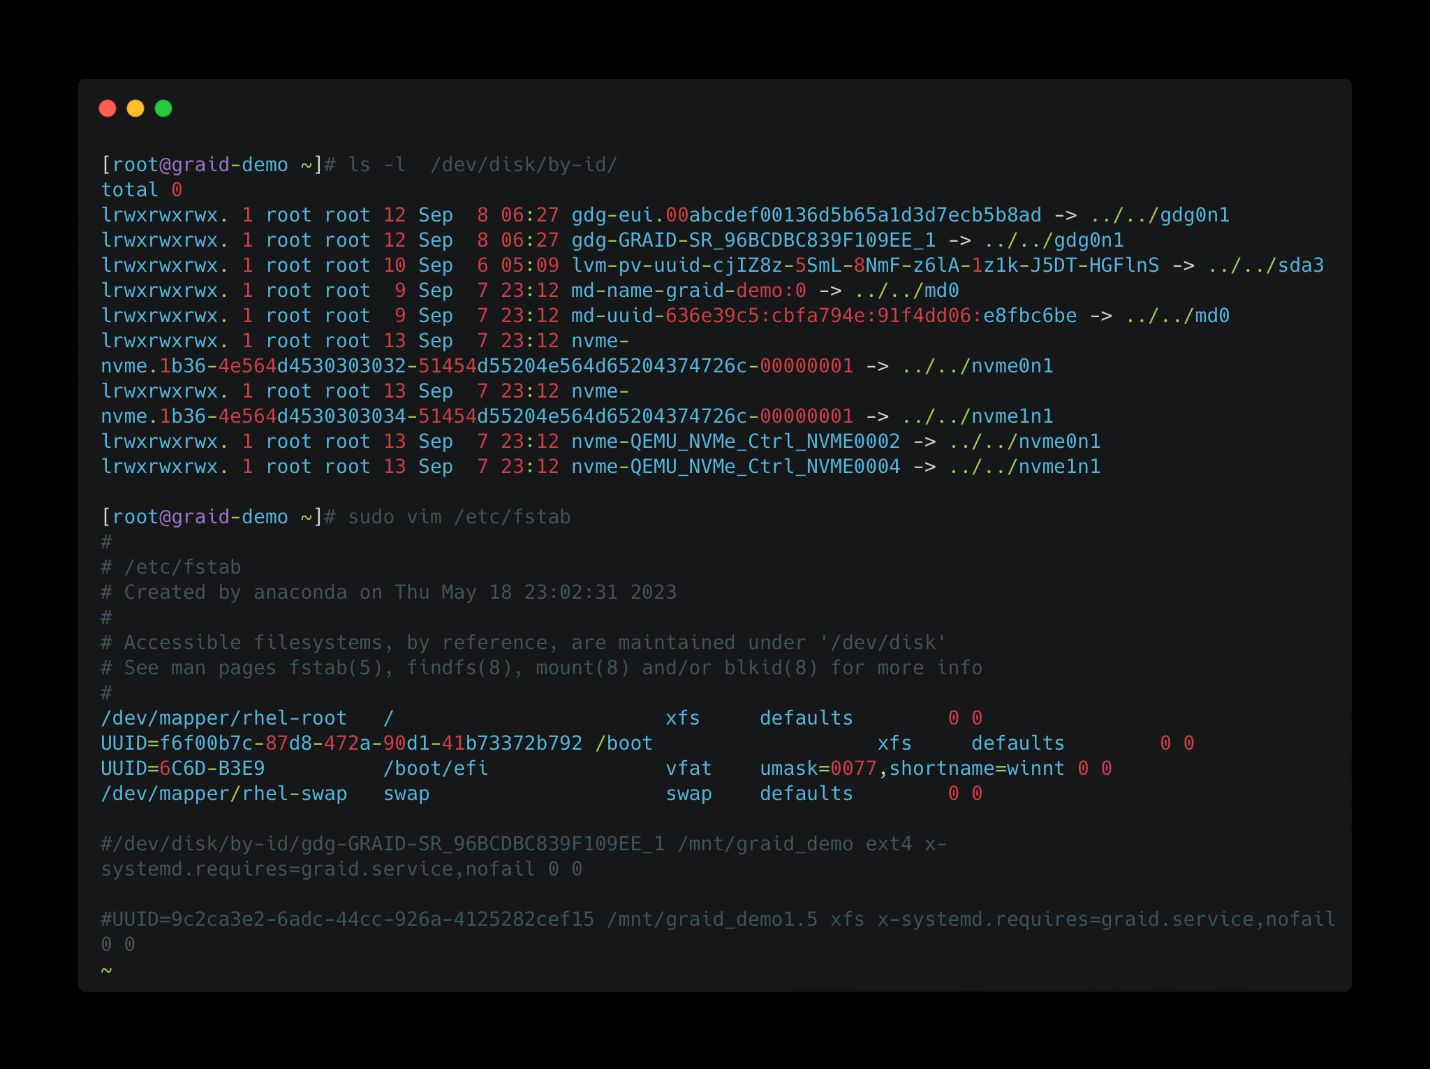
See Setting Up the Auto-mount File Systems on Linux Using the SupremeRAID™ Driver. It is critically important to follow these instructions to guarantee that the RAID group mounts automatically during system boot and to avoid any improper or unclear shutdown processes that could cause the RAID group to enter resync mode.
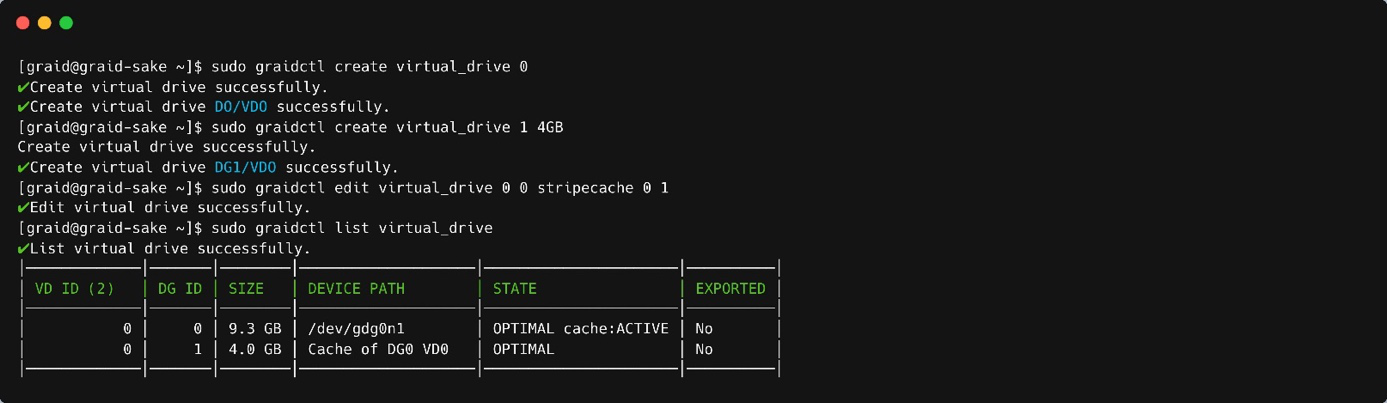
To list virtual drives, issue the following command:
$ sudo graidctl list virtual_drive [flag]
OR
$ sudo graidctl ls vd [flag]
Related command flags:
Flag
Description
-h, --help
Help for the list virtual_drive command
-d, --dg-id
[string] List VDs of a certain DG ID
-v, --vd-id
[string] List certain VD IDs
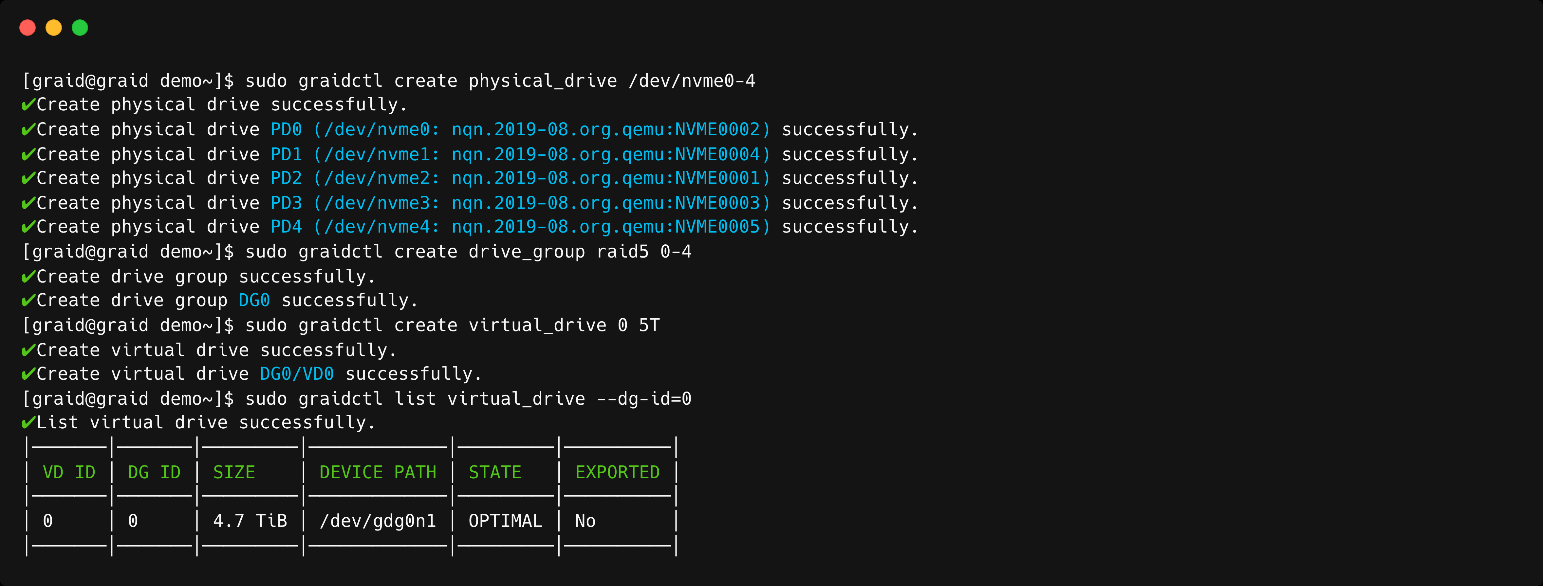
Output example:
Virtual Drive List Output
Output content:
Flag
Description
DG ID
Drive group ID
VD ID
Virtual drive ID
SIZE
Usable size of the virtual drive
DEVICE PATH
Device path of the virtual drive
NQN
NQN of the virtual drive
STATE
Virtual drive state - identical to the drive group state (see the following table)
EXPORTED
Shows whether the virtual drive was exported using NVMe-oF or iSCSI
Note
Do not perform I/O before the virtual drive is initialized and the device path (for example, /dev/gdgXnY) is created.
Virtual drive state:
State
Description
OFFLINE
Drive group is not working normally. This condition is usually caused when the number of damaged physical drives exceeds the limit.
OPTIMAL
Drive group is in the optimal state.
DEGRADED
Drive group is available and ready for use, but the number of missing or failed physical drives has reached the limit.
PARTIALLY_DEGRADED
Drive group is available and ready for use, but some physical drives are missing or failed.
RECOVERY
Drive group is recovering.
FAILED
Drive group is not working normally.
State
Description
INIT
Drive group is initializing.
RESYNC
Drive group is resynchronizing and remains available and ready for use. This condition usually occurs when the system encounters an abnormal crash. Do not replace the physical drive in this state until the resynchronization process completes.
RESCUE
Drive group is in rescue mode and can only be read.
Stripe-cache state:
State
Description
OFFLINE
Stripe cache drive group is OFFLINE.
CLEAN
Stripe cache write-back has finished.
PURGE
Stripe cache is writing data into the virtual drive.
You must disable the SupremeRAID™ controller before you can delete it. Disabling the controller prevents further access to it and its associated drives, allowing you to delete the controller safely without affecting the system's operation.
Follow these guidelines when replacing a controller license key:
Disable the Controller: Before replacing the license key for a controller in SupremeRAID™, disable the controller to ensure it is not in use. This prevents access to the controller and its associated drives, allowing the license key to be replaced safely without affecting system operation.
Ensure Compatibility: You cannot replace a license key with one that has a different architecture or supported features. Use the same license key or a compatible replacement to avoid replacement issues.
Delete Inactive or Invalid Licenses: If you are replacing a card in the system, delete any inactive or invalid licenses associated with the old card. Failing to do so may prevent other cards from becoming active, which is especially important in multi-controller systems.
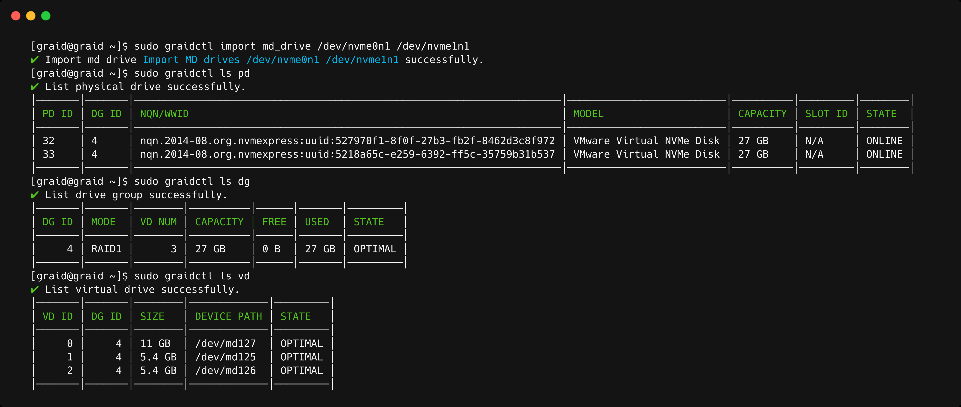
After installing the SupremeRAID™ driver and the graidctl utility, SupremeRAID™ can import and control an MD bootable NVMe RAID. This feature makes it easy to swap drives if a bootable drive malfunctions.
Note
You must disable the SupremeRAID™ controller before you can delete it. Disabling the controller prevents further access to it and its associated drives, allowing you to delete the controller safely without affecting the system's operation. For instructions on setting up the MD bootable NVMe RAID, see Configuring Boot-Drive Devices.
The add-on for SupremeRAID™ provides enhanced configuration options and allows you to fine-tune system settings to meet your specific needs. Follow these steps to ensure that the add-on is configured optimally for maximum system performance.
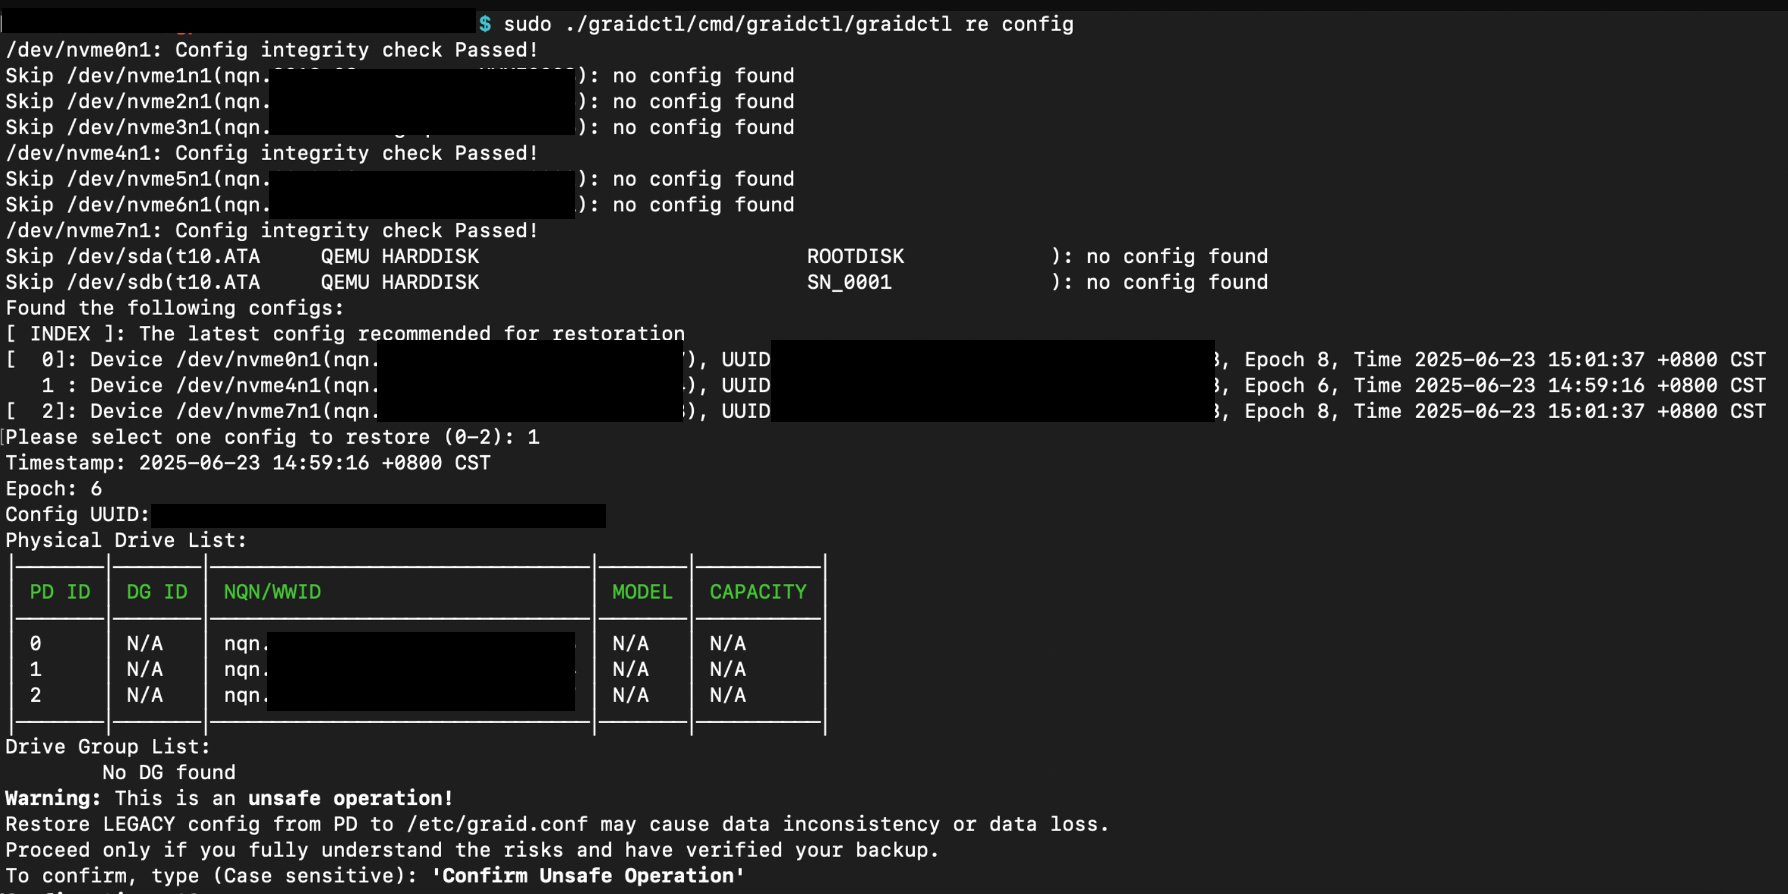
To scan all NVMe and SCSI drives and restore the latest SupremeRAID™ configuration, issue the following command:
$ sudo graidctl restore config [flags]
OR
$ sudo graidctl re conf [flags]
Related command flags:
Flag
Description
-h, --help
Help for the restore config command
-a, --auto
Selects the last configuration automatically
Output example:
Restore Config Auto Output
To restore the configuration from the file, please issue the following command:
$ sudo graidctl restore config --file[FilePath]
Output example:
Restore Config File Output
Note
The restore command does not support restoring configuration files created by a newer driver version. Therefore, it cannot be used to downgrade the driver to an earlier version.
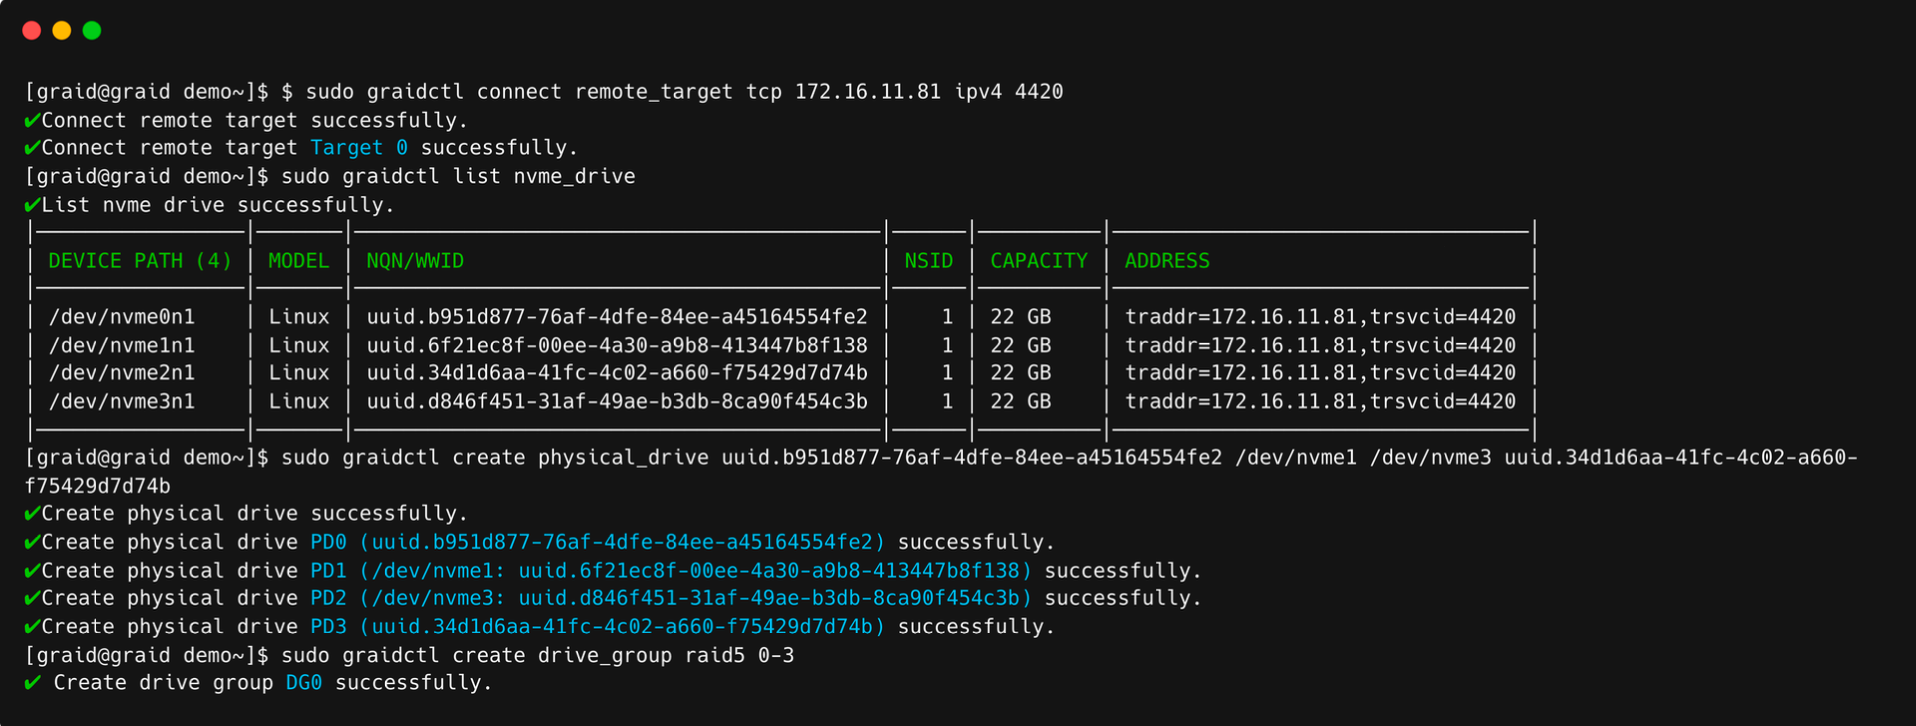
To connect to a remote NVMe-oF target, issue the following command:
$ sudo graidctl connect remote_target [transport type][addr][address family][port service id]
OR
$ sudo graidctl con rt [transport type][addr][address family][port service id]
Required parameters:
Option
Description
transport type
Network fabric used for a NVMe-over-Fabrics network. Current string values include: • RDMA = network fabric is an RDMA network (RoCE, iWARP, InfiniBand, basic RDMA, etc.) • TCP = network fabric is a TCP/IP network.
ip address
Network address of the controller
address family
Network address protocol. Current string values include ipv4/ipv6.
Integrated SPDK NVMe-oF target within the Graid management daemon, enabling direct, zero-copy data export from SupremeRAID™ virtual drives to remote clients over NVMe-oF (TCP or RDMA). This feature eliminates the need for an external SPDK instance and reduces I/O latency by bypassing the kernel block layer. The integrated SPDK target shares the same GPU-accelerated RAID engine as the kernel path but offloads the I/O stack entirely into user space. This enables low-latency data services, simplified deployment, and unified control via graidctl, making it ideal for hypervisor, disaggregated storage, or remote-NVMe use cases.
To enable Integrated SPDK target follow these guidelines:
SPDK mode applies to the entire drive group (DG). All virtual drives within that group will no longer have the kernel /dev/gdgXnY devices.
It is recommended to allocate a total of 8 GB of hugepages for stability.
The default block size of a virtual drive (VD) in SPDK mode is 4K. These VDs can optionally be configured in 512-byte LBA emulation (512e) mode.
For parameters related to Integrated SPDK target, please refer to the configuration file /etc/graid/graid_spdk.conf.
The reactor_mask option in the configuration file specifies a bitmask of the CPU cores on which SPDK is allowed to execute work items. If it is not set, the SPDK reactors will not be launched, and the integrated SPDK features will not be available. You must configure reactor_mask before starting the Graid service to enable the SPDK export target. Once the Graid service is running, the reactor_mask setting cannot be changed.
Enough contiguous free memory (for configuring hugepages), with a recommended additional 8 GB
NICs and routes ready for NVMe-oF (TCP or RDMA)
It is recommended to run our pre-installer. Otherwise, you need to install or refresh dependencies: libibverbs1, librdmacm1, libnuma1. Please refer to the dependency table.
It is recommended to allocate a total of 8 GB of hugepages for stability and not less than 4 GB as the minimum. You can allocate eight 1GB hugepages by issuing the following command:
Alternatively, you can allocate hugepages by NUMA node. To optimize performance when NUMA mode is enabled, each NUMA node included in the reactor_mask should be allocated at least 1 GB of hugepages, and the first NUMA node should be allocated at least 3 GB when using the default performance-related parameters defined in /etc/graid/graid_spdk.conf.
For a system with two NUMA nodes, you can allocate five 1GB hugepages to node 0 and three 1GB hugepages to node 1 by issuing the following command:
If any of the NUMA nodes included in reactor_mask does not have enough hugepages to achieve optimal performance, you will see warning messages in /etc/graid/graid_server.log:
Edit the configuration file: /etc/graid/graid_spdk.conf and bind SPDK reactors to specific CPU cores to enable the integrated SPDK service. For example, to bind CPU cores 0 to 3 to the integrated SPDK service, set the reactor_mask:
Please refer to the previous sections for instructions on creating physical drive (PD), drive group (DG) and virtual drive (VD). If a DG was created with zero-init, wait until initialization is complete before switching to SPDK mode.
Only SPDK-enabled virtual drives can be exported to SPDK export targets. Once an SPDK virtual drive has been exported with 512-byte LBA emulation, the same virtual drive cannot be exported to another SPDK export target with default 4K LBA size.
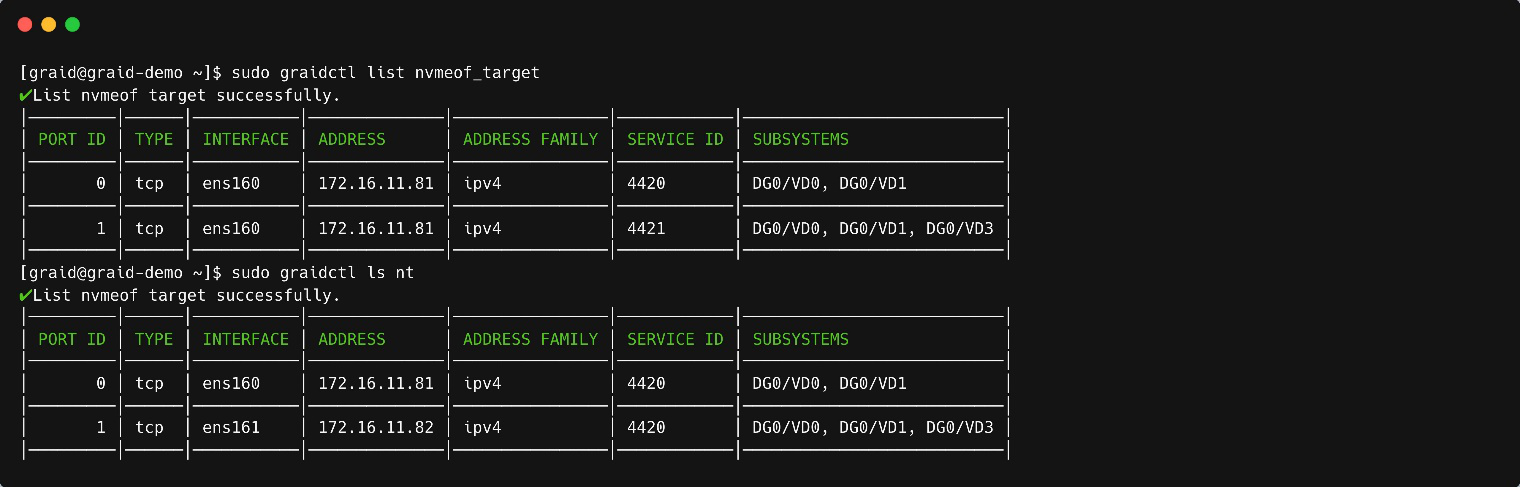
To list all SPDK NVMe-oF export targets, please refer to Listing Created NVMe-oF Export Targets. As shown in the output, the target type will display SPDK instead of Kernel.
If the integrated SPDK has been enabled (i.e., reactor_mask is properly configured), the following log files will be generated for SPDK logging: /var/log/graid/graid_server_spdk.log /var/log/graid/graid_core{0,1}_spdk.log
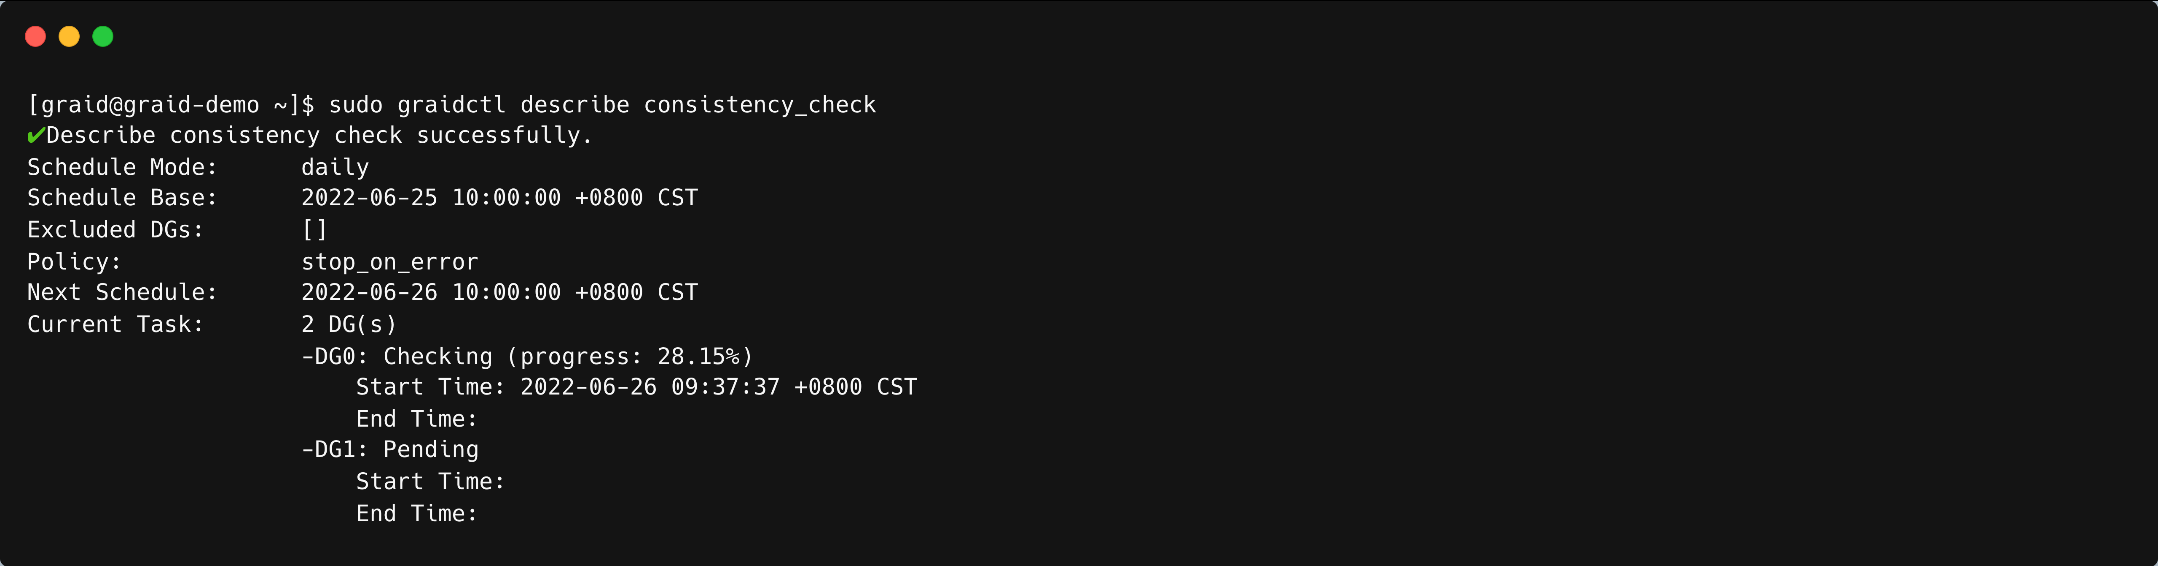
The consistency check operation verifies that the data is correct in DGs that use RAID levels 1, 5, 6, and 10. In a system with parity, for example, checking consistency calculates the data on one drive and compares the results to the contents of the parity drive.
Note
You cannot perform a consistency check on RAID 0 because it does not provide data redundancy. Additionally, a consistency check can only run when the DG is in OPTIMAL or PARTIALLY_DEGRADED state.
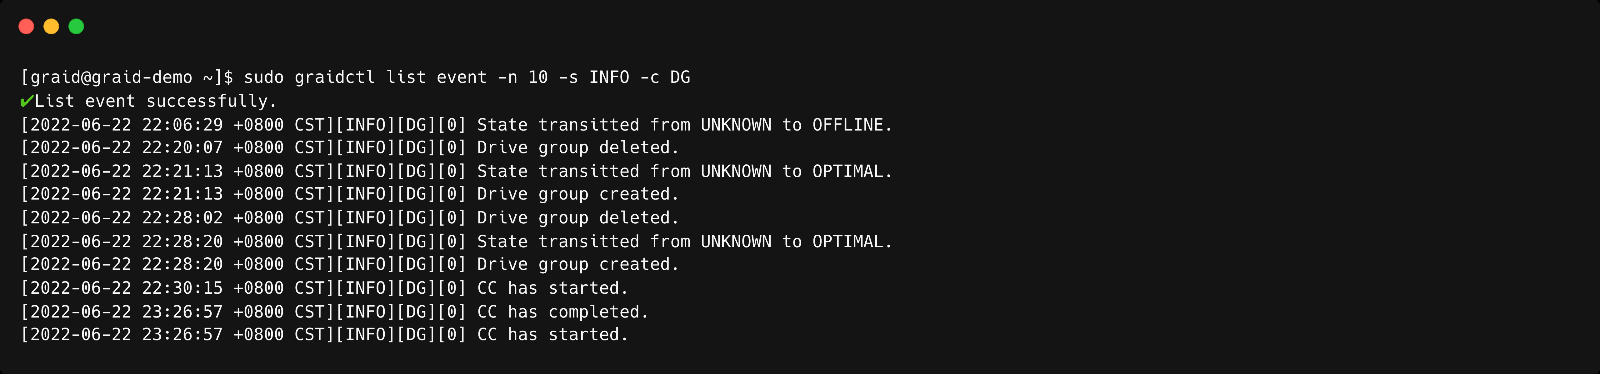
The consistency check function records all events to the event database, and graidctl provides commands to retrieve the events. The maximum number of event entries is 1,000. The system deletes event entries periodically. You can also delete entries manually.
Please note, these procedures are provided for reference only. Your actual steps may vary depending on your Linux distribution and version. For complete and up-to-date information, please refer to your Linux distro's documentation or contact the distro’s support team for further information. You cannot configure boot-drive devices across multiple operating systems.
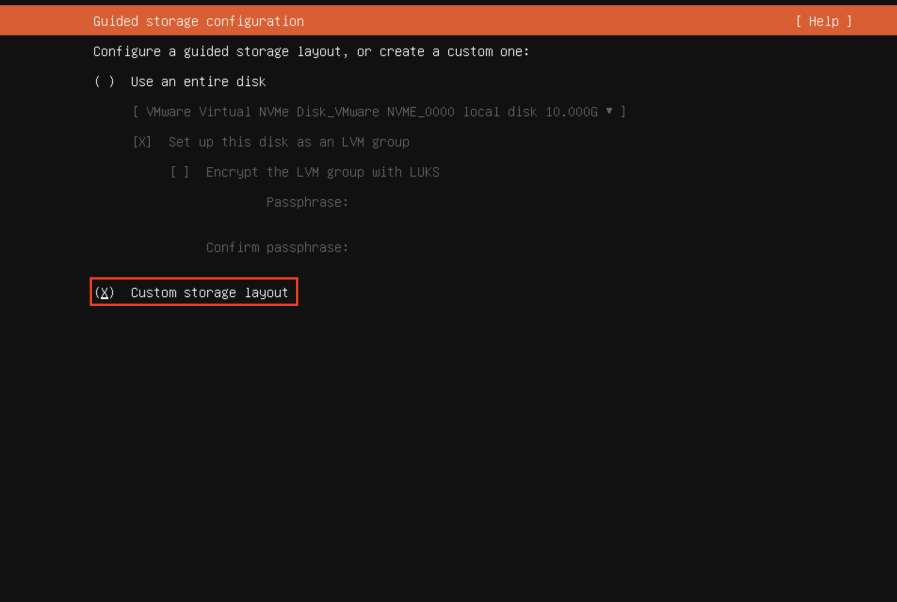
Storage partitions must be created and configured during the Ubuntu Server 20.04 installation. The partitions are required for mounting /boot, swap, and root/. Each partition functions as a software RAID.
Step 1 From the Guided storage configuration page, select Custom storage layout.
Ubuntu Custom Storage Layout
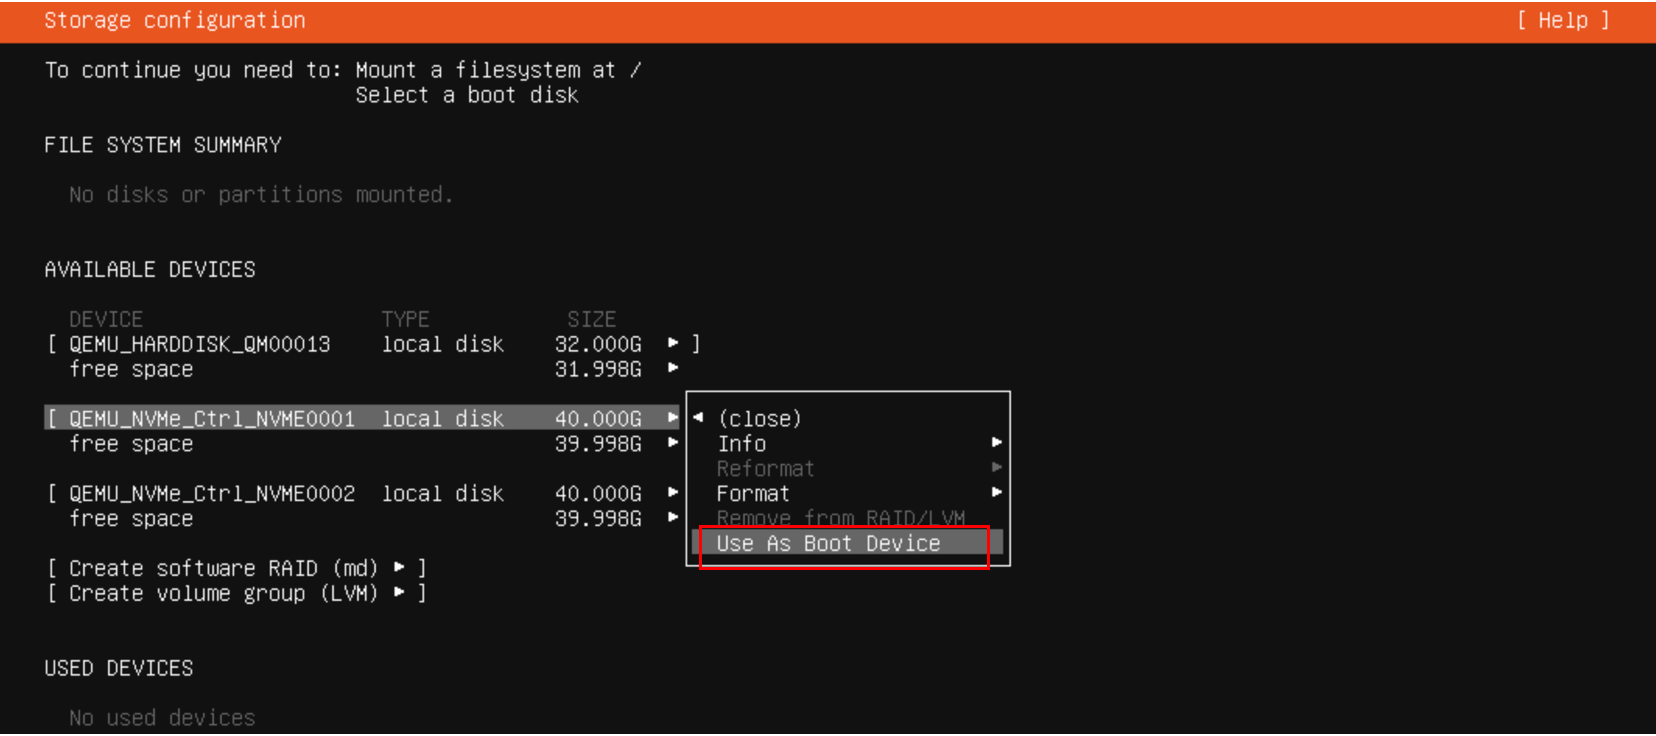
Step 2 From the Storage configuration page, select the first disk and choose Use As Boot Device.
Ubuntu Use First Disk As Boot Device
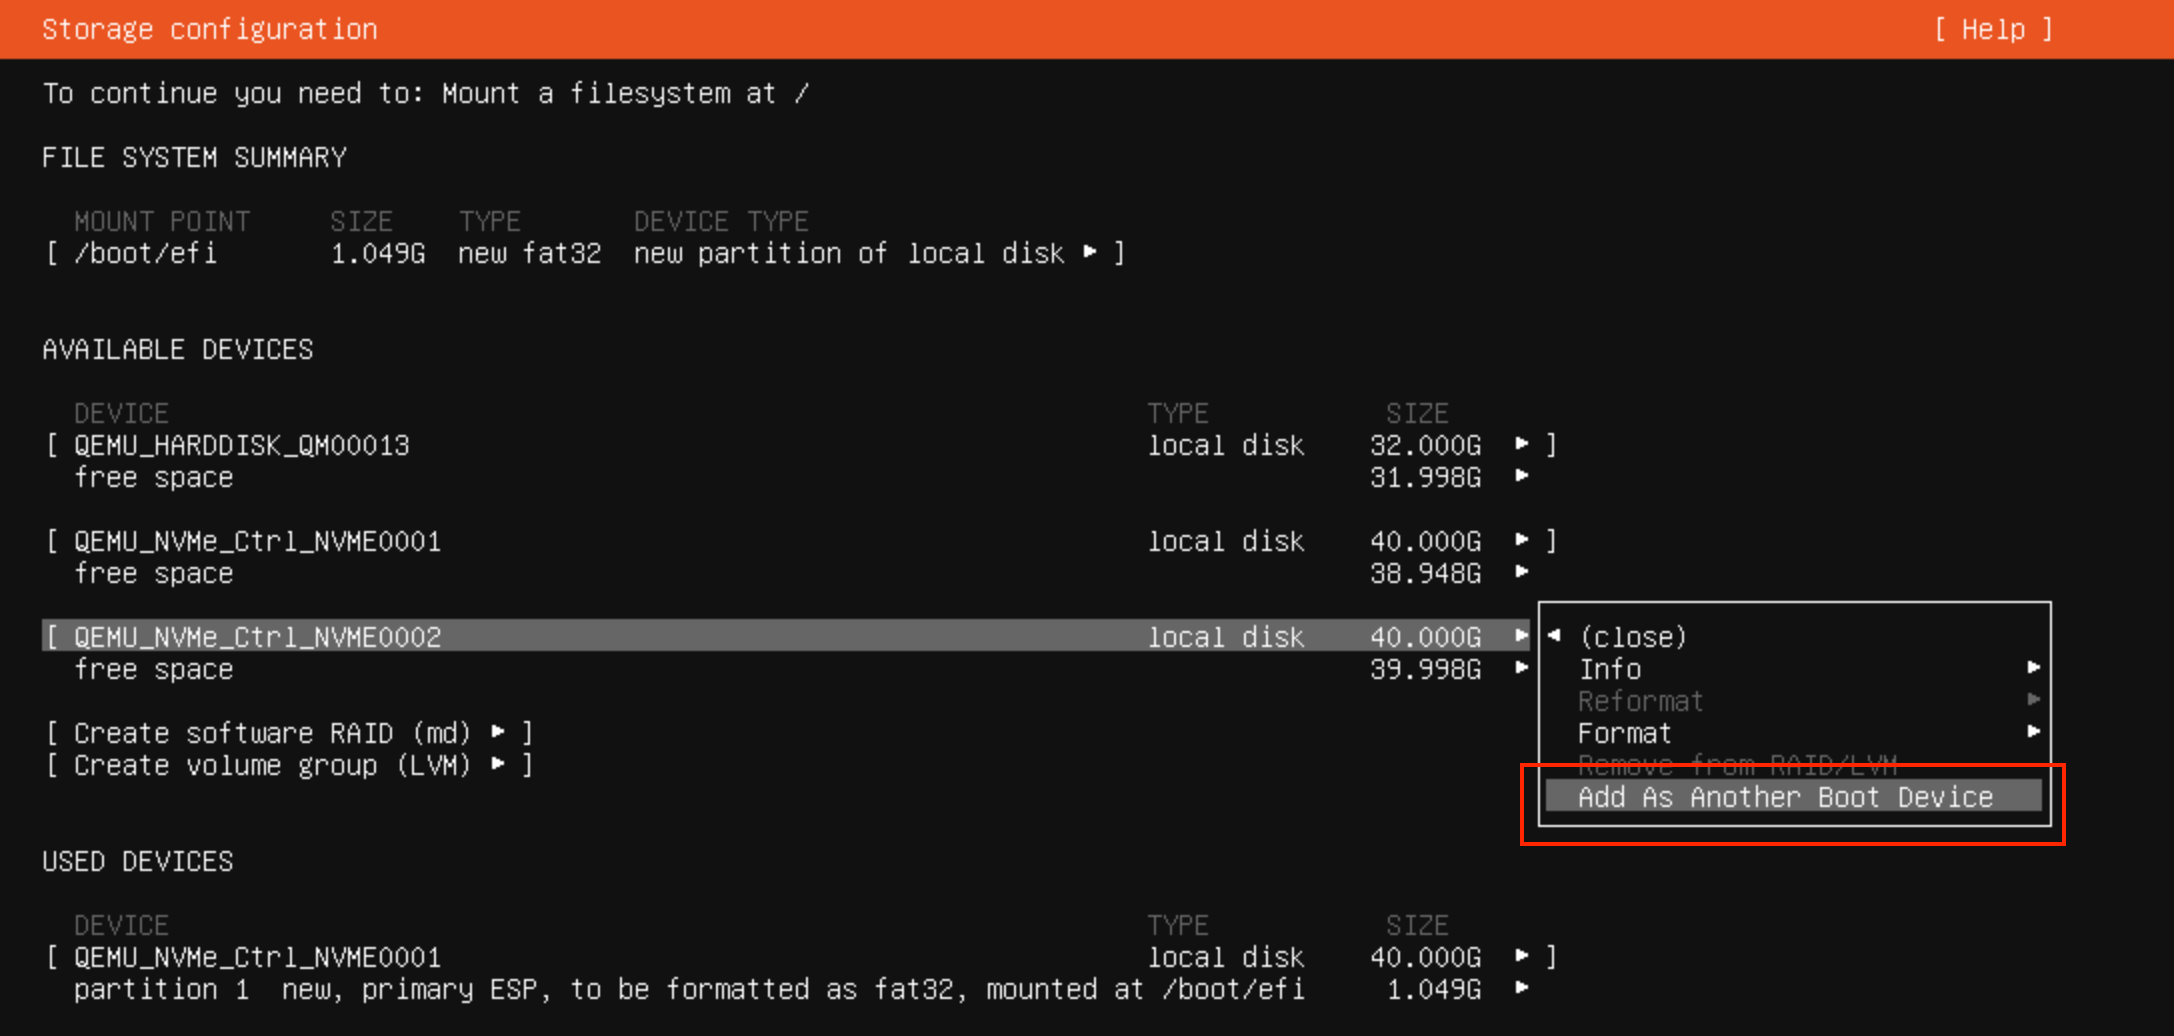
Step 3 From the Storage Configuration page, select the second disk and Use As Another Device.
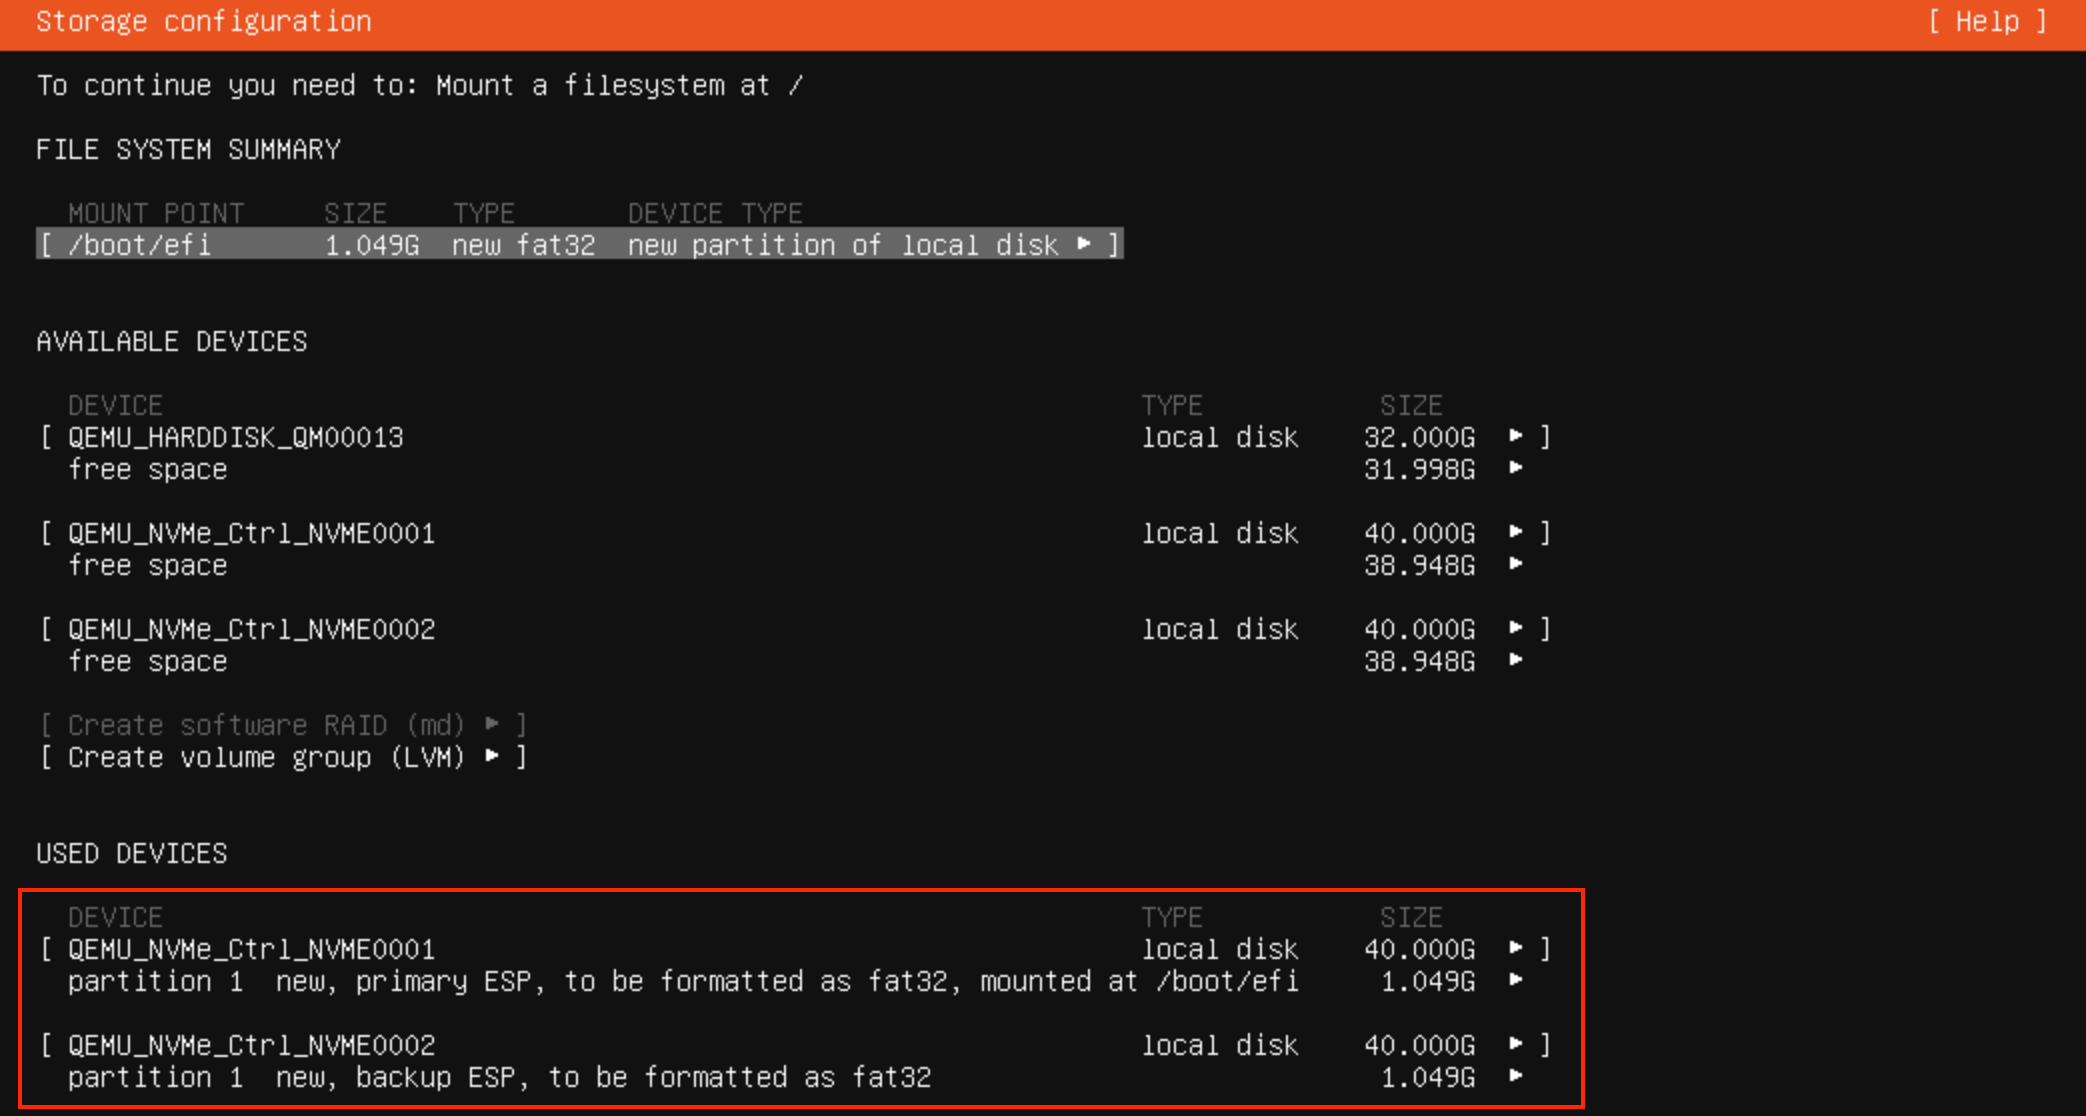
Ubuntu Used Devices List
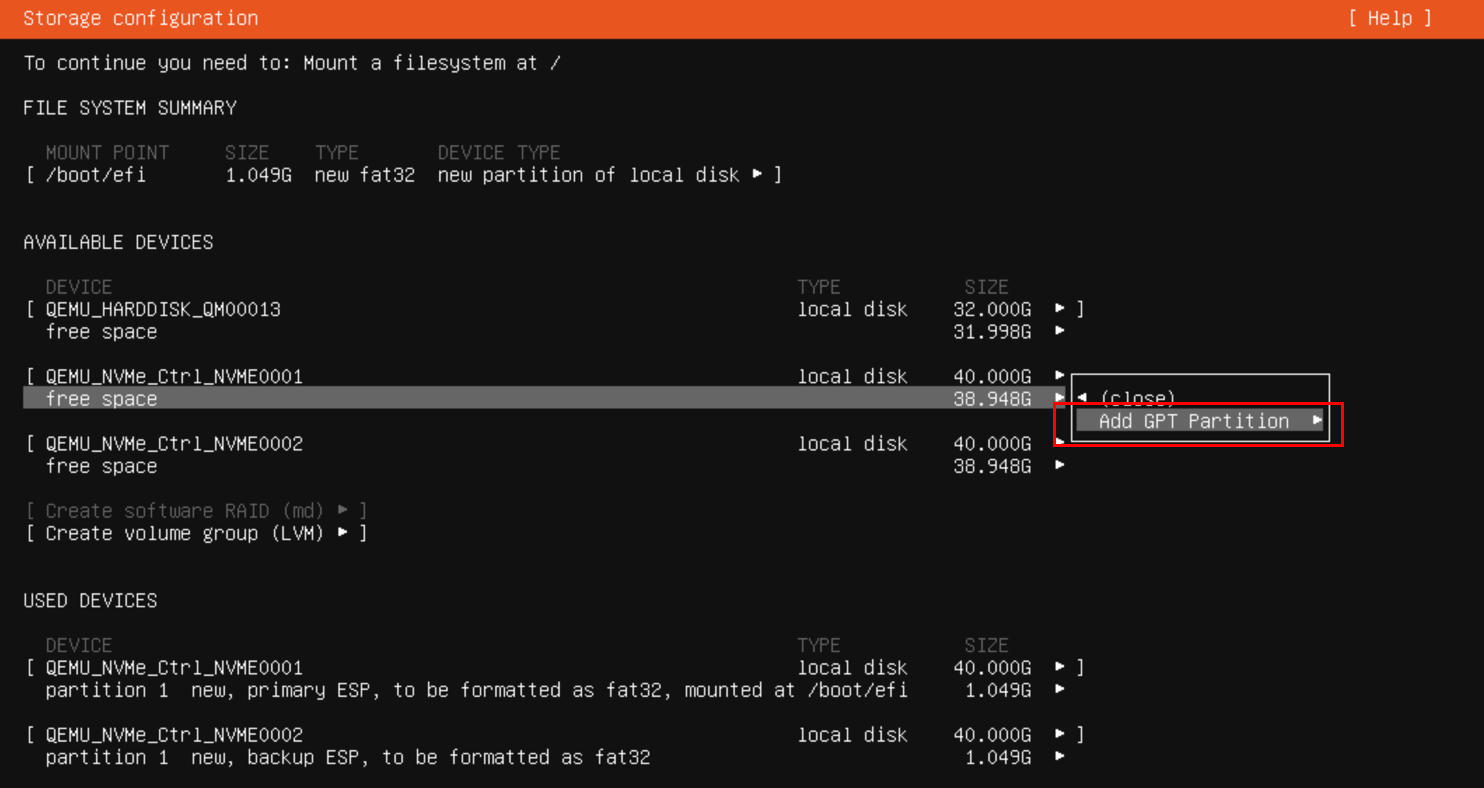
Step 4 Devices used for the MD bootable RAID will be listed as USED DEVICES in the interface.
Ubuntu Add GPT Partition Menu
Step 5 From the Disk menu, select free space and choose Add GPT Partition. Leave both disks unformatted.
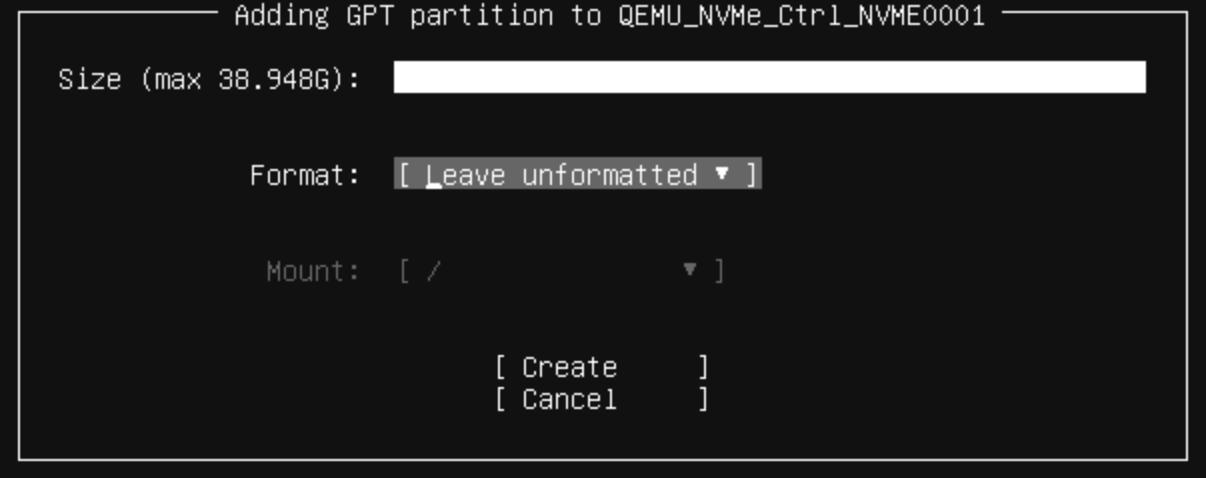
A. Select first drive and select Add GPT Partition.
Ubuntu First Drive Unformatted Partition
B. Leave the drive unformatted.
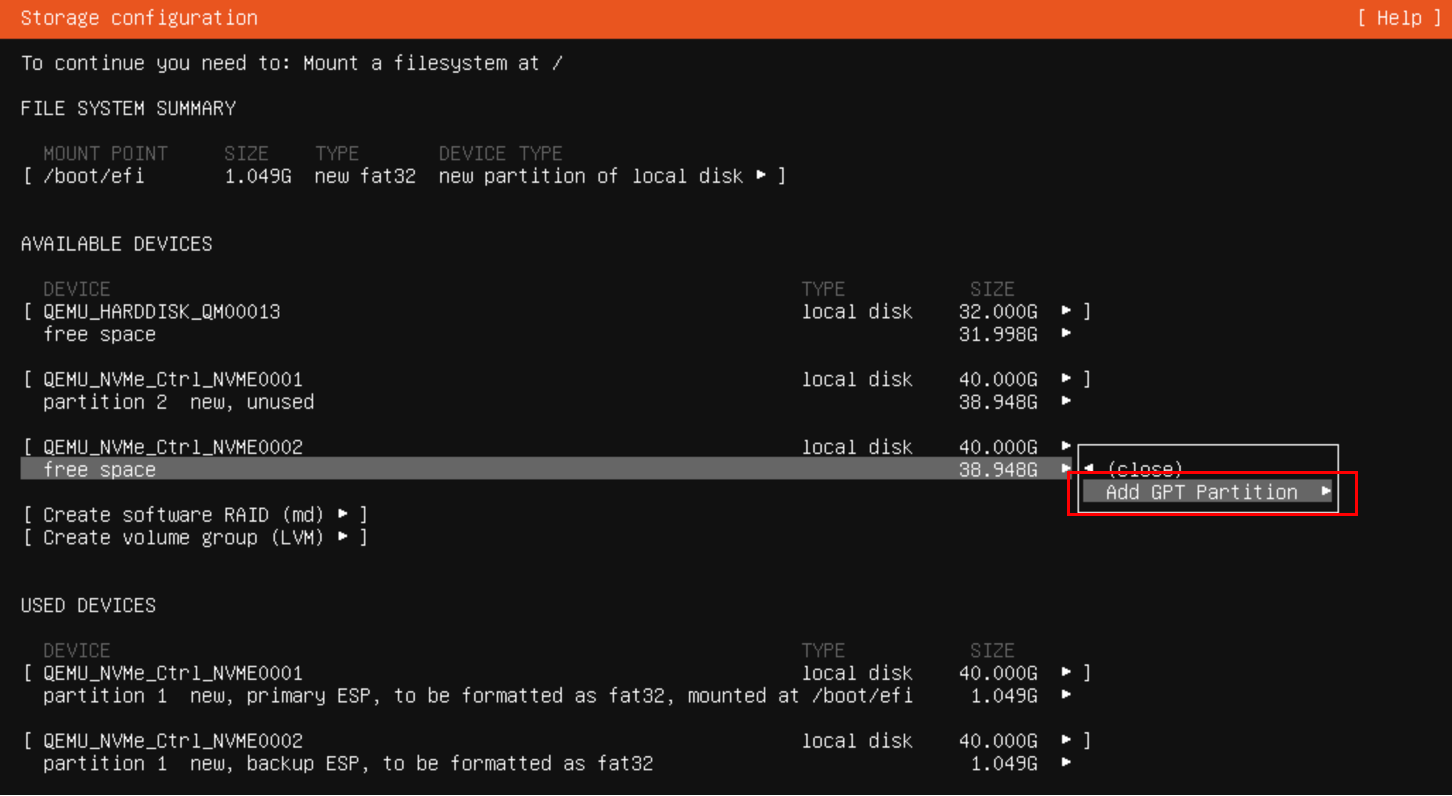
Ubuntu Select Second Boot Drive
C. Select another drive for OS bootable RAID.
Ubuntu Second Drive Unformatted Partition
D. Leave the drive also unformatted.
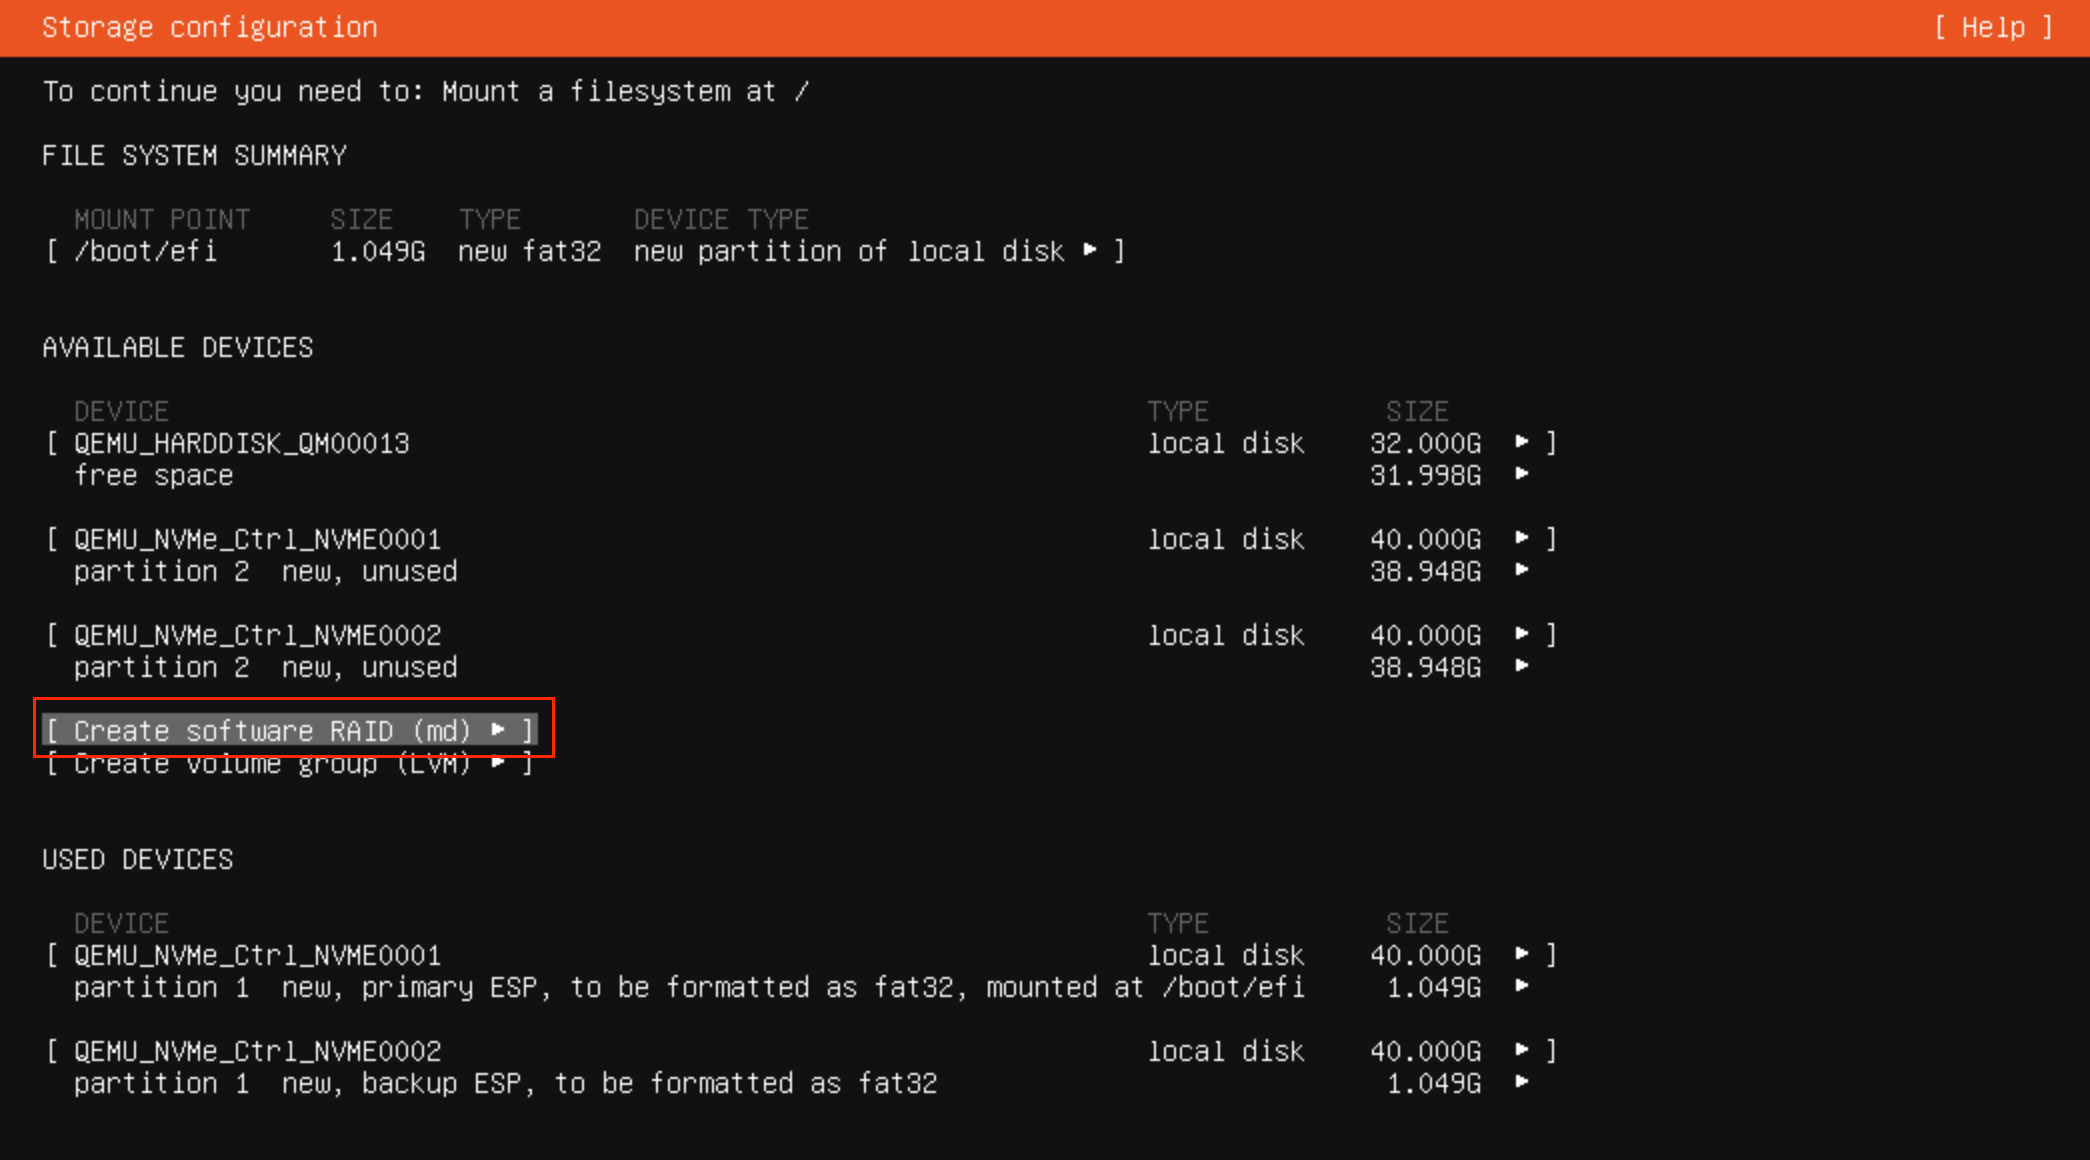
Ubuntu Create Software RAID MD Menu
Note
You must use [Leave unformatted]. DO NOT mount the partition. Setting RAID1 and mounting partitions on multiple drives (MD) occurs later in this procedure.
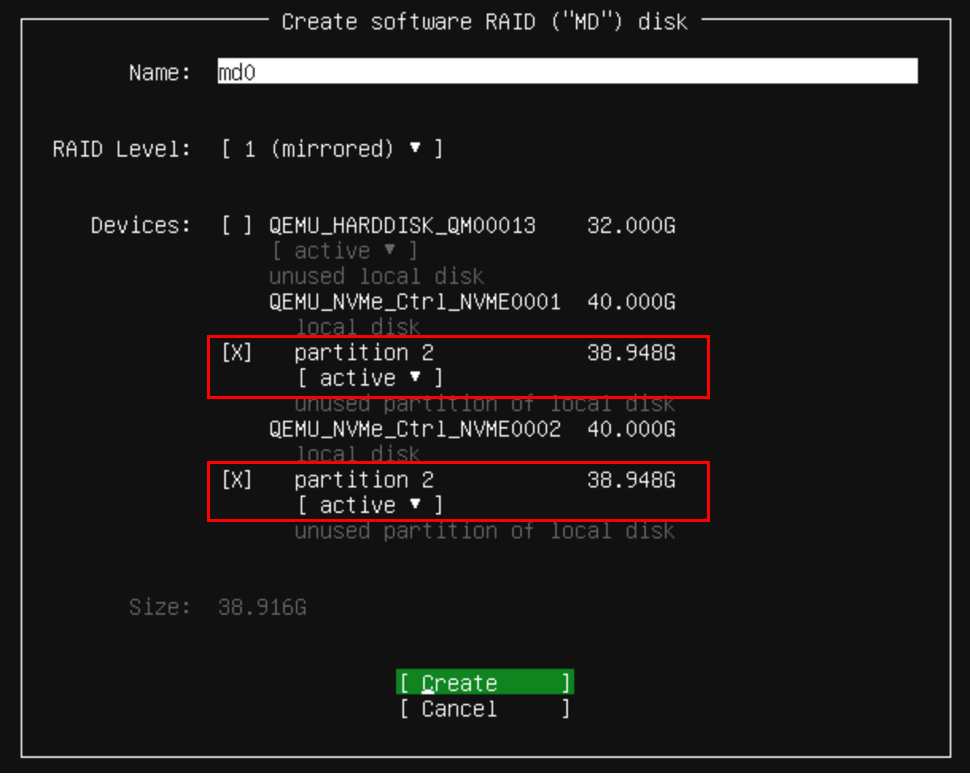
Creating a Software RAID for Multiple Devices (MD) To create the software RAID on multiple devices, from the Storage configuration page, select Create software RAID (md).
Step 1 Select Create Software RAID (md) for the previously configured disks.
Ubuntu Select Partitions For Software RAID
Step 2 Select the configured partitions on both disks, then create the Software RAID (md).
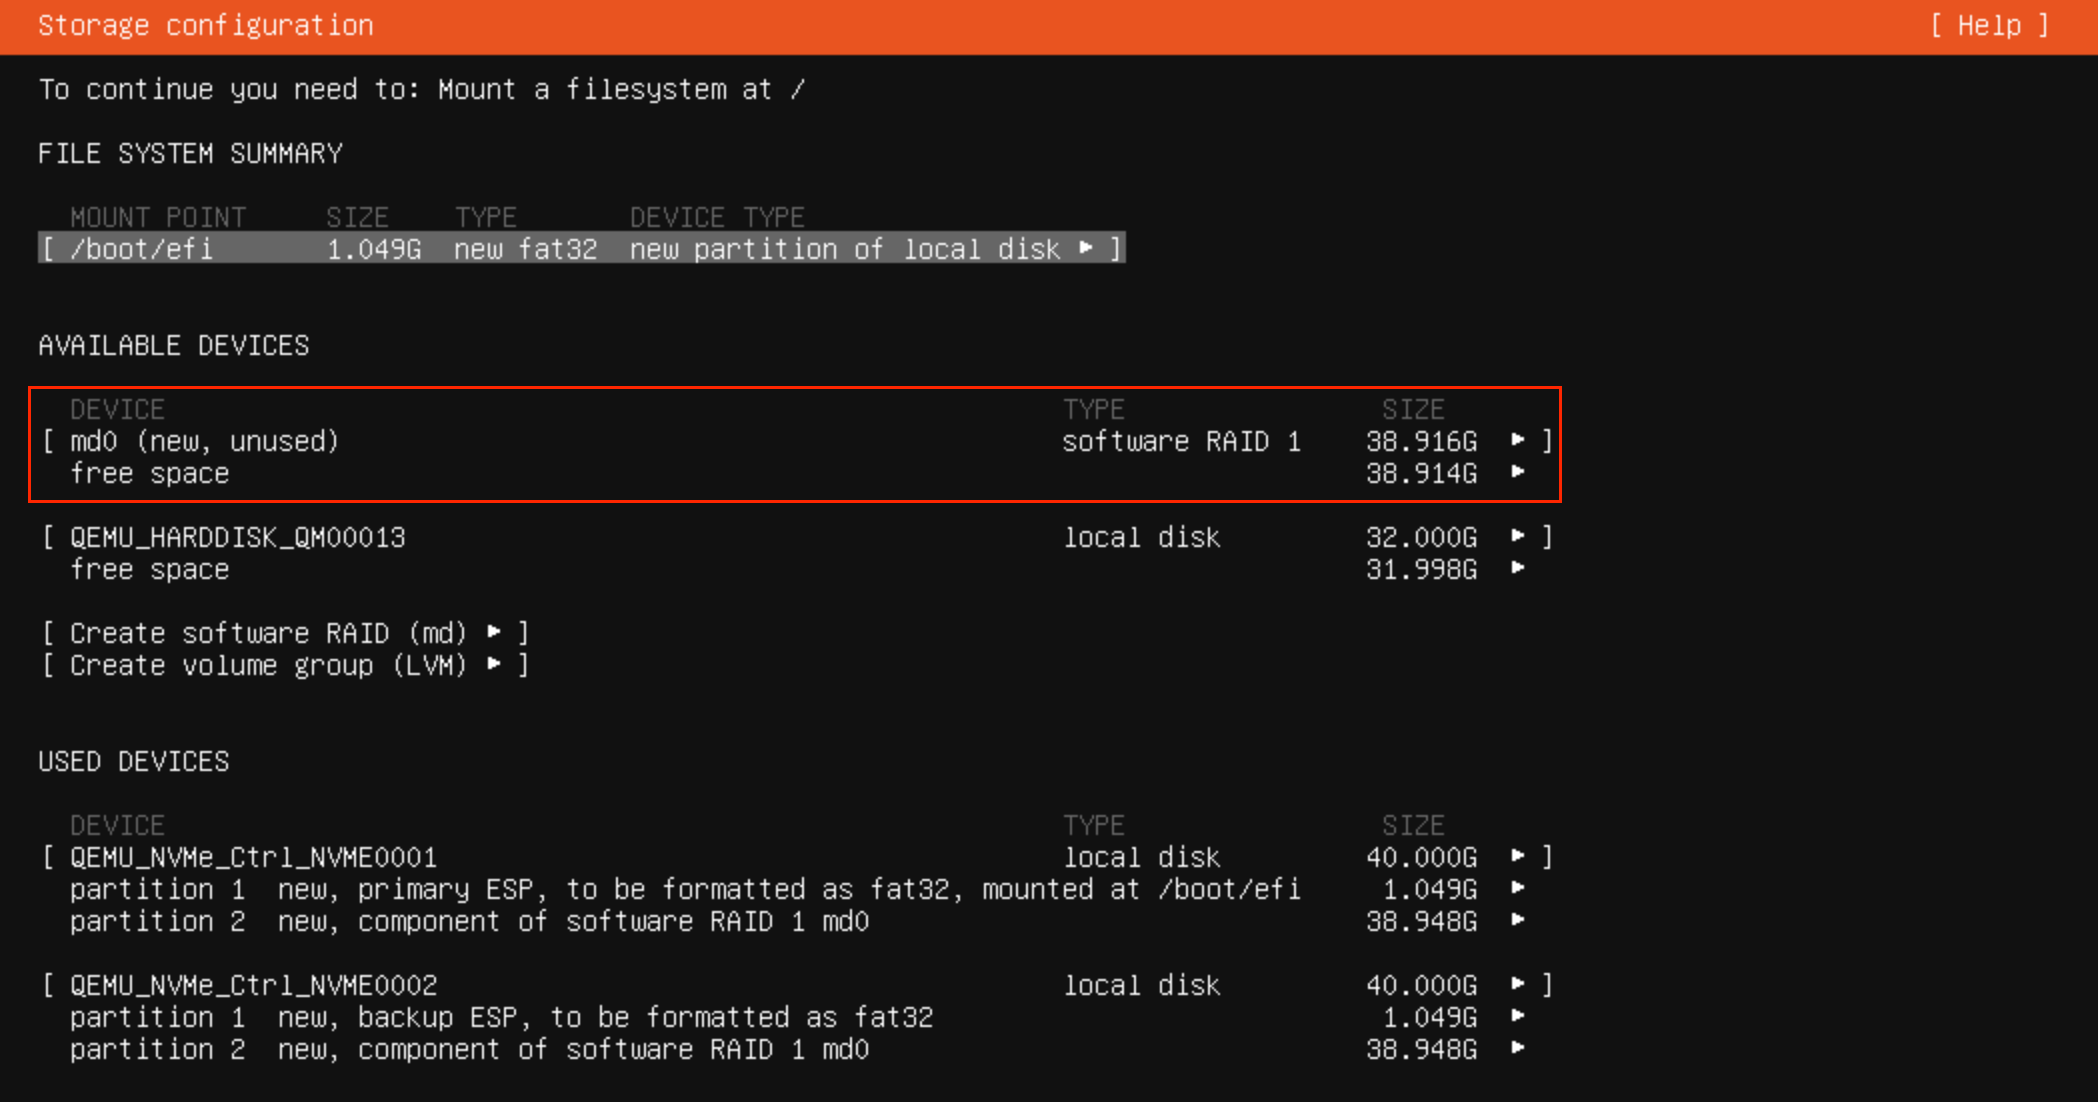
Ubuntu Software RAID CreatedUbuntu MD Free Space Add GPT Partition
Configuring the Boot Partition for MD
The following procedure describes how to configure the /boot, swap, and root partitions on both disks to set MD as the mounting point:
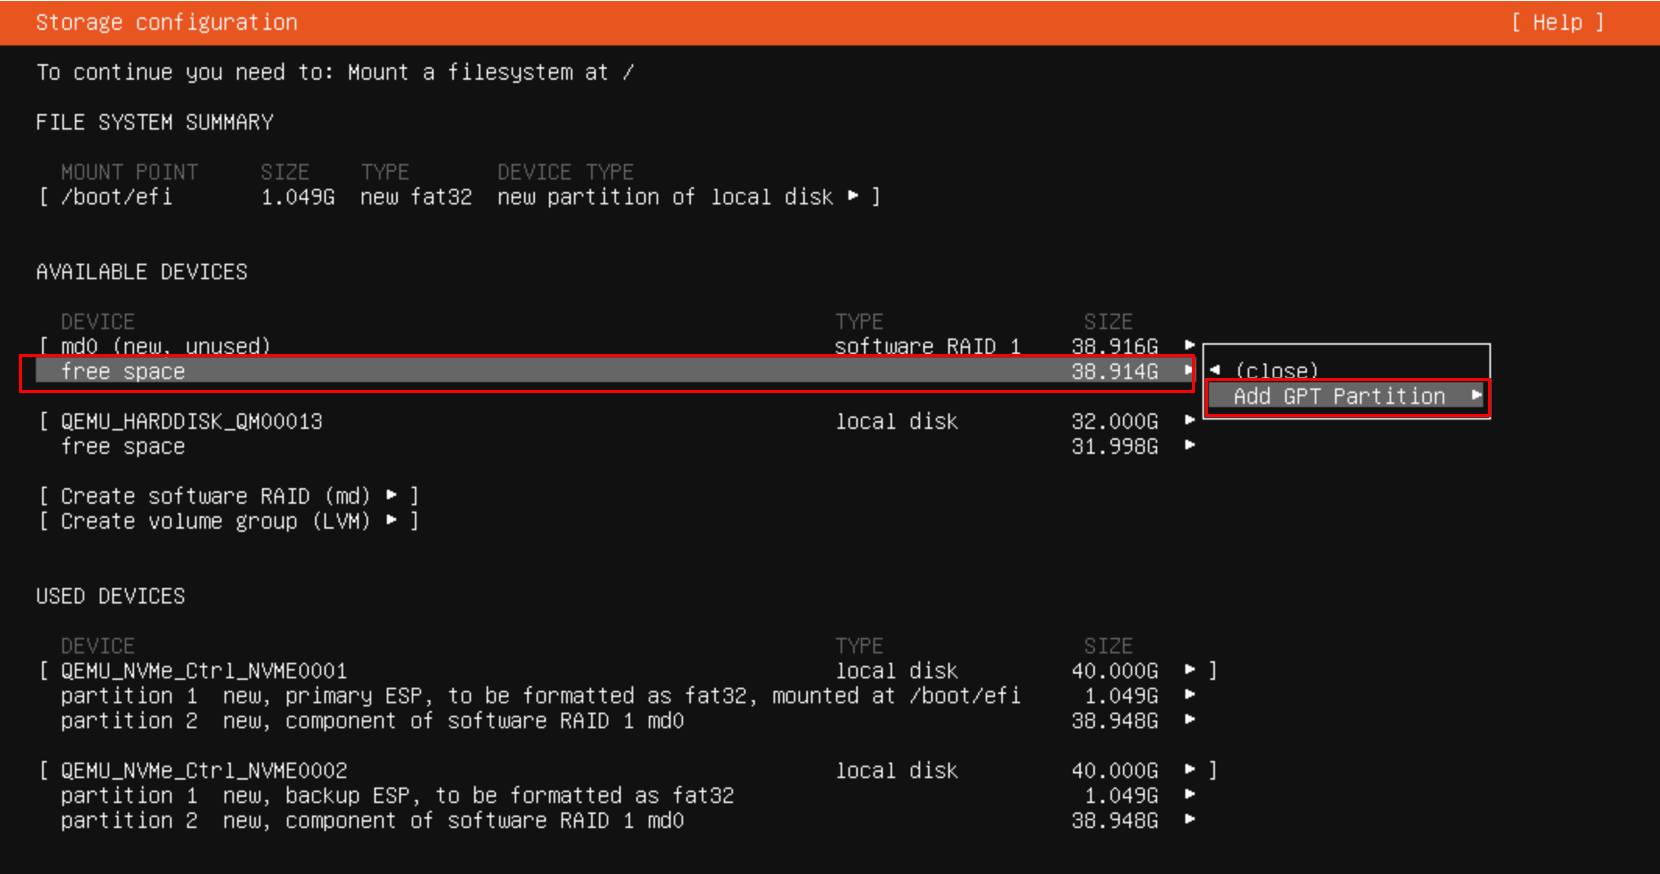
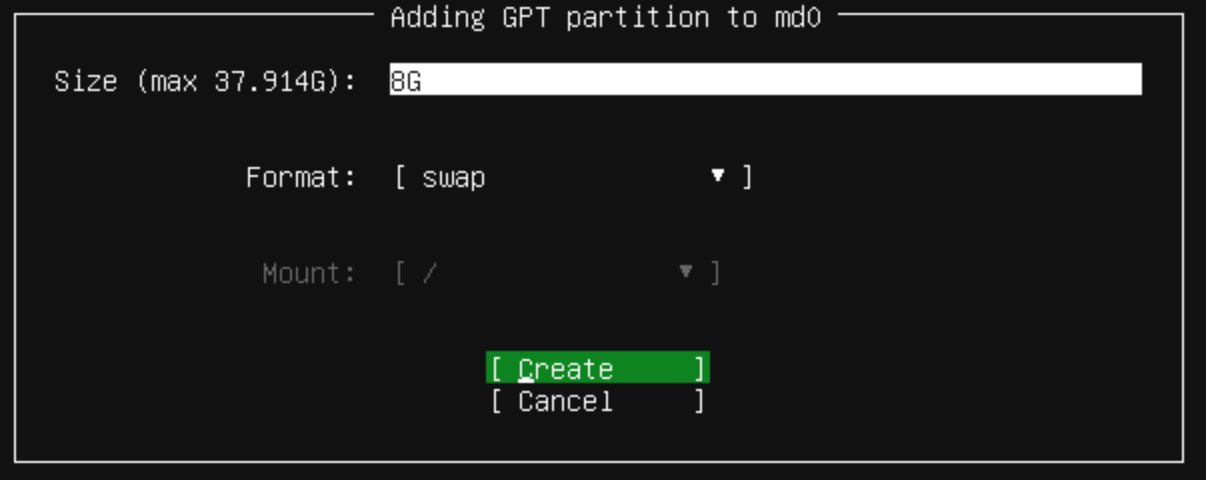
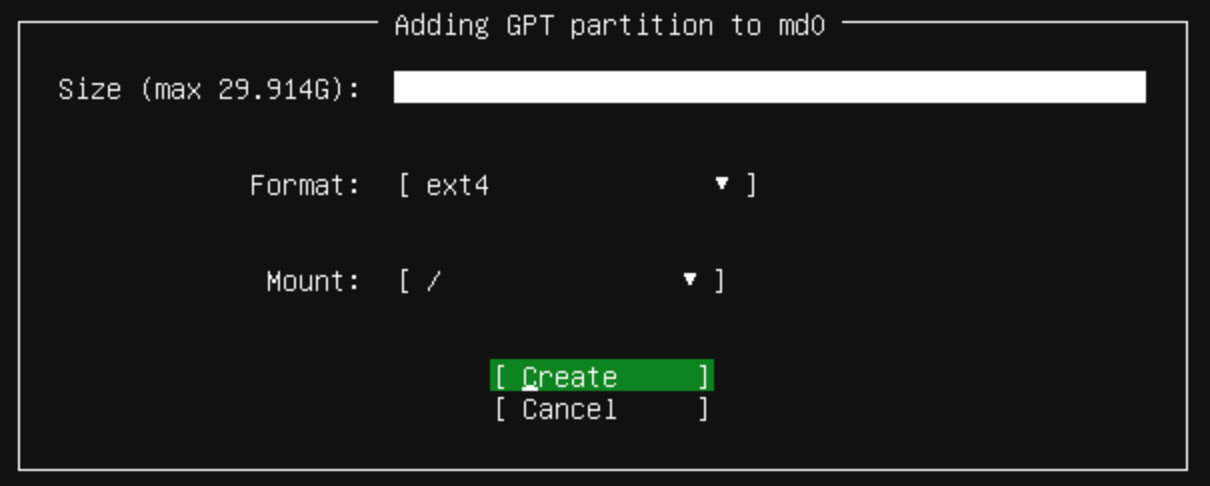
Step 1 Select the free space option in the md, then Choose Add GPT Partition.
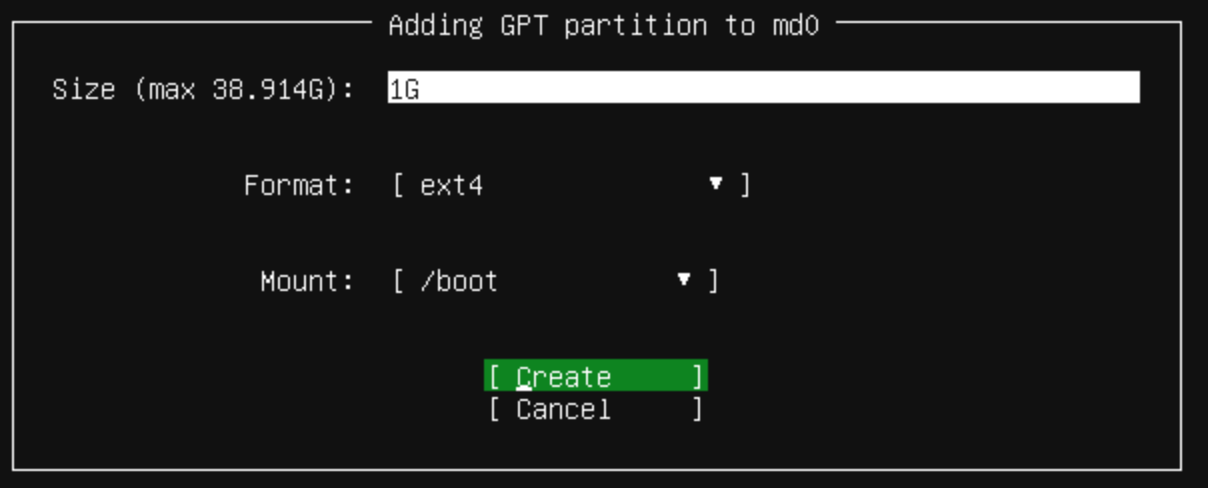
Ubuntu MD EFI Partition Size
Step 2 Set the size of the EFI System Partition (ESP). Allocate sufficient capacity for each partition based on anticipated usage.
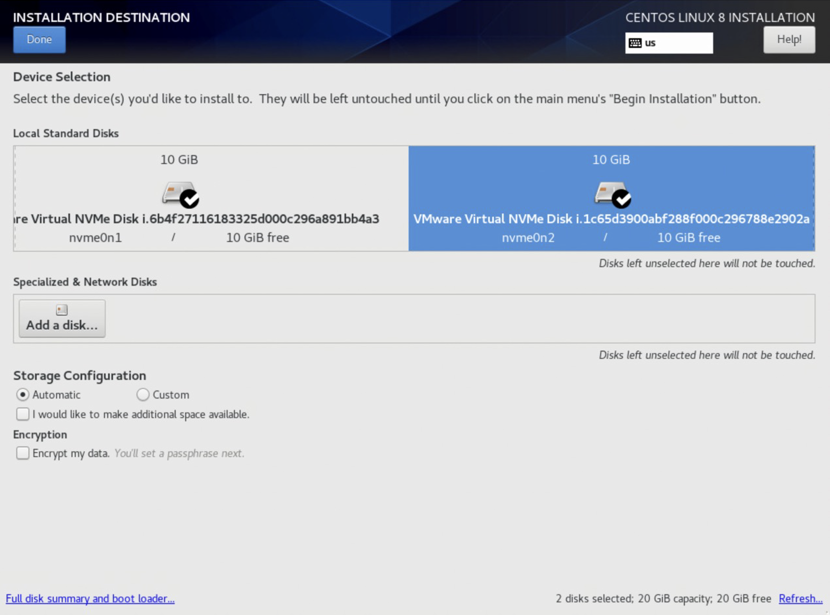
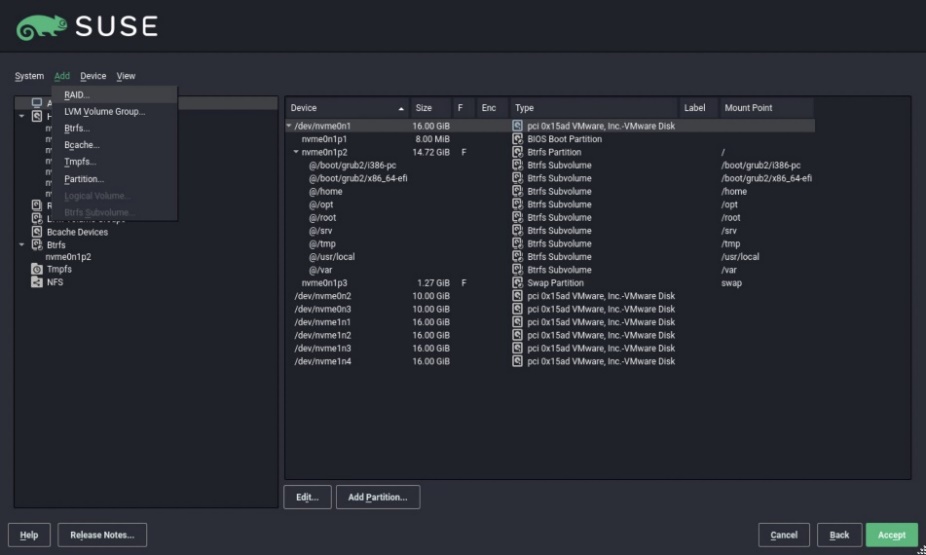
When installing SLES 15 SP2 or SP3, you must manually create RAID1 and configure the partitions. To manually create RAID1 and configure the partitions:
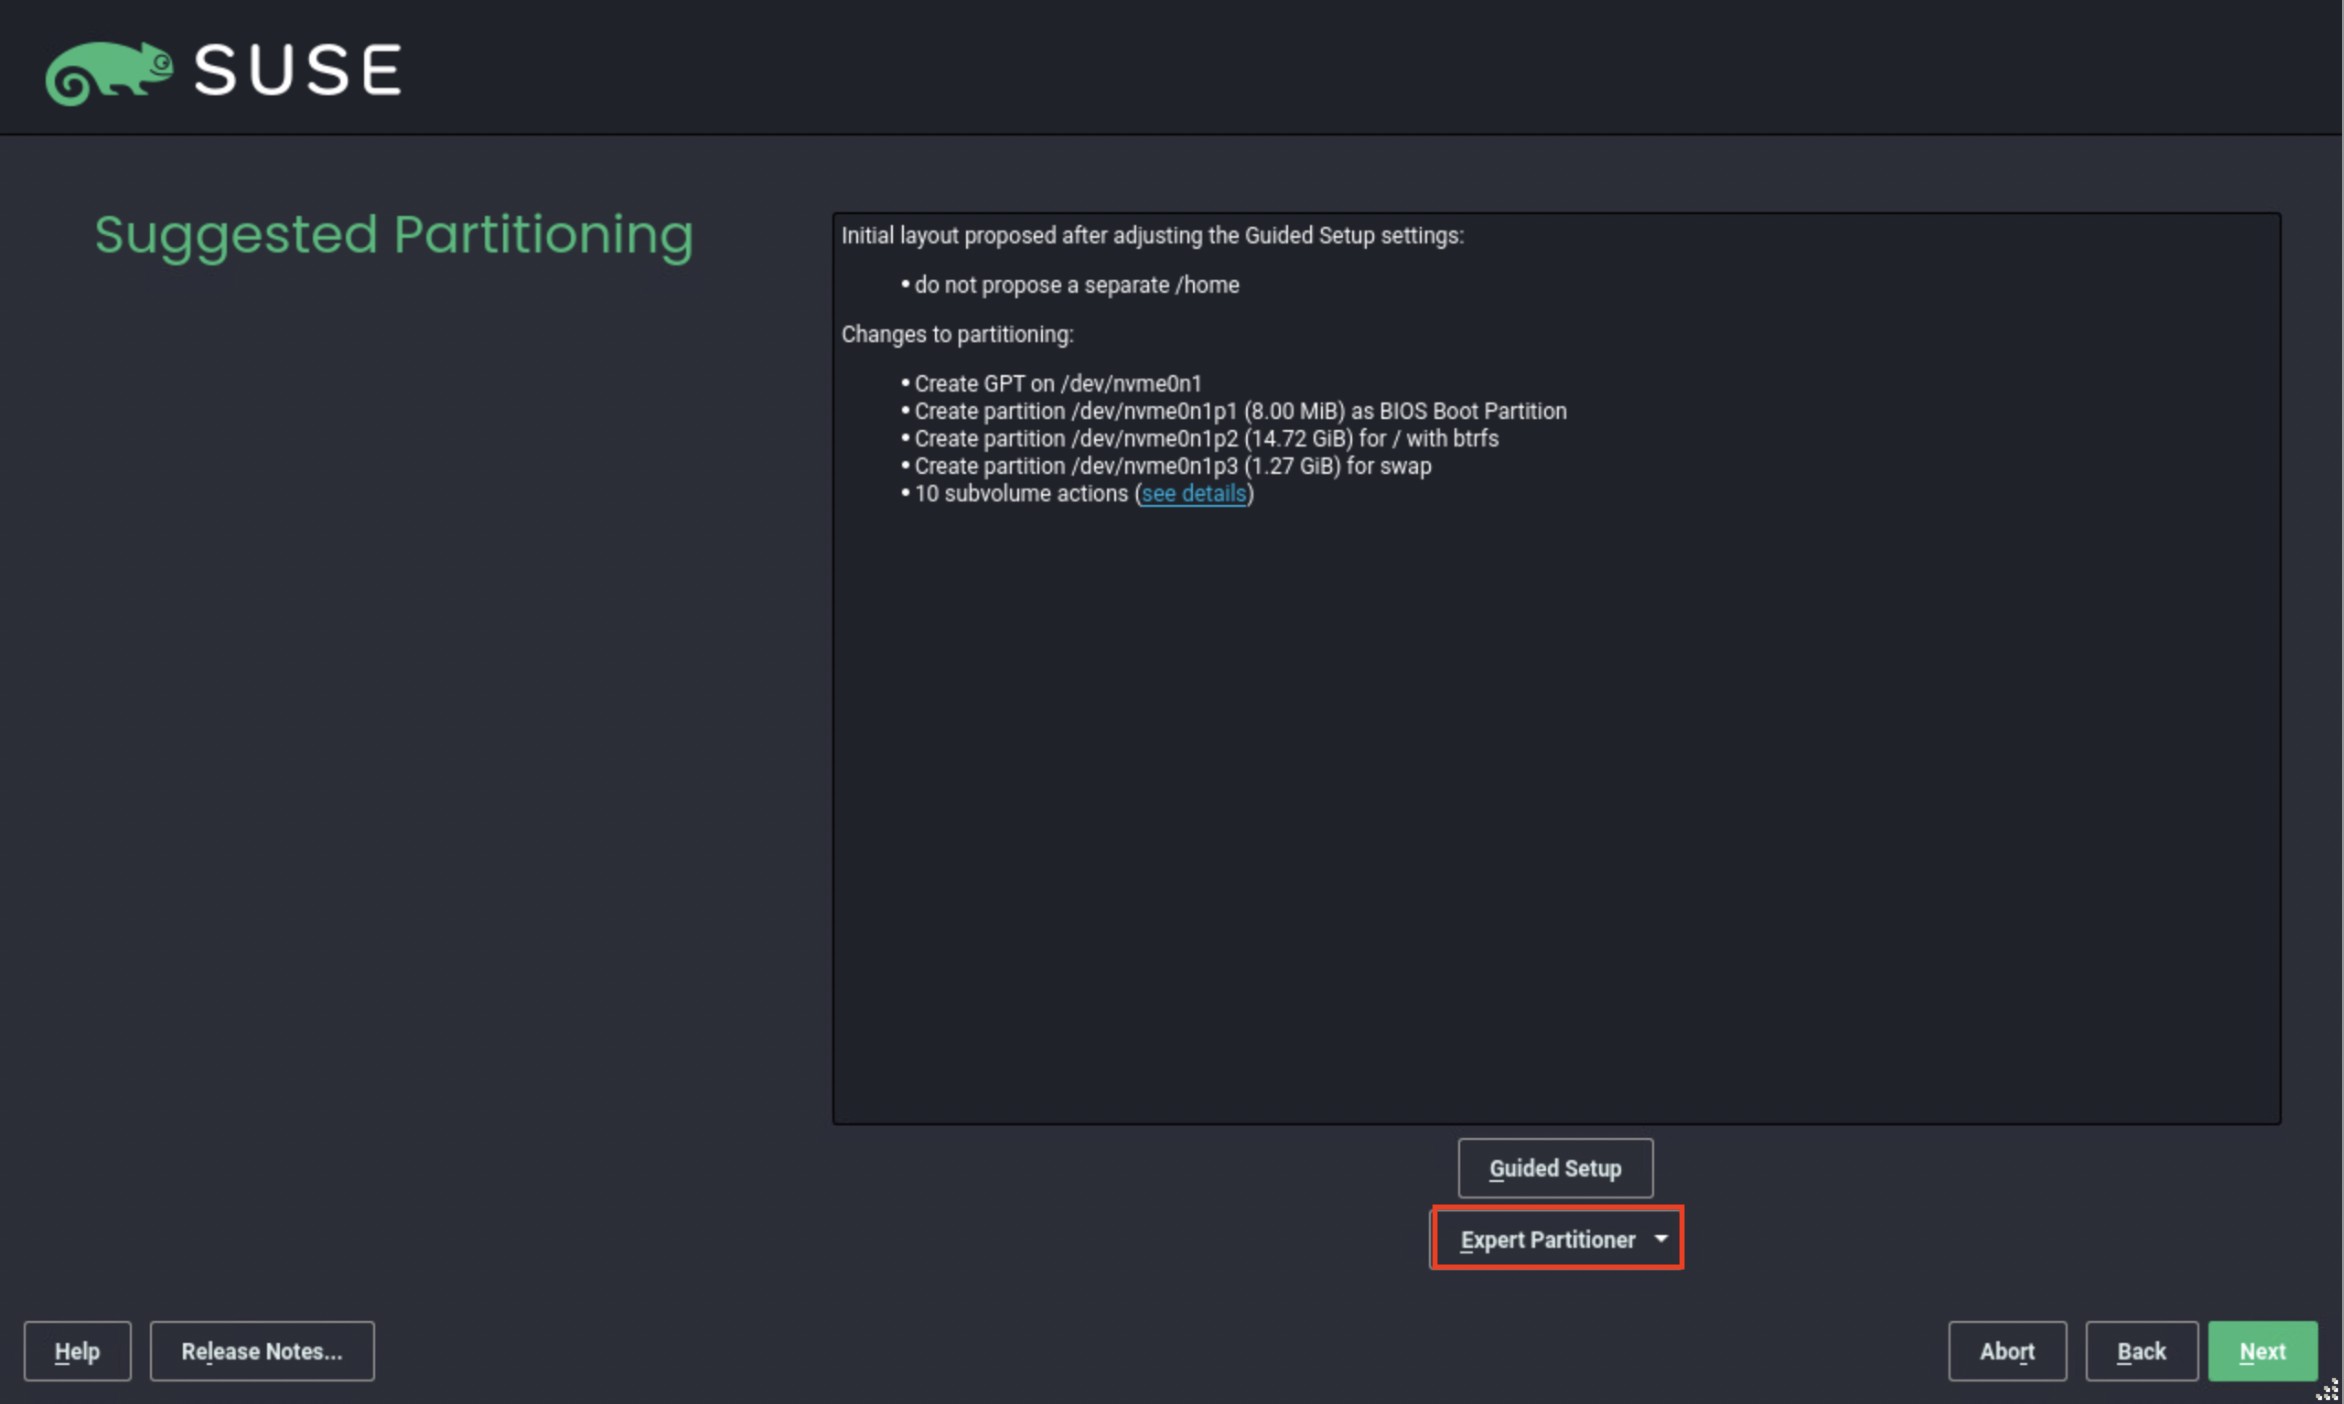
Step 1 From the SUSE Suggested Partitioning page, select Expert Partitioner > Next.
SLES Expert Partitioner
Step 2 From the SUSE Add menu, select Add > RAID.
SLES Add RAID Menu
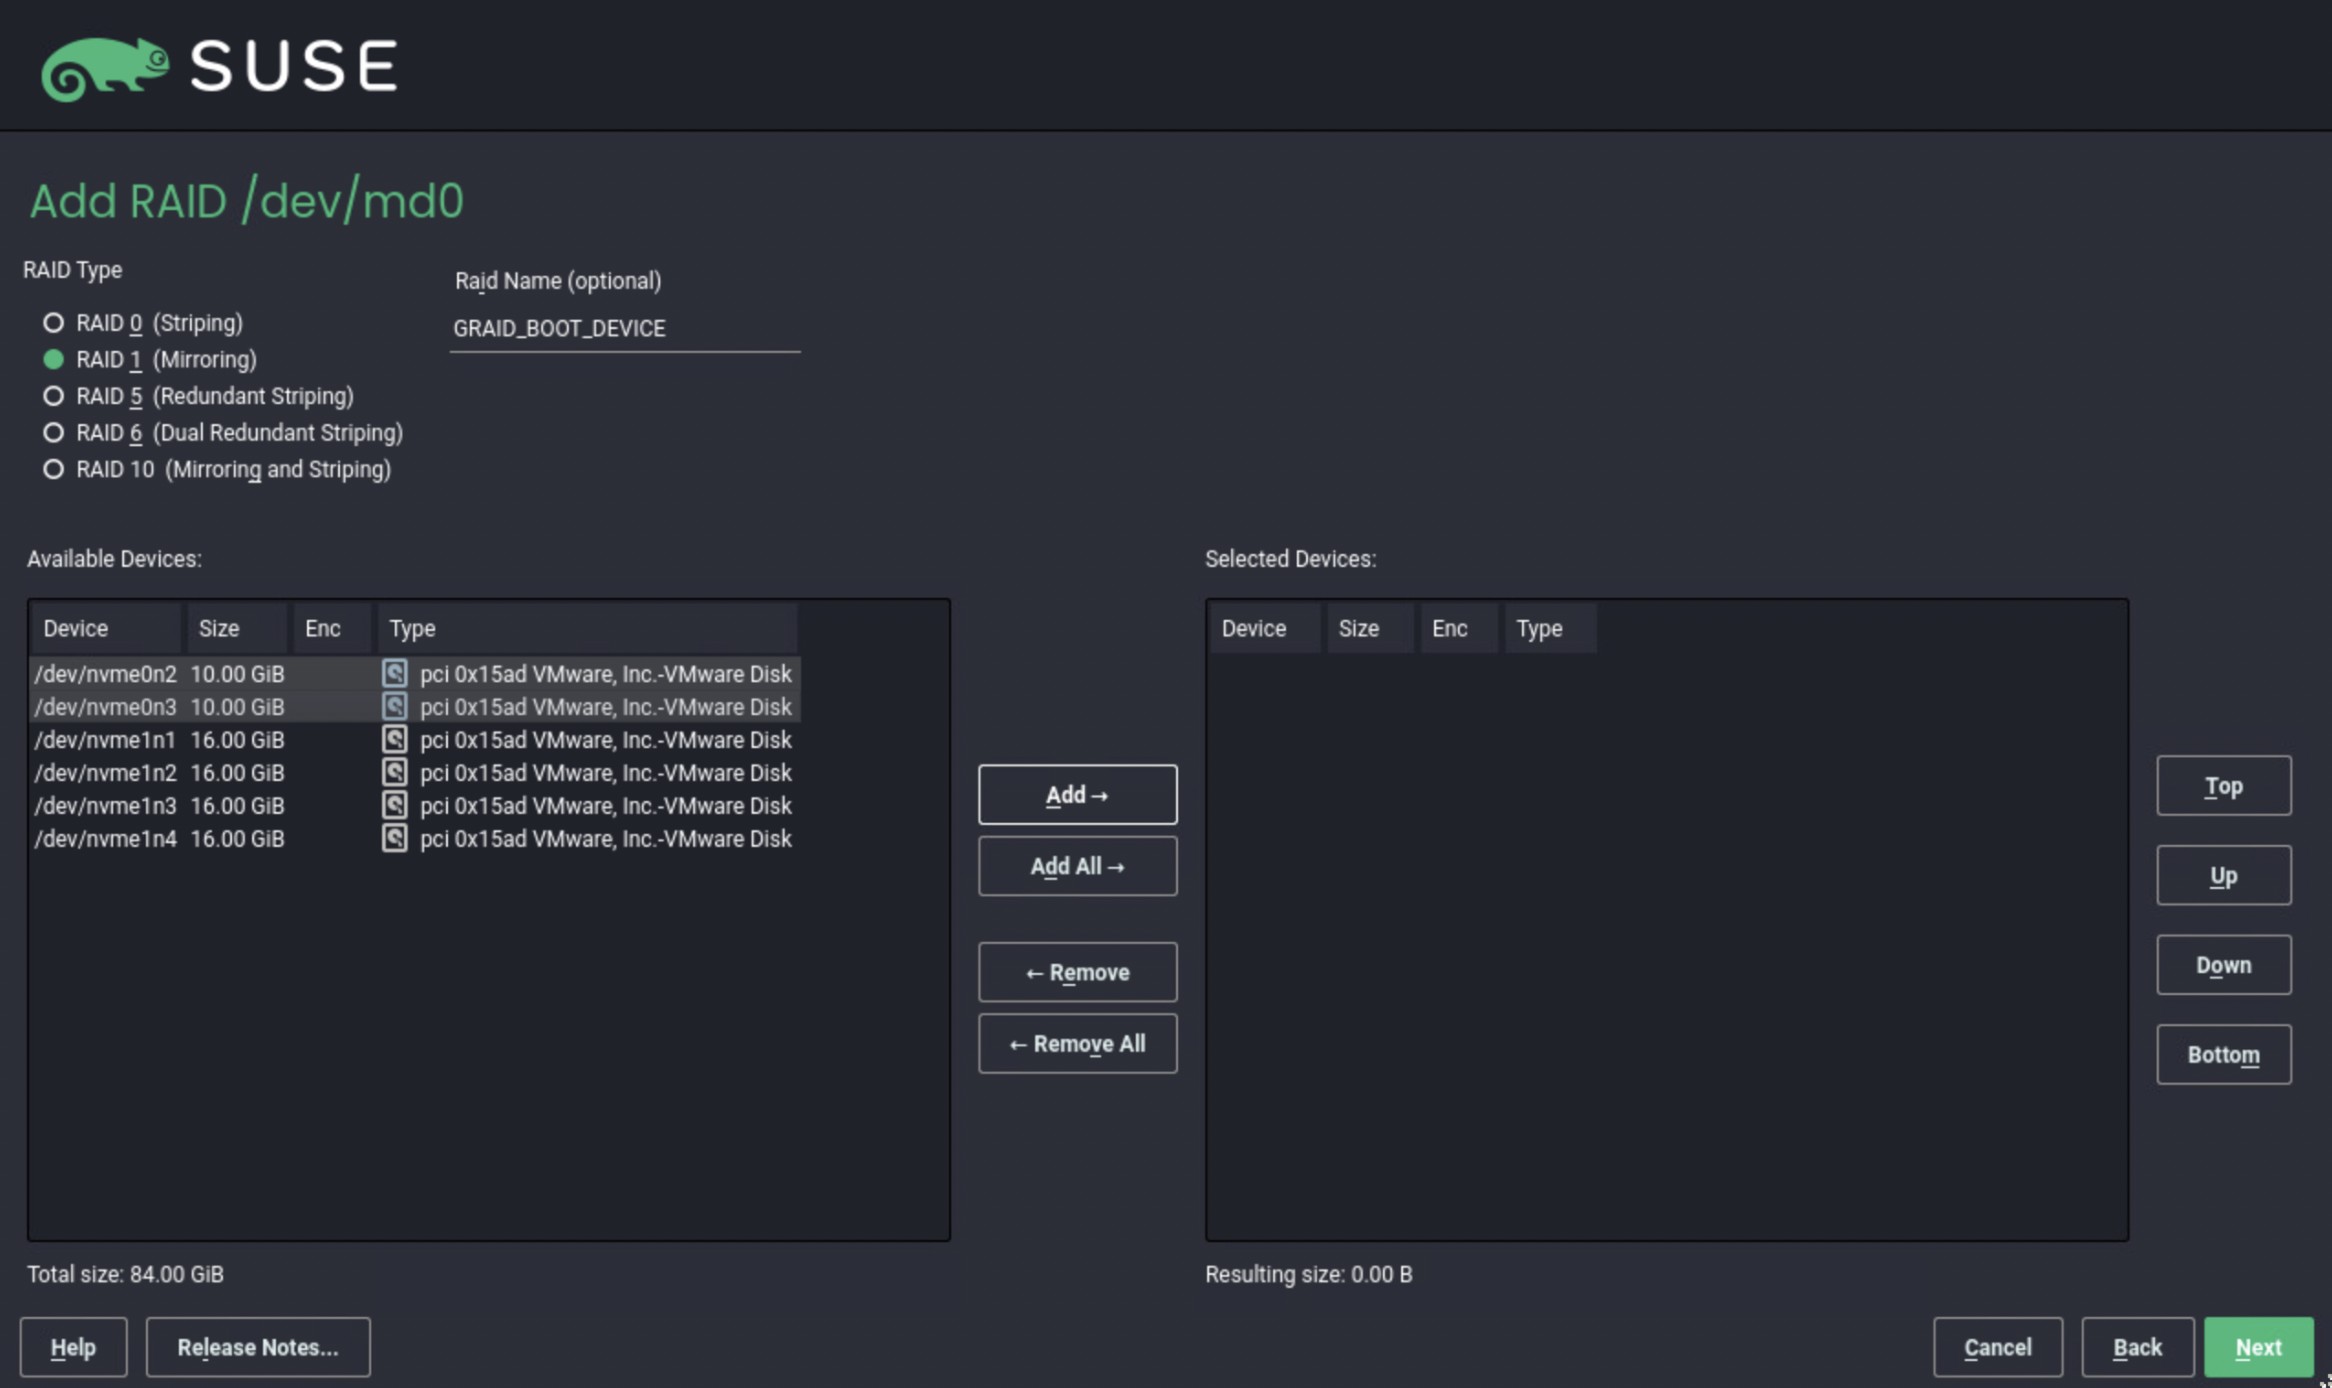
Step 3 From the SUSE Add RAID page, select RAID 1 (Mirroring) for the RAID Type.
SLES Add RAID1 Mirroring
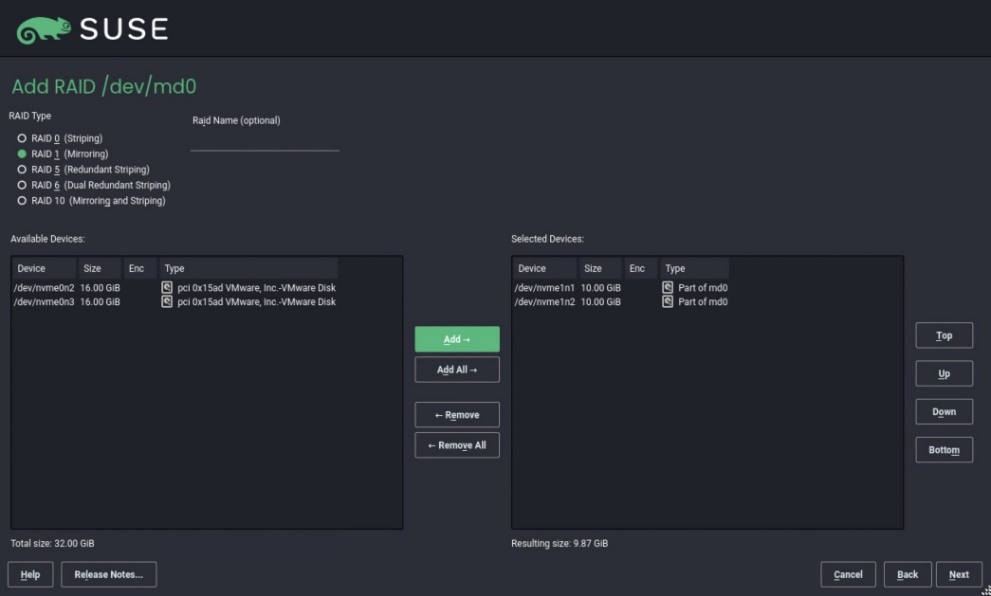
Step 4 From the Selected Devices list, select two NVMe disks and click Add.
SLES Select NVMe Disks For RAID
Step 5 Click Next to continue with the installation.
To restore a RAID configuration from a backup configuration file:
Step 1 Periodically back up the configuration file /etc/graid.conf from the original host. Use cp or scp to move the configuration file to another system.
Step 2 Set up the target host and ensure that the SupremeRAID™ service is stopped.
Note
If the target host already contains an installed and running SupremeRAID™ card, stop the service and copy the graid.conf file from the original system. On the original system, stop any running applications or unmount the mountpoint before starting the SupremeRAID™ service.
Step 3 Move all the SSDs from the original host to the new host.
Step 4 Install the SupremeRAID™ driver on the new server. Stop the SupremeRAID™ service before copying the configuration backup file to the new host using the same path (/etc/graid.conf). If you have already enabled the graphical management console, please ensure to disable it as well.
The SupremeRAID™ system provides robust support for restoring RAID configurations from SSD metadata. This feature allows you to recover a RAID configuration quickly and easily in case of a failure or other issues. Perform the following procedure to restore the RAID configuration and get the SupremeRAID™ system back online.
To restore a RAID configuration from an SSD’s metadata:
Step 1 Set up the target host and make sure that the SupremeRAID™ service is stopped.
Note
If the target host already contains an installed and running SupremeRAID™ card, stop the service the SupremeRAID™ service before restoring the configuration. On the original system, stop any running applications or unmount the mountpoint before starting the SupremeRAID™ service.
Step 2 Move all the SSDs from the original host to the new host.
Step 3 Install the SupremeRAID™ driver on the new server and stop the SupremeRAID™ service before restoring the configuration file. If you have already enabled the graphical management console, please ensure to disable it as well.
If the SupremeRAID™ service does not start properly after upgrading the kernel, reinstall the SupremeRAID™ pre-installer and the installer to ensure that they are configured properly for the new kernel environment.
To reinstall the SupremeRAID™ pre-installer and installer on new kernel, follow these steps:
Step 1 Go to the Graid Technology website to download the latest version of the pre-installer and make it executable, please download the package in Drivers & Documentation.
$ sudochmod +x [package-file]
Kernel Upgrade Pre Installer Download
Step 2 Open a terminal window and log in to the system as a user with root privileges.
Step 3 Use the cd command to navigate to the directory where the downloaded installer files are located.
Step 4 Run the graid-sr-pre-installer and follow the on-screen instructions to complete the pre-installation process.
Step 5 Run the graid-sr-installer and follow the on-screen instructions to complete the installation process.
Step 6 After installing the SupremeRAID™ pre-installer and installer, restart the SupremeRAID™ service and verify it is running correctly in the new kernel environment.
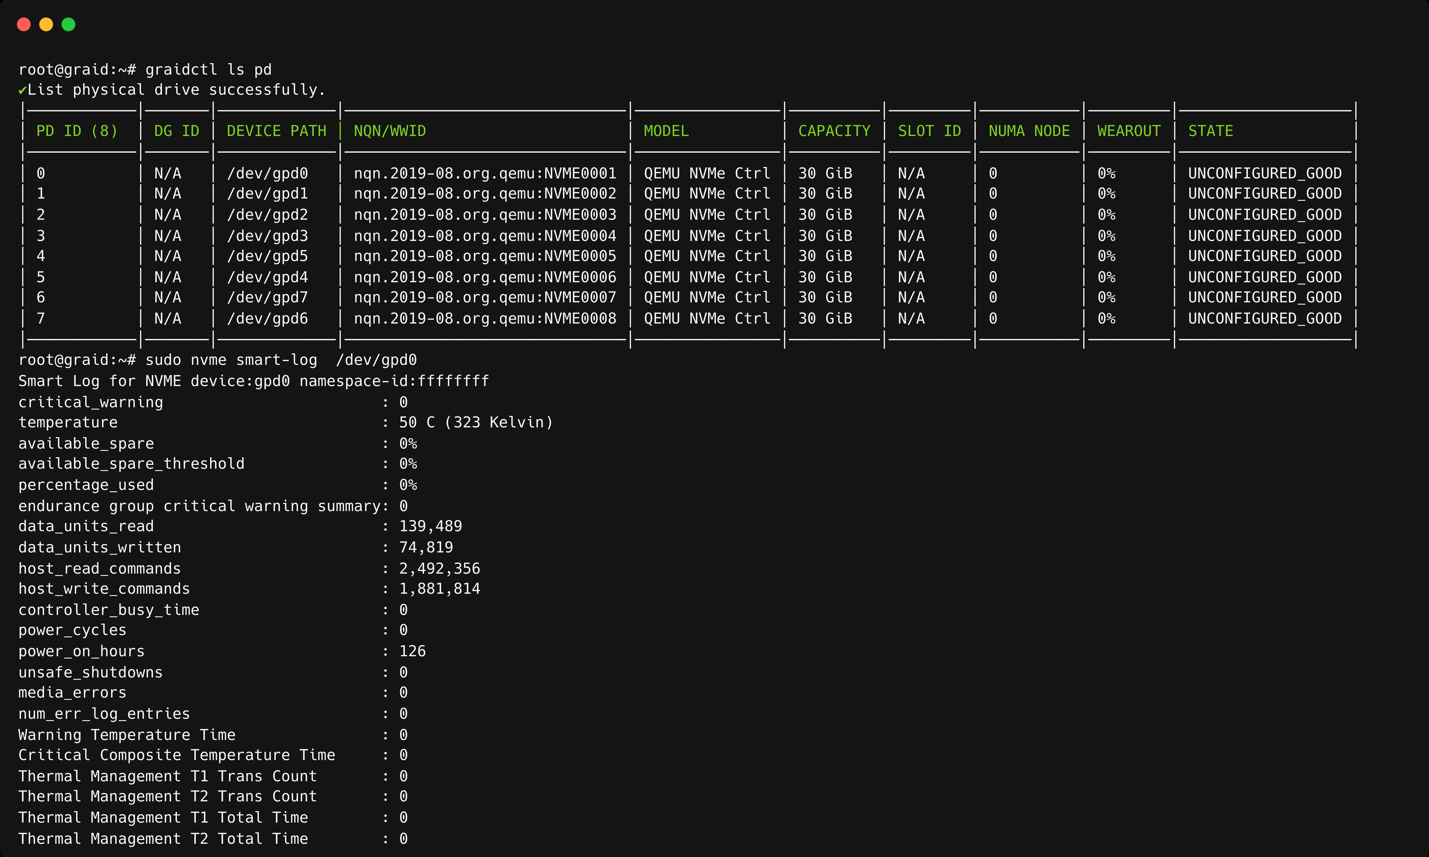
Self-Monitoring, Analysis and Reporting Technology (SMART) data is a set of metrics and parameters that SSDs collect and monitor to assess their health and performance. Although the specific information included in the SMART data varies by manufacturer and drive model, it typically reports on the temperature, available spare capacity, power-on hours, error rates, and other details that are used to monitor the health of the SSD and predict its future performance.
By monitoring the SMART data for an SSD, you can identify a potential issue or degradation of the drive before it becomes a serious problem.
To check the SMART information for the gpd device using the NVMe smart-log or smartctl command, follow these steps:
Step 1 Open a terminal window and log in to the system with administrative privileges.
Step 2 Use the list physical drives command to identify the device name for the gpd device, such as /dev/gpdx.
$ sudo graidctl list physical_drive
Step 3 Use the nvme command to display the SMART data for the gpd device:
$ sudo nvme smart-log /dev/gpd[#]
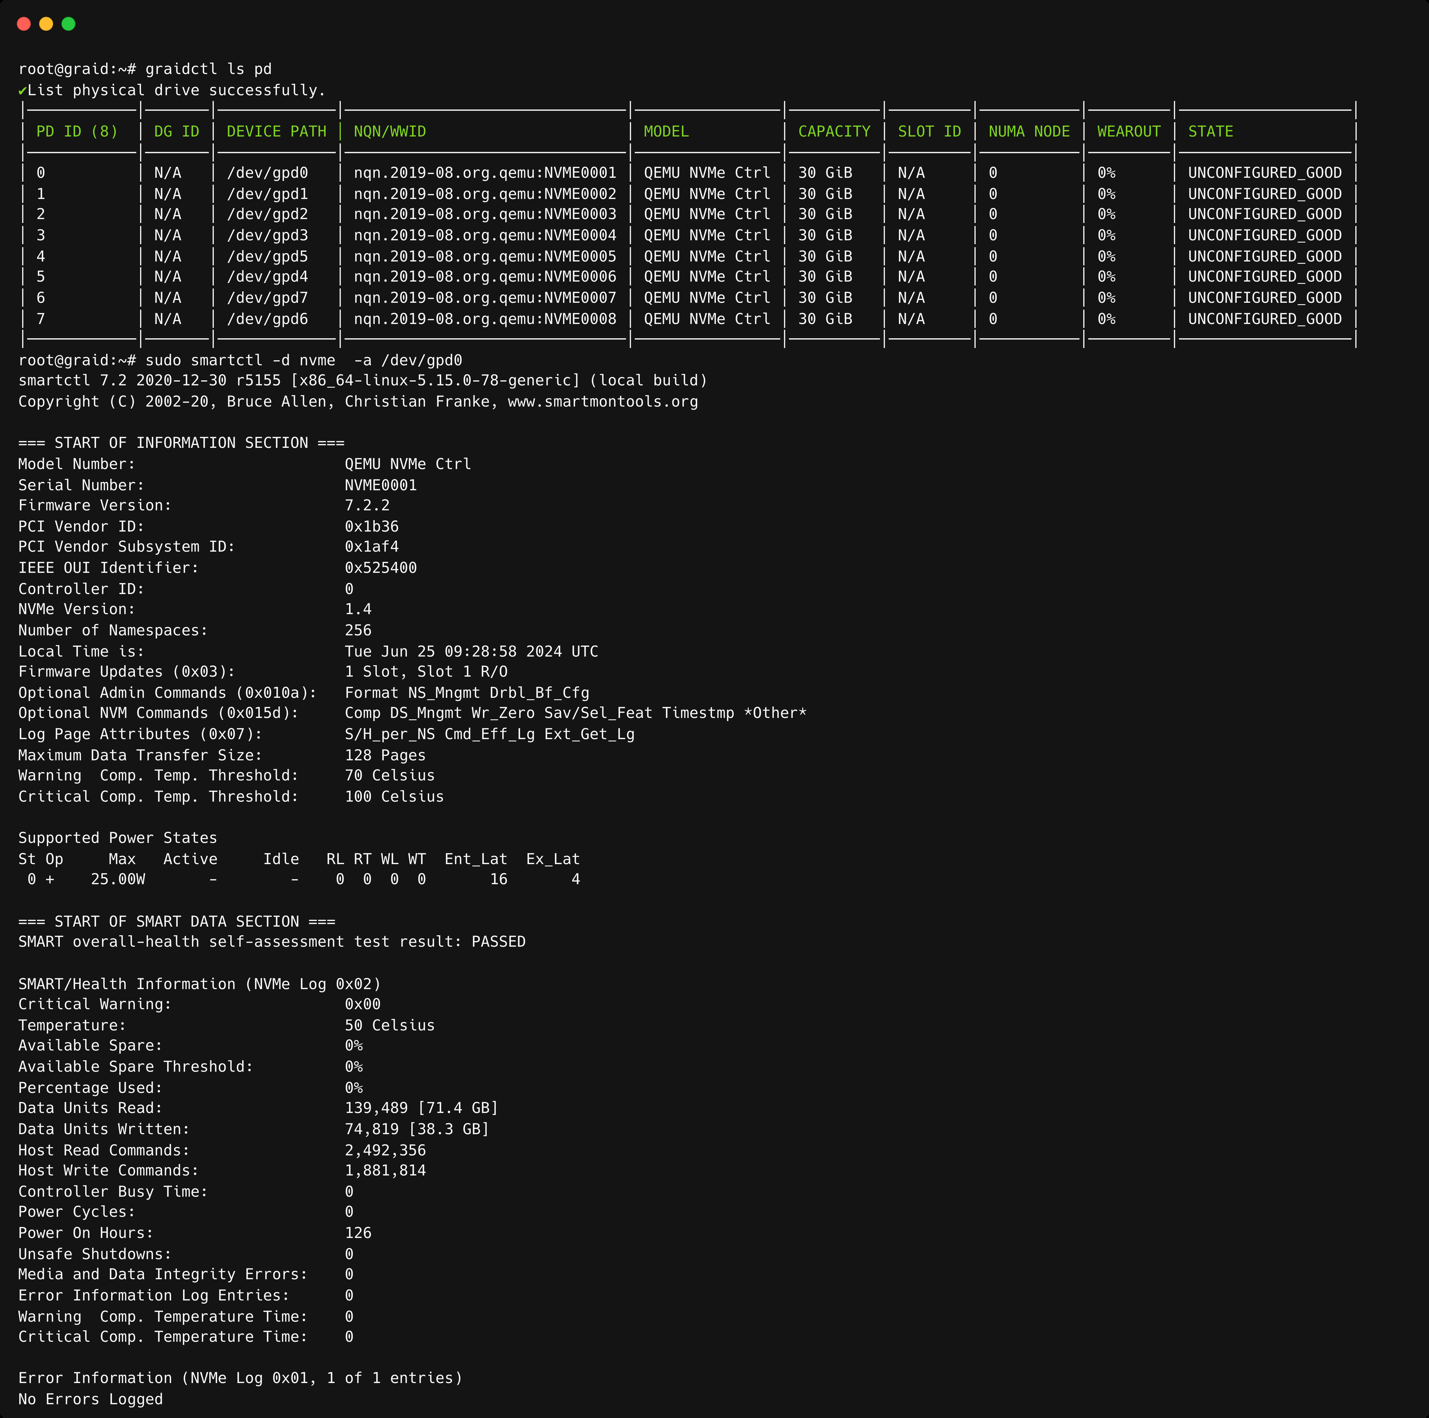
Alternatively, you can use the smartctl command to display the SMART data for the gpd device:
$ sudo smartctl -d nvme -a /dev/gpd[#]
A detailed report of the SMART data for the gpd device, including the temperature, available spare capacity, and other details, appears. Use this information to monitor the health and performance of the device and to diagnose any potential issues.
Note
The specific steps and commands used to display SMART data may vary, depending on your system and the version of the nvme or smartctl command in use. Be sure to use the correct device name for the gpd device in the command.
The following figure shows an output example using nvme smart-log.
NVMe SMART Log Output
The following figure shows an output example using smartctl.
The sysstat package contains the tools most commonly used to monitor I/O statistics in Linux systems. The sysstat package includes the iostat tool, which monitors system I/O device loading by observing the time the devices are active relative to their average transfer rates. The iostat command generates reports that allow you to fine-tune the system configuration to better balance the I/O load between physical disks.
For example, to monitor specific devices and display statistics in megabytes per second (Mbps), issue the following command:
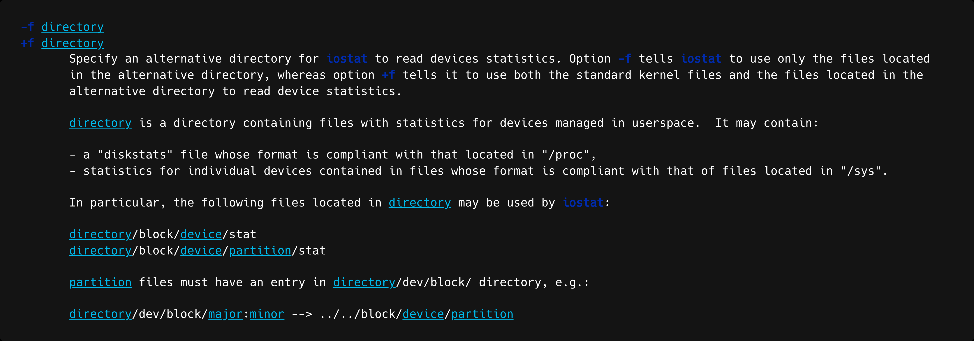
For sysstat versions v12.3.3 and later, the iostat tool includes an alternative directory feature that allows you to specify the directory from which to read device statistics.
Add a +f parameter to the tool and use the /sys/devices/virtual/graid/graid sysfs device path to read device statistics from both the standard kernel files and the files in the alternative directory.
The following figure shows an alternative directory description from the iostat manual page.
iostat Alternative Directory Manual
To check the iostat version, issue the following command:
$ iostat -V
The following figure shows an output example.
The gpd# statistics are not displayed in the iostat report without appending the +f parameter and defining the sysfs path.
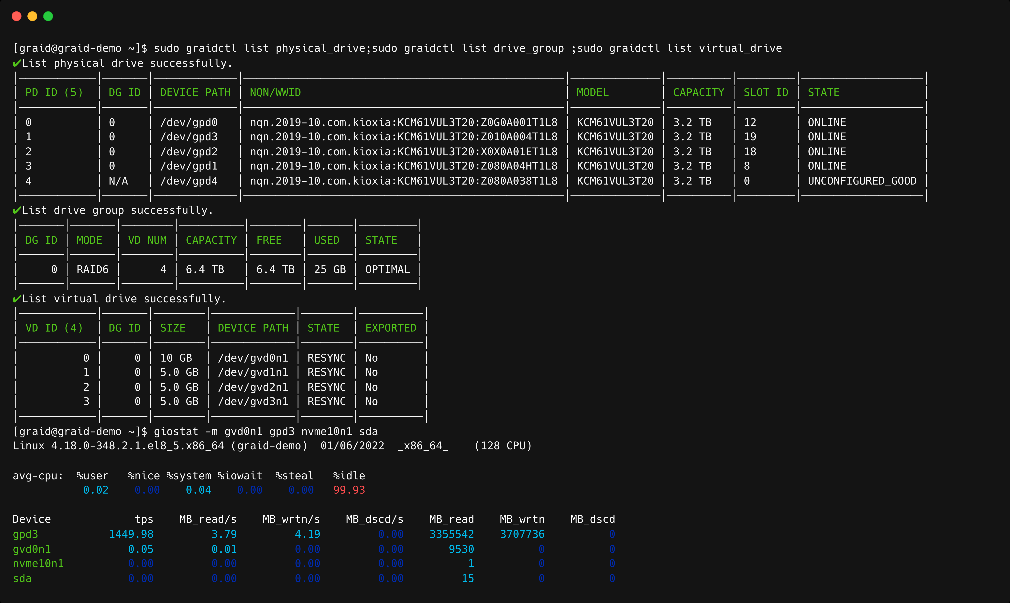
For operating systems with sysstat versions prior to v12.3.3 (for example, CentOS), Graid Technology provides an alternate tool called giostat to display device statistics.
In the following example, the operating system version of iostat is prior to v12.3.3.
$ sudo yum list --installed\|grep sysstat
The following figure shows an output example.
The giostat and iostat tools are very similar and their usage is the same. Set the parameter preferences using giostat. The following figure shows an output example.
You can create virtual machines with SupremeRAID™ support to maximize performance.
The following procedure describes how to set a single VM with SupremeRAID™. This setup is for use only within a single virtual machine and cannot be shared from the volume back to ESXi to a datastore for other virtual machines.
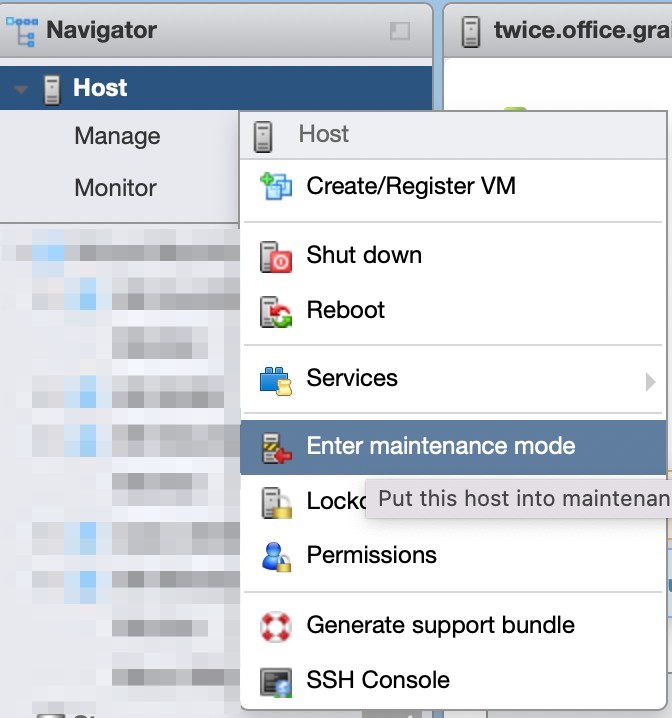
From the Navigator menu, select Host > Enter maintenance mode.
ESXi Enter Maintenance Mode
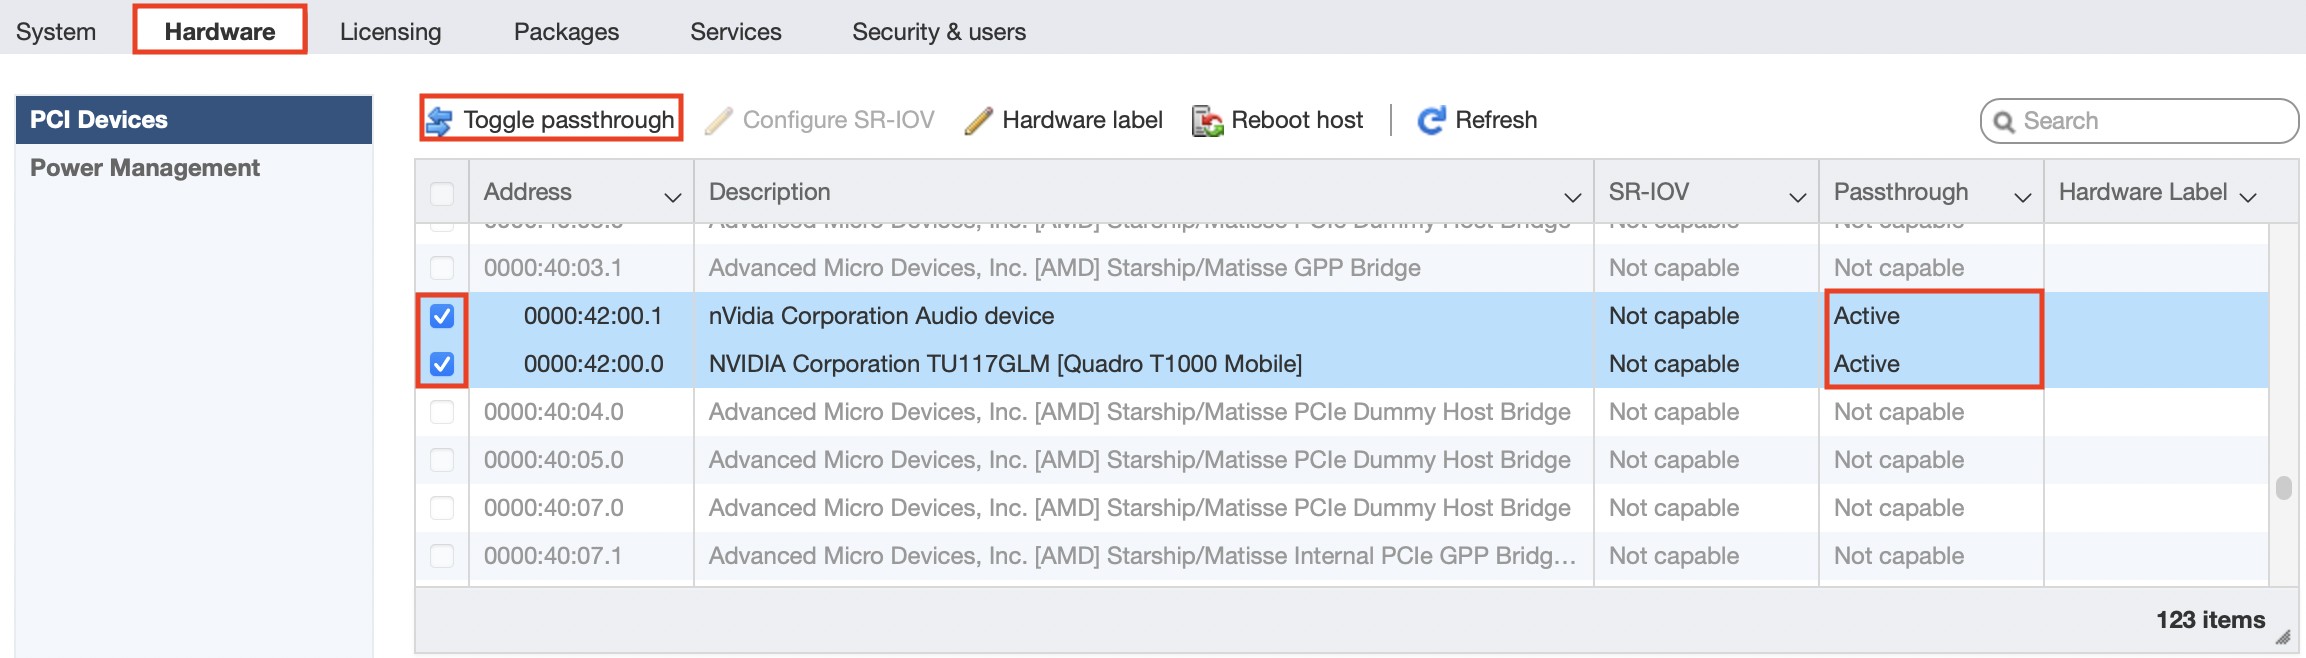
Managing PCI Device Passthrough
Step 1 From the Navigator menu, select Manage > Hardware > PCI Devices. The Passthrough Configuration page appears, listing all available passthrough devices.
Step 2 Select the NVIDIA T1000 (Quadro T1000 Mobile) and its Audio device.
Step 3 Click Toggle passthrough.
Step 4 Confirm that the Passthrough status is Active.
ESXi Pci Passthrough Active
Note
If you move the SupremeRAID™ card to a different hardware slot or plan to do so, you MUST cancel its passthrough before shutting down the ESXi server. After the hardware change, you MUST set up the passthrough again; otherwise, the virtual machine will not recognize the PCIe device properly.
Self-Encrypting Drives (SEDs) provide hardware-based full-disk encryption, ensuring data security by automatically encrypting all data written to the drive and decrypting data read from it. SupremeRAID™ supports managing SEDs, including setting encryption keys, taking ownership of drives, and securely erasing data. Before configuring an SED drive, follow these guidelines:
Before configuring an SED drive, follow these guidelines:
SED Key Configuration: The SED key must be configured using the graidctl tool before creating physical drives or during the creation process if the drive is not yet locked.
Supported Devices: Only NVMe devices are supported for SED configurations.
Locking Range: Only the global locking range is supported.
SupremeRAID™ allows you to import encryption keys (SED keys) to manage the SEDs. These keys are essential for unlocking drives during accessing data.
Importing a Single SED Key Using NQN/WWID
To import a single SED key for a specific drive identified by its NQN (NVMe Qualified Name) or WWID (World Wide Identifier), use the following command:
$ sudo graidctl edit config sed_key [NQN/WWID]
Importing a Batched SED Key Using NQN/WWID
To import multiple SED keys from a file, use the --input-file option:
You can create a physical drive with SED support directly from the command line using graidctl. The following options allow you to either import an existing SED key or take ownership of the SED during creation.
Importing an SED Key During PD Creation
To create a physical drive with an SED and import an existing key, use the --sed-import-key option:
To take ownership of a physical drive with SED support (if the drive is not yet locked), use the --sed-take-ownership option. The command will prompt you for confirmation, a new SED key, and credentials:
Note
This action will erase all user data on the drive.
When taking ownership, the SID and admin1 key will both be set to the same key (known as the SED key), and only this SED key will be stored in the system.
This enhancement improves how the SED unlock script handles scenarios where keys are retrieved from an external KMS (Key Management Server). It ensures that if the key is temporarily unavailable, the unlock process will not block service startup and can be retried later once the key becomes accessible.
SED Unlock Script Mechanism
Provide a user-written sed unlock script, allowing Graid to call this script to perform the sed-unlock operation when creating a physical drives.
Config file: /etc/graid/graidserver.conf
Parameter: sed_unlock_script
SED Unlock Timeout Mechanism
Although the timeout mechanism is not required for all use cases, the systemd service for Graid still enforces a 180-second timeout. To provide flexibility, a configurable timeout parameter has been added, which can be disabled if needed.
Config file: /etc/graid/graidserver.conf
Parameter: sed_unlock_script_timeout_sec
Default: 60 seconds
Disable: Set to 0
Maximum: 120 seconds (any value above this will be capped automatically)
Note
This timeout is independent of the systemd Graid service timeout (180 seconds).
Physical Drive SED Unlock Failure
When the configured SED unlock script does not return a successful status, the following message will be displayed:
PD state: Changes to OFFLINE, and sed_state is set to Locked.
DG state on service start: If a PD is OFFLINE and sed_state=Locked, the DG transitions to OFFLINE.
Other DG transitions: Follow existing logic. For example, if a user hot-removes a drive, the DG enters the DEGRADED state. When the drive is reinserted and the unlock process fails, the DG remains DEGRADED instead of transitioning to OFFLINE. Even after a service restart, the failed unlock on that PD will not prevent the DG from coming up and entering the DEGRADED state.
Script return codes:
rc = 0: Unlock successful
rc = 2: PD marked as MISSING
rc = others: PD set to OFFLINE (Locked)
Retrying Unlock Manually
You can manually retry the SED unlock by bringing the PD back online:
SupremeRAID™ supports securely erasing all data on physical drives that support SEDs. This action leverages the SED's built-in secure erase functionality, which is faster and more secure than standard data deletion methods.
To securely erase physical drives, use the following command:
SupremeRAID™ offers a mail notification service in Linux that enables users to receive email notifications for monitoring service status. This includes actions like creating or deleting physical drives (PD), drive groups (DG), or virtual drives (VD) and so on.
Setup the Mail Notification Service
To set up mail notification service, issue the following command:
$ sudo graid-mgr set notification [Command]
Related Commands:
Command
Description
on
Enable notification service
off
Disable notification service
smtp_host
Edit SMTP host
smtp_port
Edit SMTP port
smtp_user
Edit SMTP username
smtp_password
Edit SMTP password
sender_mail
Edit sender mail of notification service
Setup mail notification for admin user
To set up admin user email notification, issue the following command:
$ sudo graid-mgr set admin [Command]
Related Commands:
Command
Description
email
Set email of user admin
notification
Configuration of notification
To view the configuration of the mail notification
To see the configuration of mail notification, issue the following command:
$ sudo graid-mgr show notification$ sudo graid-mgr show admin
Drive Copyback feature allows users to manually initiate data migration from one drive to another without affecting the overall Drive Group state. This operation is user-controlled and can be performed for various reasons, such as replacing an aging drive before it reaches its wear limit, preparing for hardware upgrades, or managing storage configurations.
To initiate data copy from the source PD (SrcPD) to the destination PD (DstPD), follow these guidelines:
The drive group state for SrcPD must be OPTIMAL.
The DstPD state must be UNCONFIGURED_GOOD and not a hotspare in the drive group. If the DstPD is a hotspare, the -f flag must be used, and the DstPD must be a global hotspare or a hotspare under the SrcPD drive group.
DstPD and SrcPD must have identical capability (PD type, LBA size, DSM support, Write-uncor support).
A drive group can only execute one Copyback task at a time. If multiple drive groups are running Copyback, only one drive group will perform the Copyback task.
Use copyback physical drive as a hotspare of the drive group when physical drive failure
You can also log in to the SupremeRAID™ Management Console, then navigate to the RAID management / Drive Group section on the sidebar menu. Select the drive group which you want to perform the Copyback, and click the “Physical Drives” tab. Choose the physical drive, then click the “Actions” button to initiate the Copyback.
Unlike SAS/SATA hard drives, many NVMe SSDs support the de-allocate dataset management command. Using this command, you can reset all data in the NVMe SSD immediately, eliminating the need to synchronize data between physical drives when creating a drive group.
For other SSDs, however, the performance is not as expected when reading unwritten sectors after issuing the de-allocate dataset management command. While this behavior also impacts the performance of the new drive group, it does not affect the applications because they do not read sectors that do not contain data.
To test SupremeRAID™ performance, write the entire virtual drive sequentially using a large block size.
Some NVMe SSD models might display a "failed to set APST feature (-19)" message in the kernel log when creating the physical drive.
When SupremeRAID™ creates the physical drive, the SSD is unbound from the operating system so the SupremeRAID™ can control the SSD. When the APST feature is enabled during the unbinding process, the NVMe driver tries and fails to set the APST state to SSD and the error message is issued. This message is expected and can be ignored. SupremeRAID™ is working normally.
You might notice that the HDD/SSD activity indicator blink pattern is different on SupremeRAID™ than on traditional RAID cards.
SupremeRAID™ does not require a buffering or caching mechanism to improve read/write performance as do traditional RAID cards. This feature causes SupremeRAID™ indicators to blink differently than traditional RAID cards.
To activate the SupremeRAID™ server with your license key, it’s essential to install the correct driver version that matches your specific SupremeRAID™ model. If the incorrect version is installed, the following error message appears when you try to activate the SupremeRAID™ server with a license key: Apply license failed: The arch of the controller and SupremeRAID™ software mismatched.
To ascertain which model you installed, use the command graidctl version. Issuing this command displays the model information at the end of the string.
The following figure shows an example of the message, if you receive the error message, uninstall the incorrect driver, and then install the correct one.
License Architecture Mismatch Error
Step 1 Stop SupremeRAID™ service. If you have already enabled the graphical management console, please ensure to disable it as well.
Step 3 Uninstall the package using the command appropriate for your operating system:
For Centos, Rocky Linux, AlmaLinux, RHEL, openSUSE, and SLES:
$ sudorpm-e graid-sr
For Ubuntu:
$ sudo dpkg -r graid-sr
Step 4 Confirm that the SupremeRAID™ module is unloaded. The output should be empty.
$ sudo lsmod \|grep graid
Step 5 Confirm that the SupremeRAID™ package is uninstalled using the command appropriate for your operating system, the output should be empty.
For Centos, Rocky Linux, AlmaLinux, RHEL, openSUSE, and SLES:
$ sudorpm-qa\|grep graid
For Ubuntu:
$ sudo dpkg -l\|grep graid
Step 6 Install the correct SupremeRAID™ driver:
A. At the Welcome page, select Next and click Enter to view the end-user license agreement.
Correct Driver Installer Welcome Screen
B. In the end-user license agreement, use the spacebar to scroll through the content. When you complete your review, select Next and click Enter to proceed.
Correct Driver Installer License Review Screen
C. Type accept, click tab, select Next, and click Enter to accept the license agreement.
The SupremeRAID™ service may fail to run if there is insufficient free space on the root disk. Ensure that the root partition has enough available space for the graid service to operate correctly. Lack of sufficient disk space can cause the graid service to fail during the enabling process.
CE Directives Declaration: NVIDIA Corporation hereby declares that this device complies with all material requirements and other relevant provisions of the 2014/30/EU and 2011/65/EU. A copy of the Declaration of Conformity may be obtained directly from NVIDIA GmbH(Bavaria Towers - Blue Tower, Einsteinstrasse 172, D-81677 Munich, Germany)
NVIDIA products are designed to operate safely when installed and used according to the product instructions and general safety practices. The guidelines included in this document explain the potential risks associated with equipment operation and provide important safety practices designed to minimize these risks. By carefully following the information contained in this document, you can protect yourself from hazards and create a safer environment.
This product is designed and tested to meet IEC 60950-1 and IEC 62368-1 Safety Standards for Information Technology Equipment. This also covers the national implementations of IEC 60950-1/62368-1 based safety standards around the world e.g. UL 62368-1. These standards reduce the risk of injury from the following hazards:
Electric shock: Hazardous voltage levels contained in parts of the product
Fire: Overload, temperature, material flammability
Energy: Circuits with high energy levels (240-volt amperes) or potential as burn hazards.
Heat: Accessible parts of the product at high temperatures.
This device complies with part 15 of the FCC Rules. Operation is subject to the following two conditions: (1) This device may not cause harmful interference, and (2) this device must accept any interference received, including interference that may cause undesired operation.
This product, as well as its related consumables and spares, complies with the reduction in hazardous substances provisions of the "India E-waste (Management and Handling) Rule 2016". It does not contain lead, mercury, hexavalent chromium, polybrominated biphenyls, or polybrominated diphenyl ethers in concentrations exceeding 0.1 weight %, and it does not contain cadmium in concentrations exceeding 0.01 weight %, except where allowed pursuant to the exemptions set in Schedule 2 of the Rule.
Retain and follow all product safety and operating instructions.
Always refer to the documentation supplied with your equipment. Observe all warnings on the product and in the operating instructions found on the product's User Guide.
Safety Recycling Symbol
This is a recycling symbol indicating that the product/battery cannot be disposed of in the trash and must be recycled according to the regulations and/or ordinances of the local community.
Hot surface warning. Contact may cause burns. Allow to cool before servicing.
Physical Drive [PD_ID] state has transitioned from [STATE_OLD] to unconfigured bad.
Physical Drive
Critical
Physical Drive [PD_ID] state has transitioned from [OLD_STATE] to failed.
Physical Drive
Warning
Physical Drive [PD_ID] state has transitioned from [OLD_STATE] to offline.
Physical Drive
Critical
Physical Drive [PD_ID] state has transitioned from [OLD_STATE] to missing.
Physical Drive
Info
Physical Drive [PD_ID] state has transitioned from [OLD_STATE] to online.
Physical Drive
Info
Physical Drive [PD_ID] state has transitioned from [OLD_STATE] to rebuild.
Physical Drive
Info
Physical Drive [PD_ID] state has transitioned from [OLD_STATE] to unconfigured good.
Physical Drive
Info
Physical Drive [PD_ID] has been successfully created.
Physical Drive
Info
Physical Drive [PD_ID] has been deleted.
Physical Drive
Info
Physical Drive [PD_ID] has been hot-plugged.
Physical Drive
Warning
Physical Drive [PD_ID] has been hot-removed.
Physical Drive
Warning
The temperature of Physical Drive [PD_ID] is currently [CURRENT_TEMP] degrees, which exceeds the Warning threshold of [THRESHOLD_TEMP] degrees. Critical Warning error code: [ERROR_CODE].
Physical Drive
Critical
The temperature of Physical Drive [PD_ID] is currently [CURRENT_TEMP] degrees, which exceeds the Critical threshold of [THRESHOLD_TEMP] degrees. Critical Warning error code: [ERROR_CODE].
Physical Drive
Critical
The available spare capacity [AVAIL_SPARE] of Physical Drive [PD_ID] has fallen below the threshold [SPARE_THRESHOLD]. Critical Warning error code: [ERROR_CODE].
Physical Drive
Critical
The NVM subsystem reliability of Physical Drive [PD_ID] has been degraded due to significant media related errors or any internal error that degrades NVM subsystem reliability. Critical Warning error code: [ERROR_CODE].
Physical Drive
Critical
All of the media of Physical Drive [PD_ID] has been placed in read only mode. Critical Warning error code: [ERROR_CODE].
Physical Drive
Critical
The volatile memory backup device of Physical Drive [PD_ID] has failed. Critical Warning error code: [ERROR_CODE].
Physical Drive
Critical
The Persistent Memory Region of Physical Drive [PD_ID] has become read-only or unreliable. Critical Warning error code: [ERROR_CODE].
Physical Drive
Warning
Physical Drive [PD_ID] is currently experiencing a wearout level of WEAROUT, surpassing the Warning threshold of [THRESHOLD_WEAROUT].
Physical Drive
Critical
Physical Drive [PD_ID] is currently experiencing a wearout level of WEAROUT, surpassing the Critical threshold of [THRESHOLD_WEAROUT].
Drive Group
Fatal
Drive Group [DG_ID] state has transitioned from [OLD_STATE] to failed.
Drive Group
Critical
Drive Group [DG_ID] state has transitioned from [OLD_STATE] to offline.
Drive Group
Critical
Drive Group [DG_ID] state has transitioned from [OLD_STATE] to degraded.
Drive Group
Warning
Drive Group [DG_ID] state has transitioned from [OLD_STATE] to rescue.
Drive Group
Warning
Drive Group [DG_ID] state has transitioned from [OLD_STATE] to partially degraded.
Drive Group
Info
Drive Group [DG_ID] state has transitioned from [OLD_STATE] to optimal.
Drive Group
Info
Drive Group [DG_ID] state has transitioned from [OLD_STATE] to recovery.
Drive Group
Info
Drive Group [DG_ID] state has transitioned from [OLD_STATE] to init.
Drive Group
Info
Drive Group [DG_ID] state has transitioned from [OLD_STATE] to resync.
Drive Group
Info
Drive Group [DG_ID] has been successfully created.
Drive Group
Info
Drive Group [DG_ID] has been deleted.
Drive Group
Info
Consistency Check for Drive Group [DG_ID] has been manually aborted.
Drive Group
Info
Consistency Check for Drive Group [DG_ID] has been aborted due to the deletion of the Drive Group.
Drive Group
Info
Consistency Check for Drive Group [DG_ID] was aborted due to the Drive Group migrating from Controller [CX_OLD] to [CX_NEW].
Drive Group
Info
Consistency Check for Drive Group [DG_ID] has been aborted due to the Drive Group's state transitioning to [DG_STATE].
Drive Group
Info
Manual Consistency Check for Drive Group [DG_ID] has been completed.
Drive Group
Info
Scheduled Consistency Check for Drive Group [DG_ID] has completed.
Drive Group
Info
Manual Consistency Check for Drive Group [DG_ID] has started.
Drive Group
Info
Scheduled Consistency Check for Drive Group [DG_ID] has started.
Drive Group
Info
Inconsistency in Drive Group [DG_ID] has been fixed at: Drive Group block range: [DG_INTERS].
Drive Group
Critical
Inconsistency detected in Drive Group [DG_ID] at: Drive Group block range: [DG_INTERS].
Drive Group
Critical
Consistency Check for Drive Group [DG_ID] has been aborted due to the 'stop_on_error' policy.
Drive Group
Critical
Consistency Check for Drive Group [DG_ID] has been aborted due to numerous inconsistencies found and fixed.
Drive Group
Info
Journal Replay for Drive Group [DG_ID] has started.
Drive Group
Info
Journal Replay for Drive Group [DG_ID] has been completed. Entry replayed [REPLAYNR].
Drive Group
Critical
Journal Replay for Drive Group [DG_ID] has been waiting Physical Drive [PD_ID] to be active.
Drive Group
Critical
Journal Replay for Drive Group [DG_ID] has been aborted due to inconsistency detected on journal.
Virtual Drive
Info
Inconsistency for Virtual Drive [VD_ID] within Drive Group [DG_ID] has been fixed at: Virtual Drive block range: [VD_OFFSETS].
Virtual Drive
Critical
Inconsistency found in Virtual Drive [VD_ID] of Drive Group [DG_ID] at: Virtual Drive block range: [VD_OFFSETS].
Virtual Drive
Info
Virtual Drive [VD_ID] for Drive Group [DG_ID] has been created successfully.
Virtual Drive
Info
Virtual Drive [VD_ID] for Drive Group [DG_ID] has been deleted.
Virtual Drive
Info
Stripe cache for Virtual Drive [VD_ID] on Drive Group [DG_ID] has been deleted.
Virtual Drive
Info
Stripe cache for Virtual Drive [VD_ID] on Drive Group [DG_ID] has been created successfully.
Controller
Warning
The temperature of Controller [CX_ID] is currently [CURRENT_TEMP] degrees, which exceeds the GPU threshold of [THRESHOLD_TEMP] degrees.
Controller
Warning
The temperature of Controller [CX_ID] is currently [CURRENT_TEMP] degrees, which exceeds the GPU memory threshold of [THRESHOLD_TEMP] degrees.
Controller
Warning
The temperature of Controller [CX_ID] is currently [CURRENT_TEMP] degrees, it will cause controller slowdown.
Controller
Critical
The temperature of Controller [CX_ID] is currently [CURRENT_TEMP] degrees, it will cause controller shutdown.