BeeGFS High Availability Storage with SupremeRAID™ HE Deployment Guide
Document Purpose
This guide provides comprehensive instructions for deploying and managing the High Availability NVMe Storage Cluster system - a reference architecture high-performance storage solution integrating a high-density dual-node server platform, SupremeRAID™ HE, and BeeGFS parallel file system. This enterprise-grade storage infrastructure delivers exceptional performance, scalability, and reliability for data-intensive computing environments.
This document guides system administrators and storage engineers through the complete deployment lifecycle, from initial system preparation to ongoing maintenance and troubleshooting. By following these procedures, technical staff can efficiently implement, verify, and maintain their High Availability NVMe Storage Cluster infrastructure to ensure optimal performance and availability.
Introduction
In today’s data-driven landscape, enterprises and high-performance computing (HPC) environments demand storage solutions that deliver exceptional speed, scalability, and resilience while optimizing cost-efficiency. Graid Technology introduces SupremeRAID™ HE, a cutting-edge GPU-accelerated NVMe RAID solution with array migration and cross-node high-availability (HA) capabilities, paired with a 2U all-flash Storage Bridge Bay (SBB) system and the BeeGFS parallel file system. Highlighting its performance, this architecture achieves the world’s highest throughput in a 2U system, saturating a 400Gb/s network with up to 132 GB/s read and 83 GB/s write locally, and up to 93 GB/s read and 84 GB/s write from the client side, while eliminating cross-node replication for cost savings and scaling seamlessly. Unlike advanced software RAID approaches, SupremeRAID™ HE leverages GPU parallelism to maximize NVMe performance, eliminate CPU bottlenecks, and reduce total cost of ownership (TCO). This whitepaper explores how this innovative design meets evolving demands.
Solution Overview
SupremeRAID™ HE integrates with a dual-node SBB server and BeeGFS to form a high-performance, highly available NVMe storage platform. Unlike software RAID, which consumes significant CPU resources, SupremeRAID™ HE offloads RAID operations to a GPU, preserving CPU capacity for critical upper-layer applications like BeeGFS. This GPU-accelerated approach, combined with array migration for cross-node high availability (HA), delivers exceptional throughput while supporting up to 32 drives in a compact 2U footprint. By reducing CPU overhead, it streamlines system performance, enhances scalability, and lowers total cost of ownership (TCO) for data-intensive enterprise and HPC workloads, offering a cost-effective and efficient alternative to advanced software RAID solutions.
SupremeRAID™ HE (HPC Edition) by Graid Technology
SupremeRAID™ HE, developed by Graid Technology, is a GPU-accelerated NVMe RAID solution featuring array migration for cross-node high availability (HA). It supports configurations with up to 32 drives and delivers exceptional throughput. By leveraging GPU computing power and patented out-of-path data protection technology, it maximizes NVMe performance, ensures zero-downtime HA, and reduces total cost of ownership (TCO) by eliminating data replication.
BeeGFS Parallel File System
BeeGFS, an open-source POSIX file system from the Fraunhofer Institute, is built for HPC with parallel data access, scalability, and fault tolerance via distributed metadata and data. It delivers high-throughput I/O with low overhead, making it ideal for data-intensive workloads in scalable NVMe environments.
System Design and High Availability
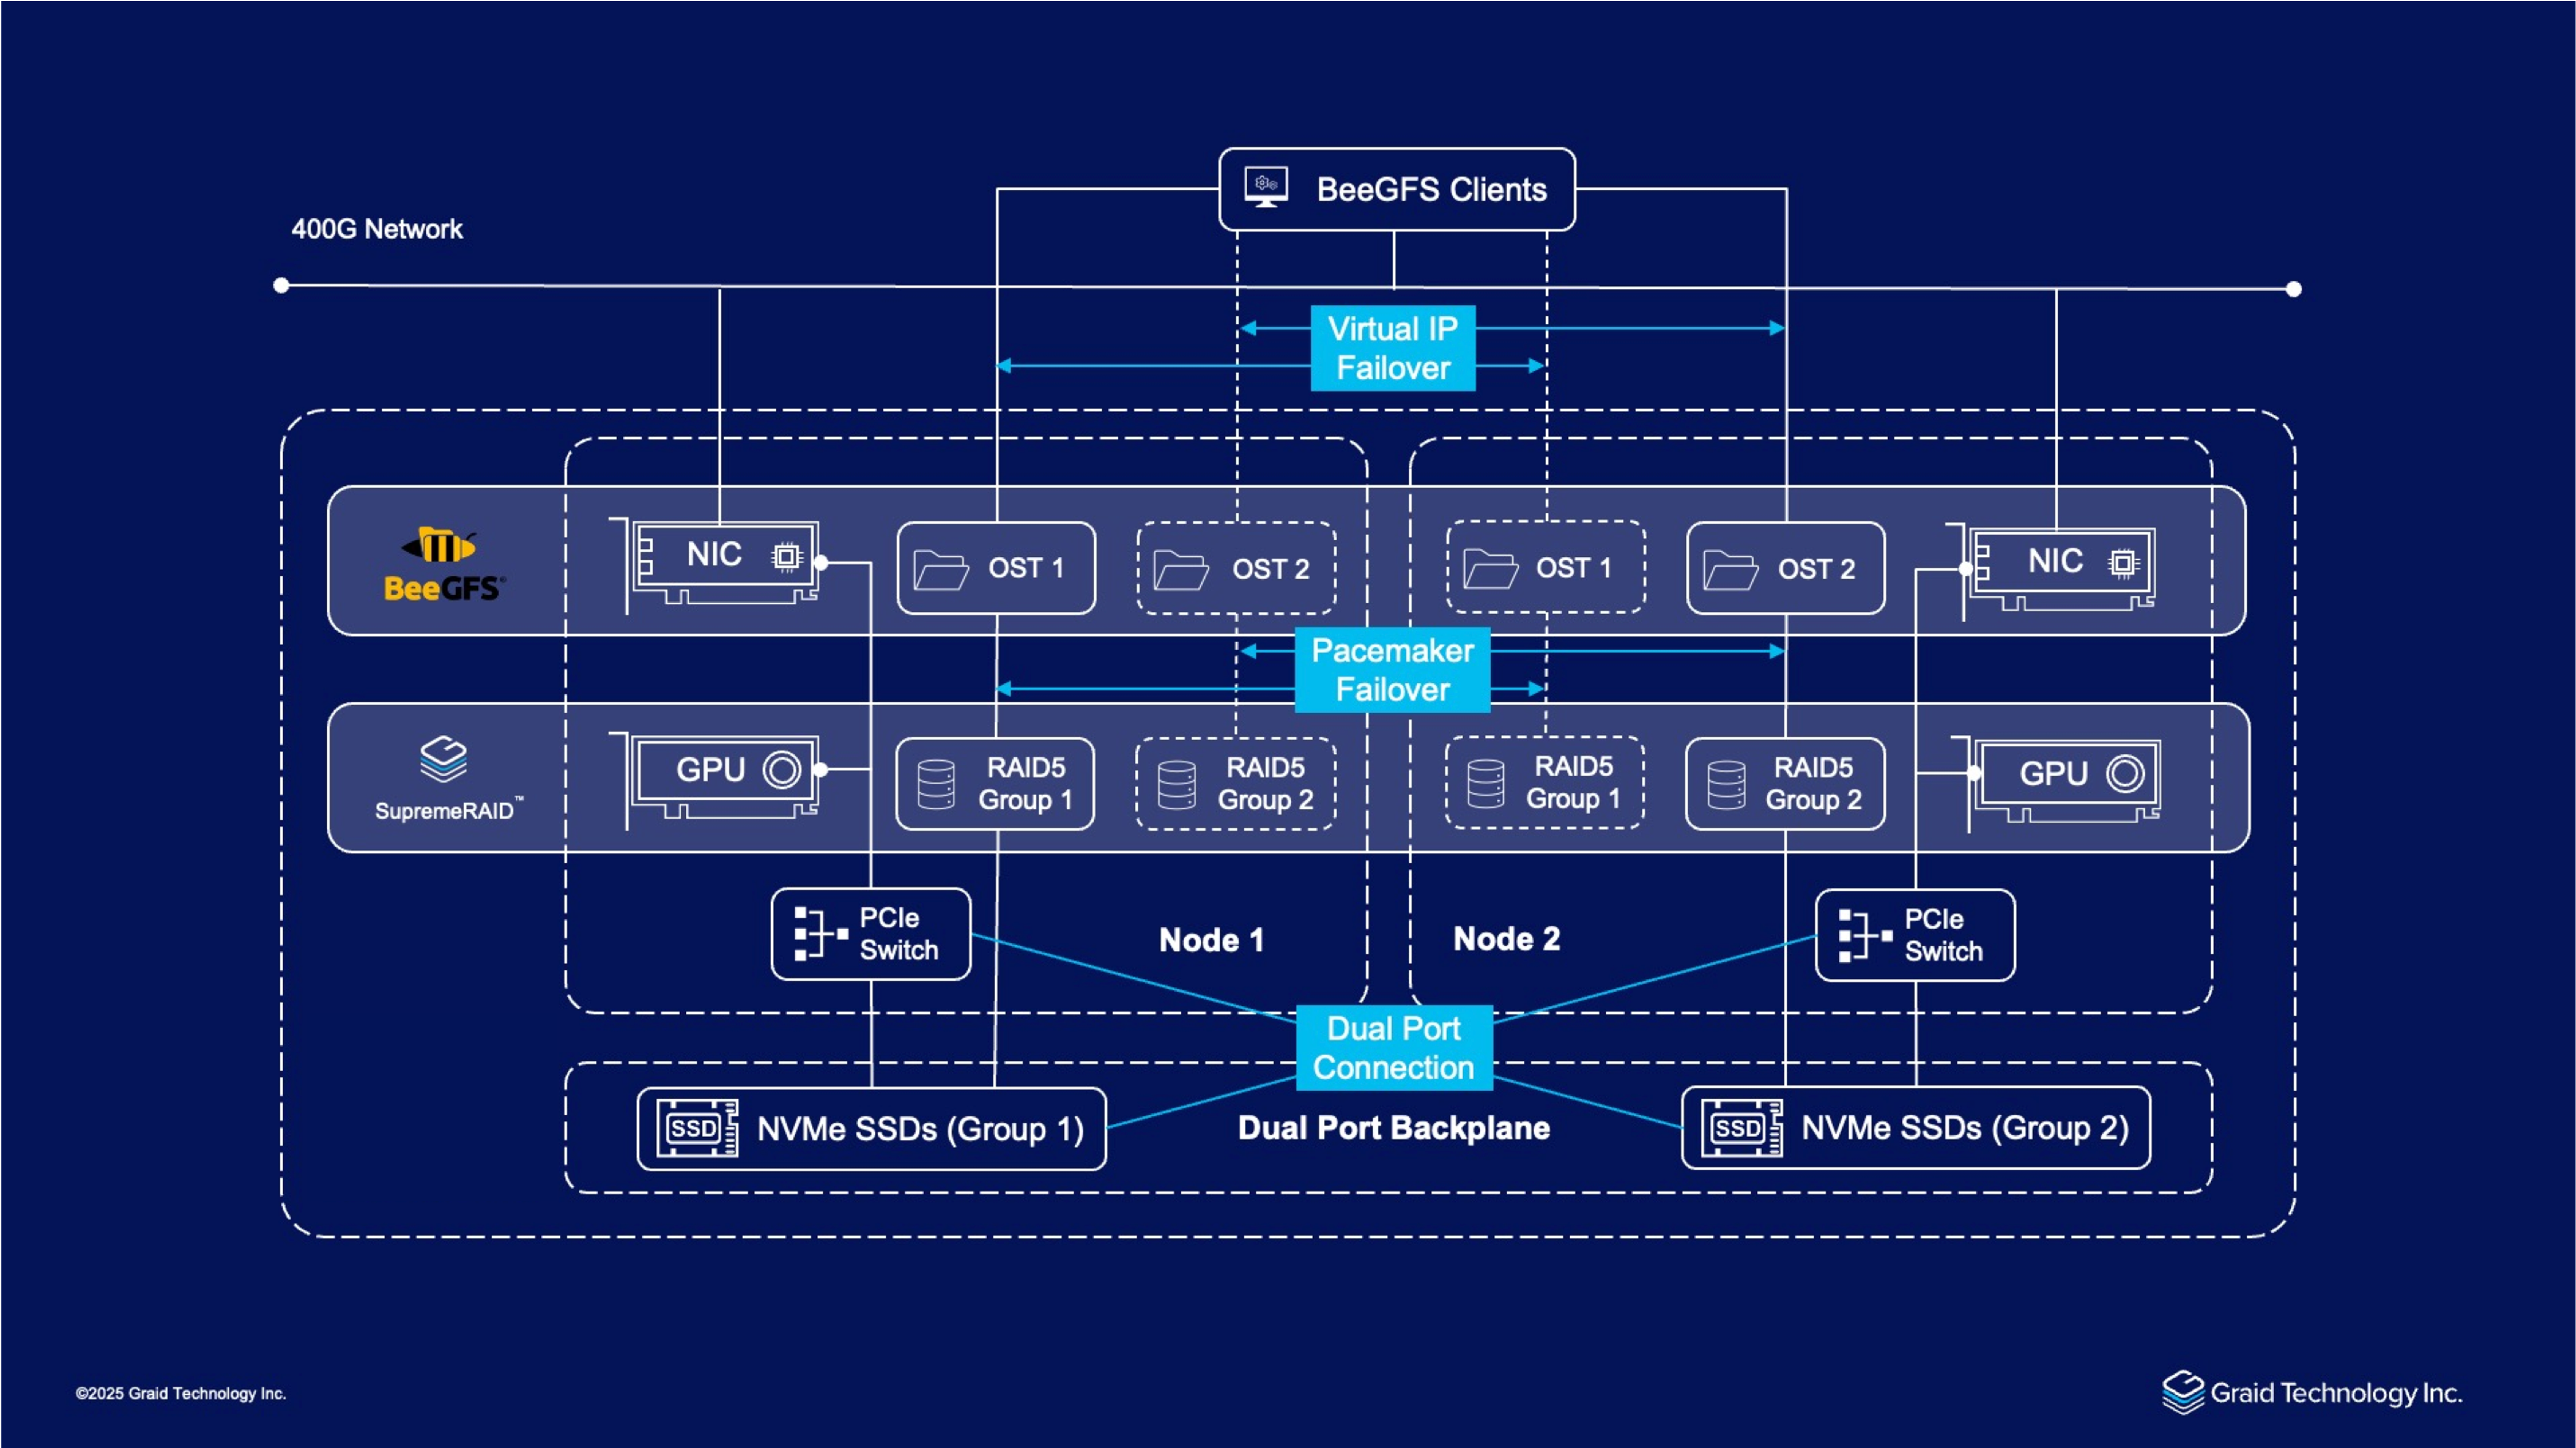
This solution leverages a server's dual-node architecture, enhanced by SupremeRAID™ HE’s array migration capabilities, to deliver exceptional performance and robust high availability (HA) within a 2U chassis. Integrated into a 400G network, the system connects seamlessly with BeeGFS clients, optimizing resource utilization by eliminating cross-node data replication and reducing costs. The design supports linear scalability, allowing additional SBB units to expand capacity and performance as needed.
Hardware Configuration
The solution features two SBB nodes, each equipped with a PCIe switch for internal data routing and connected via a dual-port backplane that enables both nodes to access 24 NVMe SSDs, organized into two groups of 12. Each node includes a Network Interface Card (NIC) and a GPU, with SupremeRAID™ HE utilizing GPU acceleration to offload RAID operations, enhancing throughput and preserving CPU resources. The setup is tested over a 400G network infrastructure.
RAID and Storage Setup
SupremeRAID™ HE manages the 24 dual-port NVMe SSDs, with each node handling 12 drives. This configuration supports the system’s high-performance capabilities.
- Metadata Target (MDT):
- Configured as RAID 10 with 2 drives per node (4 total), forming 4 virtual drives for low-latency metadata operations.
- Object Storage Target (OST):
- Configured as RAID 5 or RAID 6 with 10 drives per node (20 total across both nodes), creating multiple virtual drives for high-capacity, fault-tolerant data storage.
High Availability Implementation
High availability is ensured through Pacemaker, which manages failover using a virtual IP, maintaining service continuity during node failures. SupremeRAID™ HE’s array migration enables seamless RAID array transfers between nodes, eliminating replication needs and optimizing NVMe usage. The dual-port backplane and 400G network connectivity enhance fault tolerance and data throughput.
System Requirements
Graid-Provided Deployment Tools
Please note that this deployment guide utilizes proprietary tools from Graid Technology which are required for the setup. These tools are not included in the standard SupremeRAID™ HE driver packages.
- High Availability NVMe Storage Cluster Setup Manager (
bgfs-setup-manager): This package contains thebeegfs_control.pyscript and related configuration files, used for deploying and managing the BeeGFS cluster. - SupremeRAID™ RAID Arrays Creation Script (
create_bgfs_raid.py): This script is used to configure the SupremeRAID™ arrays for optimal performance with BeeGFS.
To obtain create_bgfs_raid.py and bgfs-setup-manager, please contact your Graid Technology technical support representative or sales window.
BeeGFS Node
- Operating System: RHEL/Rocky Linux 9.x or Ubuntu 22.04/24.04
- Required packages: Python 3.8+, SSH, and necessary IB-related packages (RDMA/DOCA)
- Hardware: A dual-node server with shared storage capabilities
- SSD: Dual-Port SSDs are required
- RAID: SupremeRAID™ controllers in each node
- Network: High-speed network infrastructure (preferably InfiniBand or high-speed Ethernet)
BeeGFS Client Node (Optional)
- Hardware: Any general-purpose server
- Required packages: Python 3.8+, SSH, and necessary IB-related packages (RDMA/DOCA)
- Network: High-speed network infrastructure (preferably InfiniBand or high-speed Ethernet)
1. System Configuration
1.1 Network Configuration
- Configure all network interfaces on each node (management, storage, and client).
- Ensure appropriate subnet, gateway, and DNS settings.
- Test connectivity between all nodes with ping and verify latency is acceptable.
1.1.1 IP Planning Example
To avoid configuration conflicts, it is highly recommended to plan your IP allocation before deployment. The following table outlines the IP schema used in this document's examples:
| Role | Hostname | System/Mgmt Network | BMC/IPMI Network | Storage Network (Data) | Heartbeat Network | Notes |
|---|---|---|---|---|---|---|
| Node A | bgfs-oss1 | 192.168.10.101 | 192.168.1.101 | 10.16.10.101 (Multi-NIC: 10.16.11.101) | 192.168.20.101 | Physical IP |
| Node B | bgfs-oss2 | 192.168.10.102 | 192.168.1.102 | 10.16.10.102 (Multi-NIC: 10.16.11.102) | 192.168.20.102 | Physical IP |
| Client | bgfs-client | 192.168.10.201 | N/A | 10.16.10.201 (Multi-NIC: 10.16.11.201) | N/A | Client Node |
| Cluster VIP | (MGT-VIP) | 192.168.10.100 | N/A | N/A | N/A | Beegfs Mgmt Service VIP |
| Node A VIPs | (A-VIPs) | N/A | N/A | VIP1: 10.16.10.103 VIP2: 10.16.11.103 | N/A | Node A Service VIPs |
| Node B VIPs | (B-VIPs) | N/A | N/A | VIP1: 10.16.10.104 VIP2: 10.16.11.104 | N/A | Node B Service VIPs |
Note
- VIP (Virtual IP): Must be on the same subnet as the physical IP but must not be the same as any physical IP. For multi-NIC mode, each storage subnet requires a dedicated VIP, which must be added as a resource in the Pacemaker resource group.
- System/Mgmt Network: Used for SSH, Pacemaker communication, and the BeeGFS management service.
- BMC/IPMI Network: Used for STONITH Fencing.
- Storage Network: Used for BeeGFS data traffic. High-speed networks like InfiniBand or RoCE are recommended.
- Multi-NIC Recommendation: If the system has multiple high-speed network cards (e.g., ib0, ib1), we recommend assigning IPs from different subnets to each card (e.g., ib0: 10.16.10.x, ib1: 10.16.11.x) to enable BeeGFS multi-rail capabilities for maximum throughput.
- Heartbeat Network: Used for Pacemaker node-to-node health checks. If your server model includes a dedicated Node-to-Node 1GbE internal port (not for external access), it is strongly recommended to use this port for the heartbeat network to protect it from external switch failures.
1.2 Host Configuration
Configure hostnames for all nodes and ensure that hostnames and IP addresses can be resolved correctly across the cluster. This can be achieved by configuring a DNS service or by updating the /etc/hosts file on each server to ensure all nodes can communicate with each other by hostname.
Note
In this documentation, "bgfs-oss1" refers to Node A of the SBB (Storage Bridge Bay) system
"bgfs-oss2" refers to Node B of the SBB system
These hostnames represent the individual computing nodes within the dual-node enclosureEnsure SSH access is properly configured between all nodes (optional):
- For password-based authentication: ensure
sshpassis installed - For key-based authentication (recommended): set up SSH keys as shown below
# [Please log in to Node A (bgfs-oss1) and execute the following command]
# Generate SSH key if you don't already have one
ssh-keygen -t rsa -b 4096

# Copy the key to each node
for node in bgfs-oss1 bgfs-oss2 bgfs-client; do
    ssh-copy-id root@$node
done

# Test SSH connectivity to each node
for node in bgfs-oss1 bgfs-oss2 bgfs-client; do
    ssh root@$node echo "SSH connection successful"
done
- For password-based authentication: ensure
1.3 Install SupremeRAID™ Drivers
Download the latest version of the SupremeRAID™ pre-installer script:
wget https://download.graidtech.com/driver/pre-install/graid-sr-pre-installer-1.7.2-185-x86_64.runNote
In this documentation, "graid-sr-pre-installer-1.7.2-185-x86_64.run" is the latest version as of 2025/12/15. Please visit https://docs.graidtech.com/ to get the latest version.
Run the SupremeRAID™ pre-installer script to set up the environment:
chmod +x graid-sr-pre-installer-1.7.2-185-x86_64.run
sudo ./graid-sr-pre-installer-1.7.2-185-x86_64.run
Download the SupremeRAID™ HE driver package:
# SR-HE-PRO-AM (SR-1000-AM/GPU: NVIDIA RTX A1000)
# For RHEL/Rocky Linux
wget https://download.graidtech.com/driver/sr-he/linux/1.7.2/release/\
graid-sr-he-1.7.2-57.gfbd894ea.pam.el9.6.x86_64.rpm

# For Ubuntu
wget https://download.graidtech.com/driver/sr-he/linux/1.7.2/release/\
graid-sr-he-1.7.2-57.gfbd894ea.pam.x86_64.deb

# SR-HE-ULTRA-AD (SR-1010-AD/GPU: NVIDIA RTX 2000 Ada)
# For RHEL/Rocky Linux
wget https://download.graidtech.com/driver/sr-he/linux/1.7.2/release/\
graid-sr-he-1.7.2-57.gfbd894ea.uad.el9.6.x86_64.rpm

# For Ubuntu
wget https://download.graidtech.com/driver/sr-he/linux/1.7.2/release/\
graid-sr-he-1.7.2-57.gfbd894ea.uad.x86_64.deb
Install the SupremeRAID™ HE driver package:
- For RHEL/Rocky Linux:
sudo rpm -i graid-<version>.rpm - For Ubuntu:
sudo dpkg -i graid-<version>.deb
Note
- In this documentation, the "SupremeRAID™ HE driver package" is the latest version as of 2025/12/15. Please visit https://docs.graidtech.com/ to get the latest version.
- If you want to use a SupremeRAID™ HE version other than SR-HE-PRO-AM or SR-HE-ULTRA-AD, please contact your Graid Technologies representative to obtain the correct driver package.
- For RHEL/Rocky Linux:
Apply the license key to activate the driver:
sudo graidctl apply license <your-license-key>Note
The license key must correspond to your SupremeRAID™ HE driver. If you have a license for SupremeRAID™ SR or another driver, please contact your Graid Technologies representative.
Verify the driver installation:
sudo systemctl status graidImportant
For a dual-node system, repeat the SupremeRAID™ driver installation on both Node A (bgfs-oss1) and Node B (bgfs-oss2) with identical configuration to ensure proper dual-port SSD functionality.
1.4 Install BeeGFS Deployment Package
Note
The deployment script only needs to run on a single node. Select one node as the deployment node; in this case, we've selected node A.
Install the BeeGFS deployment package:
- For RHEL/Rocky Linux:
sudo rpm -i bgfs-setup-manager-<version>.rpm - For Ubuntu:
sudo dpkg -i bgfs-setup-manager-<version>.deb
- For RHEL/Rocky Linux:
Install required related packages:
- Ubuntu:
apt install -y \ pcs pacemaker corosync resource-agents-extra \ resource-agents-common resource-agents-base python3-pip sshpass- Rocky/Almalinux:
yum install --enablerepo="highavailability" pcs pacemaker corosync fence-agents-all \ python3-pip sshpass -y- RHEL:
subscription-manager repos --enable="rhel-9-for-x86_64-highavailability-rpms"
yum install --enablerepo=rhel-9-for-x86_64-highavailability-rpms pcs pacemaker \
corosync fence-agents-all python3-pip sshpass -y
Install required Python packages:
cd /opt/beegfs_setup_manager
sudo pip install -r requirements.txt
Note
For Ubuntu 22 or 24 versions, if pip doesn't work correctly, consider using a virtual environment or following the warning messages to add any necessary flags. For example:
sudo pip install --break-system-packages -r requirements.txtAlternatively, you can create a virtual environment:
python3 -m venv venv
source venv/bin/activate
pip install -r requirements.txt
2. SupremeRAID™ Arrays Configuration
2.1 Create SupremeRAID™ Arrays for BeeGFS
Use the create_bgfs_raid.py script to create optimized RAID arrays for BeeGFS. This script must be executed individually on each node.
# View help information
sudo python3 create_bgfs_raid.py --help

# Without Hotspare
# Example: Create 24 SSDs with Node A configuration
# Node A:
# [Please log in to Node A (bgfs-oss1) and execute the following command]
sudo python3 create_bgfs_raid.py create 24 node_a

# Example: Create 24 SSDs with Node B configuration
# Node B:
# [Please log in to Node B (bgfs-oss2) and execute the following command]
sudo python3 create_bgfs_raid.py create 24 node_b

# With Hotspare
# Example: Create 24 SSDs with Node A configuration with Hotspare
# Node A:
# [Please log in to Node A (bgfs-oss1) and execute the following command]
sudo python3 create_bgfs_raid.py create 24 node_a --hotspare

# Example: Create 24 SSDs with Node B configuration
# Node B:
# [Please log in to Node B (bgfs-oss2) and execute the following command]
sudo python3 create_bgfs_raid.py create 24 node_b --hotspare
The script performs these key operations:
- Detects NVMe devices in the system
- Groups devices by size and PCIe arrangement
- Configures virtual drives (VDs) with optimal sizing
Note
- This script must be run on both Node A (bgfs-oss1) and Node B (bgfs-oss2), using the appropriate command for each node.
- To configure hot spares, you must apply the settings to both nodes to guarantee the integrity of the High Availability mechanism. Configuring a hot spare on only one node may cause the function to malfunction.
2.2 Verify RAID Configuration
After creating the RAID arrays, verify the configuration:
# List drive groups
sudo graidctl ls dg

# List virtual drives
sudo graidctl ls vd

# Query the drive group UUIDs, which are needed for the BeeGFS cluster configuration later.
# This command must be executed on each node (Node A and Node B).
# Node A or Node B
sudo python3 create_bgfs_raid.py query-dg
Make note of the drive group UUIDs as they will be needed for the BeeGFS configuration.
Expect Output:
sudo graidctl ls dg
✔List drive group successfully.
│───────│───────│────────│──────────│─────────│─────────│───────────────────────│─────────│
│ DG ID │ MODE  │ VD NUM │ CAPACITY │ FREE    │ USED    │ CONTROLLER            │ STATE   │
│───────│───────│────────│──────────│─────────│─────────│───────────────────────│─────────│
│ 0     │ RAID5 │ 2      │ 23 TiB   │ 240 MiB │ 23 TiB  │ running: 0 prefer: 0  │ OPTIMAL │
│ 9     │ RAID1 │ 9      │ 2.9 TiB  │ 0 B     │ 2.9 TiB │                       │ OPTIMAL │
│───────│───────│────────│──────────│─────────│─────────│───────────────────────│─────────│
graidctl ls vd
✔List virtual drive successfully.
│─────────────│───────│─────────│─────────────│─────────│──────────│
│ VD ID (10)  │ DG ID │ SIZE    │ DEVICE PATH │ STATE   │ EXPORTED │
│─────────────│───────│─────────│─────────────│─────────│──────────│
│ 0           │ 0     │ 12 TiB  │ /dev/gdg0n1 │ OPTIMAL │ No       │
│ 1           │ 0     │ 12 TiB  │ /dev/gdg0n2 │ OPTIMAL │ No       │
│ 4           │ 9     │ 638 GiB │ /dev/md55p4 │ OPTIMAL │ No       │
│ 2           │ 9     │ 638 GiB │ /dev/md55p2 │ OPTIMAL │ No       │
│ 7           │ 9     │ 1.9 GiB │ /dev/md55p7 │ OPTIMAL │ No       │
│ 5           │ 9     │ 95 GiB  │ /dev/md55p5 │ OPTIMAL │ No       │
│ 3           │ 9     │ 638 GiB │ /dev/md55p3 │ OPTIMAL │ No       │
│ 1           │ 9     │ 638 GiB │ /dev/md55p1 │ OPTIMAL │ No       │
│ 8           │ 9     │ 191 GiB │ /dev/md55p8 │ OPTIMAL │ No       │
│ 6           │ 9     │ 1.9 GiB │ /dev/md55p6 │ OPTIMAL │ No       │
│─────────────│───────│─────────│─────────────│─────────│──────────│
sudo python3 create_bgfs_raid.py query-dg
uuids:
          - id: 0
            uuid: 655712732737176961
          - id: 9
            md_uuid: 524f5cd6:7aa5158d:30a4e1d0:9b02d64f
2.3 Purge RAID Configuration
To completely remove all RAID configuration from your system, you can use the purge command:
Warning
This action will permanently delete all data stored on the RAID array.
Please ensure you have backed up any important data before proceeding.
To execute the RAID purge:
# Purge all the configuration
# Node A or Node B
# [Please login to Node A (bgfs-oss1) and Node B (bgfs-oss2) execute the following command]
sudo python3 create_bgfs_raid.py purge
3. BeeGFS Configuration and Deployment
Note
The deployment script only needs to run on a single node. Select one node as the deployment node; in this case, we've selected nodeA.
3.1 Configure BeeGFS Manager
Edit the BeeGFS manager configuration file:
sudo vim /opt/beegfs_setup_manager/config/beegfs_manager_config.yamlUpdate the following sections in the configuration file:
Basic Configuration Section
This section contains fundamental settings that affect the overall operation:# Basic Configuration config_ver: 1 ssh_password: "your_ssh_password" # Replace with your actual SSH password # NOTE: If using password auth, ensure all nodes (Node A, Node B, Client) have the same root password. log_file: "/var/log/beegfs_manager.log" root_mount_point: "/mnt/beegfs"config_ver: DO NOT CHANGE THIS VALUEssh_password: Set this to the SSH password that will be used for remote connections if key-based authentication fails (optional).log_file: The path where logs will be written. Ensure this path is accessible and writable.root_mount_point: The base directory where BeeGFS will mount its storage and metadata services.
BeeGFS Configuration Section
This section defines the BeeGFS services configuration:
# BeeGFS Configuration beegfs: mgmtd: # Management service config (required) base_port: 8008 host: "bgfs-oss1" # Primary management service host supremeraid: virtual_drive: "md55p5" # Actual virtual drive name from your config meta: # Metadata config (required) base_port: 8005 naming_rule: "meta" hosts: - "bgfs-oss1" # Node A - "bgfs-oss2" # Node B supremeraid: - host: "beegfs-oss1" virtual_drive_pattern: "md55p" # Virtual drive pattern for metadata - host: "beegfs-oss2" virtual_drive_pattern: "md88p" # Virtual drive pattern for metadata storage: # Storage config (required) base_port: 8003 naming_rule: "storage" hosts: - "bgfs-oss1" # Node A - "bgfs-oss2" # Node B supremeraid: virtual_drive_pattern: "gdg0n" # Virtual drive pattern for storage client: # Client configuration (Optional) client_thirdparty_include_path: "/usr/src/ofa_kernel/default/include/" base_port: 8004 helper_base_port: 8006 hosts: - "bgfs-client" # Client node hostnamemgmtd: Configuration for the management servicehost: Specify the hostname for the management service (typically Node A)virtual_drive: The exact virtual drive name used for the management service, default namemd0p5
metaandstorage: Configuration for metadata and storage serviceshosts: List of hostnames where these services will runvirtual_drive_pattern: The naming pattern for virtual drives (fromgraidctl ls vd)
client: Configuration for client servicesclient_thirdparty_include_path: Path to external libraries (especially important for InfiniBand)
Pacemaker Configuration Section
This section configures high availability using Pacemaker:
# Pacemaker Configuration pacemaker: stonith: enable: true devices: - node: bgfs-oss1 # Node A name: bgfs-oss1-fence ip: 192.168.1.101 # Replace with BMC IP address for Node A username: ADMIN # Replace with BMC username password: PASSWORD # Replace with BMC password host_list: bgfs-oss1 - node: bgfs-oss2 # Node B name: bgfs-oss2-fence ip: 192.168.1.102 # Replace with BMC IP address for Node B username: ADMIN # Replace with BMC username password: PASSWORD # Replace with BMC password host_list: bgfs-oss2 cluster_name: graid-cluster cluster_username: hacluster cluster_password: p@ssW0rd # Change this for production deployments cluster_nodes: - node: "bgfs-oss1" # Node A addrs: - 192.168.10.101 # Replace with Node A IP address - 192.168.20.101 # Replace with Node A heartbeat IP address - node: "bgfs-oss2" # Node B addrs: - 192.168.10.102 # Replace with Node B IP address - 192.168.20.102 # Replace with Node B heartbeat IP address ha_pair: - ["bgfs-oss1", "bgfs-oss2"] # Define the HA pairenable: Set totrueto enable Pacemaker for high availabilitystonith: Configure fencing devices for each node- Replace IP addresses, usernames, and passwords with your actual BMC (Baseboard Management Controller) details
cluster_nodes: List of nodes with their IP addresses- Each node should have at least two addresses: primary and heartbeat
ha_pair: Define which nodes form high-availability pairs
Resource Groups Configuration Section
This section configures how resources are grouped and managed:
groups: - name: mgt-group # prefer_node: node for management prefer_node: "bgfs-oss1" vip: resource_name: mgt-vip # Virtual IP for management (replace with your actual VIP) inet: "192.168.10.100/24" # Network interface (replace with your actual interface) nic_iflabel: "enp0s1:mgt" dg: resource_name: mgt-dg uuids: - id: 9 # Replace with actual UUID (dg9) from `create_bgfs_raid.py query-dg` md_uuid: <mgt-dg-uuid> - name: a-group # prefer_node: node for Node A prefer_node: "bgfs-oss1" vip: # Virtual IP-1 for Node A (replace with your actual VIP) - inet: "10.16.10.103/24" # Network interface (replace with your actual interface) nic_iflabel: "enp0s4:bgfs-a" # Virtual IP-2 for Node A (replace with your actual VIP) - inet: "10.16.11.103/24" nic_iflabel: "enp0s5:bgfs-a" dg: uuids: - id: 0 # Replace with actual UUID(dg0) from `create_bgfs_raid.py query-dg` uuid: <a-dg-storage-uuid> - id: 9 # Replace with actual UUID(dg9) from `create_bgfs_raid.py query-dg` md_uuid: <a-md-dg-meta-uuid> - name: b-group # prefer_node: node for Node B prefer_node: "bgfs-oss2" vip: # Virtual IP-1 for Node B (replace with your actual VIP) - inet: "10.16.10.104/24" # Network interface (replace with your actual interface) nic_iflabel: "enp0s4:bgfs-b" # Virtual IP-2 for Node B (replace with your actual VIP) - inet: "10.16.11.104/24" nic_iflabel: "enp0s5:bgfs-b" dg: uuids: - id: 0 # Replace with actual UUID(dg0) from `create_bgfs_raid.py query-dg` uuid: <b-dg-storage-uuid> - id: 9 # Replace with actual UUID(dg1) from `create_bgfs_raid.py query-dg` md_uuid: <b-md-dg-meta-uuid>- Each group represents a logical set of resources that move together during failover
prefer_node: The node where this group runs under normal conditionsvip: Virtual IP configurationinet: The virtual IP address with subnet mask (CIDR notation)nic_iflabel: The network interface and label
dg: Drive group configurationuuids: List of drive group UUIDs obtained fromcreate_bgfs_raid.py query-dg
Note
- mgt-vip must NOT match the IP address of either Node A or Node B; please specify a unique IP address.
- The UUIDs for a-group must be obtained from running the query-dg command on Node A (bgfs-oss1).
- The UUIDs for b-group must be obtained from running the query-dg command on Node B (bgfs-oss2).
Critical Configuration Notes:
- Drive Group UUIDs: These are unique identifiers for your RAID groups and must be correct. Use the
create_bgfs_raid.py query-dgcommand to get the exact UUIDs for your configuration. - Network Interfaces: Ensure that the network interfaces specified in the
nic_iflabelfields actually exist on your systems. Useip link showto verify. - Virtual IP Addresses: The virtual IPs must be on the same subnet as your physical interfaces but should not be already in use.
- Filesystem Types: The default configuration uses
ext4for metadata andxfsfor storage. Change these only if you have specific requirements. - Mount Options: The
x-systemd.requires=graid.serviceoption ensures that the SupremeRAID™ service is running before mounting. This is crucial for proper operation. - Security: Remember to change default passwords (
ssh_password,cluster_password, and BMC credentials) in production environments.
- Drive Group UUIDs: These are unique identifiers for your RAID groups and must be correct. Use the
After editing the configuration file, save it and verify that the YAML syntax is correct:
sudo python3 -c "import yaml;\
  yaml.safe_load(open('/opt/beegfs_setup_manager/config/beegfs_manager_config.yaml'))"
If there are no errors, the command will complete silently. Any syntax errors will be reported.
Ensure the configuration properly reflects your dual-node setup with:
- Both nodes (bgfs-oss1 and bgfs-oss2) listed in the appropriate sections
- Proper UUIDs for each drive group on both nodes
- Correct networking configuration for each node
3.2 Deploy BeeGFS
Deploy BeeGFS with the latest version:
cd /opt/beegfs_setup_manager/
sudo python3 beegfs_control.py deploy
This command:
- Retrieves the latest BeeGFS version
- Installs required packages on all nodes
- Configures repositories
- Prepares hosts for BeeGFS deployment
3.3 Setup BeeGFS Services
Set up BeeGFS services including Pacemaker resources:
cd /opt/beegfs_setup_manager/
sudo python3 beegfs_control.py setup
This command:
- Prepares mount points for mgmtd, meta, and storage services
- Configures firewall rules
- Sets up Pacemaker authentication and cluster (if enabled)
- Creates physical devices and drive groups
- Sets up BeeGFS services and resource agents
- Configures authentication for the cluster
3.4 Start BeeGFS Services
Start the BeeGFS services:
# Start Pacemaker BeeGFS resources
cd /opt/beegfs_setup_manager/
sudo python3 beegfs_control.py start pcs_bgfs
3.5 Verify BeeGFS Services
This deployment script is designed for BeeGFS 7.4.6. Support for BeeGFS 8.x will be provided in a future update. The verification commands differ between these versions.
Please use the commands corresponding to your BeeGFS version.
Check BeeGFS Version:
# For BeeGFS 8 version
beegfs version

# For BeeGFS 7 versions
beegfs-ctl --version
3.5.1 For BeeGFS 7.x
Verify that all BeeGFS services are running correctly:
# Check status of management service
beegfs-ctl --listnodes --nodetype=mgmtd --detail --nicdetail --routes

# Check status of metadata services
beegfs-ctl --listnodes --nodetype=meta --detail --nicdetail --routes

# Check status of storage services
beegfs-ctl --listnodes --nodetype=storage --detail --nicdetail --routes

# Check status of client services
beegfs-ctl --listnodes --nodetype=client --detail --nicdetail --routes

# Check status of client
beegfs-ctl --clientstats

# Check df of beegfs
beegfs-df

# Check the client connection
beegfs-net
3.5.2 For BeeGFS 8.x
BeeGFS 8 introduces the unified beegfs command. The old beegfs-ctl and beegfs-check-servers tools are replaced by subcommands within this new tool.
Key Syntax Changes:beegfs-check-servers ➔ beegfs health checkbeegfs-ctl --listnodes ➔ beegfs node listbeegfs-df ➔ beegfs health dfbeegfs-ctl --getentryinfo ➔ beegfs entry info
# [Recommended] Cluster Health Check
# This replaces beegfs-check-servers and performs a comprehensive check
# of node reachability and status across the cluster.
beegfs health check

# List all Management nodes with network details
beegfs node list --node-type=mgmtd --with-nics

# List all Metadata nodes with network details and reachability status
beegfs node list --node-type=meta --with-nics --reachability-check

# List all Storage nodes with network details and reachability status
beegfs node list --node-type=storage --with-nics --reachability-check

# List all Client nodes
beegfs node list --node-type=client --with-nics

# Check Client I/O Statistics
beegfs stats client

# Check BeeGFS capacity usage (Disk Free)
# Displays usage for storage targets and pools
beegfs health df

# Check BeeGFS connections
beegfs health net

# Verify a specific mount path (Optional)
# This replaces beegfs-ctl --getentryinfo
beegfs entry info /mnt/beegfs
3.6 Mount BeeGFS on Client
The beegfs_control.py script can automatically configure and mount the BeeGFS client if the client section in beegfs_manager_config.yaml is properly filled out.
Alternatively, if you prefer to set up the BeeGFS client service manually on your client nodes, follow these steps:
- Install BeeGFS Client Packages: Refer to the official BeeGFS website for detailed instructions on installing the necessary client packages for your operating system.
- Copy Authentication File: The authentication file,
conn_authorauth, located on the BeeGFS server at /etc/beegfs/conn_auth, must be copied to/etc/beegfs/conn_author/etc/beegfs/authon each client node to ensure proper authentication.
3.7 Post-Deployment Verification
Before proceeding with client mounting and read/write operations, it is mandatory to ensure that the PCS Cluster and BeeGFS services are successfully deployed and in a healthy state. Please perform the following verification steps in sequence:
Cluster Status Check(Server Side):
First, verify the Pacemaker cluster status on a management node (Node A or Node B) to ensure that all resources (VIPs, file systems, BeeGFS services) are Started and error-free.sudo pcs statusExpected Result: All Resource Groups should show as
Startedand be distributed across the expected nodes.
Example:pcs status Cluster name: graid-cluster Cluster Summary: * Stack: corosync (Pacemaker is running) * Current DC: bgfs-oss1 (version 2.1.6-6fdc9deea29) - partition with quorum * Last updated: Thu Dec 18 09:40:49 2025 on bgfs-oss1 * Last change: Wed Dec 17 14:31:39 2025 by root via cibadmin on bgfs-oss1 * 2 nodes configured * 38 resource instances configured (1 DISABLED) Node List: * Online: [ bgfs-oss1 bgfs-oss2 ] Full List of Resources: * graid-kv (ocf:heartbeat:Dummy): Stopped (disabled) * mgt-vip (ocf:heartbeat:IPaddr2): Started bgfs-oss1 * a-vip-stor1 (ocf:heartbeat:IPaddr2): Started bgfs-oss1 * a-vip-stor2 (ocf:heartbeat:IPaddr2): Started bgfs-oss1 * b-vip-stor1 (ocf:heartbeat:IPaddr2): Started bgfs-oss2 * b-vip-stor2 (ocf:heartbeat:IPaddr2): Started bgfs-oss2 * mgt-dg9 (ocf:graid:md_dg_daemon_py): Started bgfs-oss1 * a-dg0 (ocf:graid:dg_daemon_py): Started bgfs-oss1 * b-dg0 (ocf:graid:dg_daemon_py): Started bgfs-oss2 * b-dg9 (ocf:graid:md_dg_daemon_py): Started bgfs-oss2 * mgt-fs (ocf:heartbeat:Filesystem): Started bgfs-oss1 * a-fs-meta1 (ocf:heartbeat:Filesystem): Started bgfs-oss1 * a-fs-meta2 (ocf:heartbeat:Filesystem): Started bgfs-oss1 * a-fs-meta3 (ocf:heartbeat:Filesystem): Started bgfs-oss1 * a-fs-meta4 (ocf:heartbeat:Filesystem): Started bgfs-oss1 * a-fs-storage1 (ocf:heartbeat:Filesystem): Started bgfs-oss1 * a-fs-storage2 (ocf:heartbeat:Filesystem): Started bgfs-oss1 * b-fs-meta1 (ocf:heartbeat:Filesystem): Started bgfs-oss2 * b-fs-meta2 (ocf:heartbeat:Filesystem): Started bgfs-oss2 * b-fs-meta3 (ocf:heartbeat:Filesystem): Started bgfs-oss2 * b-fs-meta4 (ocf:heartbeat:Filesystem): Started bgfs-oss2 * b-fs-storage1 (ocf:heartbeat:Filesystem): Started bgfs-oss2 * b-fs-storage2 (ocf:heartbeat:Filesystem): Started bgfs-oss2 * mgt-bgfs (ocf:beegfs:beegfs-mgmt-daemon): Started bgfs-oss1 * a-bgfs-meta1 (ocf:beegfs:beegfs-meta-daemon): Started bgfs-oss1 * a-bgfs-meta2 (ocf:beegfs:beegfs-meta-daemon): Started bgfs-oss1 * a-bgfs-meta3 (ocf:beegfs:beegfs-meta-daemon): Started bgfs-oss1 * a-bgfs-meta4 (ocf:beegfs:beegfs-meta-daemon): Started bgfs-oss1 * a-bgfs-storage1 (ocf:beegfs:beegfs-storage-daemon): Started bgfs-oss1 * a-bgfs-storage2 (ocf:beegfs:beegfs-storage-daemon): Started bgfs-oss1 * b-bgfs-meta1 (ocf:beegfs:beegfs-meta-daemon): Started bgfs-oss2 * b-bgfs-meta2 (ocf:beegfs:beegfs-meta-daemon): Started bgfs-oss2 * b-bgfs-meta3 (ocf:beegfs:beegfs-meta-daemon): Started bgfs-oss2 * b-bgfs-meta4 (ocf:beegfs:beegfs-meta-daemon): Started bgfs-oss2 * b-bgfs-storage1 (ocf:beegfs:beegfs-storage-daemon): Started bgfs-oss2 * b-bgfs-storage2 (ocf:beegfs:beegfs-storage-daemon): Started bgfs-oss2 * bgfs-oss1-fence (stonith:fence_ipmilan): Started bgfs-oss2 * bgfs-oss2-fence (stonith:fence_ipmilan): Started bgfs-oss1 Daemon Status: corosync: active/enabled pacemaker: active/enabled pcsd: active/enabledCheck Mount Status (Client Side)
Once the cluster status is confirmed to be normal, verify on the client node that BeeGFS is mounted correctly.#[Please log in to the Client (bgfs-client) to execute the following command] mount | grep beegfs
Expected Result: The file system type beegfs named beegfs_nodev is detected.
mount | grep beegfs
beegfs_nodev on /mnt/beegfs type beegfs (rw,relatime,cfgFile=/etc/beegfs/beegfs-client.conf,_netdev
Basic Read/Write Test (Client Side)
Perform a simple write test on the client to verify data access permissions and network connectivity.- Write Test (1GB)
dd if=/dev/zero of=/mnt/beegfs/testfile bs=1M count=1024 status=progress- Read Test
dd if=/mnt/beegfs/testfile of=/dev/null bs=1M status=progressHigh Availability (HA) Test Verify the failover functionality.
It is recommended to perform a manual resource migration to another node while continuous I/O (e.g., writing a large file) is running on the client, to observe if the I/O is interrupted.pcs node standby bgfs-oss2Expected Result: All services from
bgfs-oss2should failover tobgfs-oss1.pcs status Cluster name: graid-cluster Cluster Summary: * Stack: corosync (Pacemaker is running) * Current DC: bgfs-oss1 (version 2.1.6-6fdc9deea29) - partition with quorum * Last updated: Thu Dec 18 09:40:49 2025 on bgfs-oss1 * Last change: Wed Dec 17 14:31:39 2025 by root via cibadmin on bgfs-oss1 * 2 nodes configured * 38 resource instances configured (1 DISABLED) Node List: * Node bgfs-oss2: standby * Online: [ bgfs-oss1 ] Full List of Resources: * graid-kv (ocf:heartbeat:Dummy): Stopped (disabled) * mgt-vip (ocf:heartbeat:IPaddr2): Started bgfs-oss1 * a-vip-stor1 (ocf:heartbeat:IPaddr2): Started bgfs-oss1 * a-vip-stor2 (ocf:heartbeat:IPaddr2): Started bgfs-oss1 * b-vip-stor1 (ocf:heartbeat:IPaddr2): Started bgfs-oss2 * b-vip-stor2 (ocf:heartbeat:IPaddr2): Started bgfs-oss2 * mgt-dg9 (ocf:graid:md_dg_daemon_py): Started bgfs-oss1 * a-dg0 (ocf:graid:dg_daemon_py): Started bgfs-oss1 * b-dg0 (ocf:graid:dg_daemon_py): Started bgfs-oss2 * b-dg9 (ocf:graid:md_dg_daemon_py): Started bgfs-oss2 * mgt-fs (ocf:heartbeat:Filesystem): Started bgfs-oss1 * a-fs-meta1 (ocf:heartbeat:Filesystem): Started bgfs-oss1 * a-fs-meta2 (ocf:heartbeat:Filesystem): Started bgfs-oss1 * a-fs-meta3 (ocf:heartbeat:Filesystem): Started bgfs-oss1 * a-fs-meta4 (ocf:heartbeat:Filesystem): Started bgfs-oss1 * a-fs-storage1 (ocf:heartbeat:Filesystem): Started bgfs-oss1 * a-fs-storage2 (ocf:heartbeat:Filesystem): Started bgfs-oss1 * b-fs-meta1 (ocf:heartbeat:Filesystem): Started bgfs-oss2 * b-fs-meta2 (ocf:heartbeat:Filesystem): Started bgfs-oss2 * b-fs-meta3 (ocf:heartbeat:Filesystem): Started bgfs-oss2 * b-fs-meta4 (ocf:heartbeat:Filesystem): Started bgfs-oss2 * b-fs-storage1 (ocf:heartbeat:Filesystem): Started bgfs-oss2 * b-fs-storage2 (ocf:heartbeat:Filesystem): Started bgfs-oss2 * mgt-bgfs (ocf:beegfs:beegfs-mgmt-daemon): Started bgfs-oss1 * a-bgfs-meta1 (ocf:beegfs:beegfs-meta-daemon): Started bgfs-oss1 * a-bgfs-meta2 (ocf:beegfs:beegfs-meta-daemon): Started bgfs-oss1 * a-bgfs-meta3 (ocf:beegfs:beegfs-meta-daemon): Started bgfs-oss1 * a-bgfs-meta4 (ocf:beegfs:beegfs-meta-daemon): Started bgfs-oss1 * a-bgfs-storage1 (ocf:beegfs:beegfs-storage-daemon): Started bgfs-oss1 * a-bgfs-storage2 (ocf:beegfs:beegfs-storage-daemon): Started bgfs-oss1 * b-bgfs-meta1 (ocf:beegfs:beegfs-meta-daemon): Started bgfs-oss2 * b-bgfs-meta2 (ocf:beegfs:beegfs-meta-daemon): Started bgfs-oss2 * b-bgfs-meta3 (ocf:beegfs:beegfs-meta-daemon): Started bgfs-oss2 * b-bgfs-meta4 (ocf:beegfs:beegfs-meta-daemon): Started bgfs-oss2 * b-bgfs-storage1 (ocf:beegfs:beegfs-storage-daemon): Started bgfs-oss2 * b-bgfs-storage2 (ocf:beegfs:beegfs-storage-daemon): Started bgfs-oss2 * bgfs-oss1-fence (stonith:fence_ipmilan): Stopped * bgfs-oss2-fence (stonith:fence_ipmilan): Started bgfs-oss1 Daemon Status: corosync: active/enabled pacemaker: active/enabled pcsd: active/enabled- Migrate back to the original node
pcs node unstandby bgfs-oss2Expected Result: All services for
bgfs-oss2should migrate back frombgfs-oss1tobgfs-oss2.
4. Cluster Expansion (Adding Nodes)
To add additional nodes to an existing BeeGFS cluster:
4.1 Prepare New Nodes
Follow the steps in sections 1.1-1.7 to prepare the new nodes.
4.2 Update Configuration
Update the config/config/beegfs_manager_config.yaml file to include the new nodes.
4.3 Join Existing Cluster
Use the join command to add nodes to an existing cluster:
cd /opt/beegfs_setup_manager/
sudo python3 beegfs_control.py join <mgmtd_ip>
Where <mgmtd_ip> is the IP address of the management node's virtual IP.
5. Operations and Maintenance
5.1 Stopping BeeGFS Services
To stop BeeGFS services:
# Stop Pacemaker BeeGFS resources
cd /opt/beegfs_setup_manager/
sudo python3 beegfs_control.py stop pcs_bgfs
5.2 Purging BeeGFS Services
To completely remove BeeGFS data and configuration (use with caution):
cd /opt/beegfs_setup_manager/
# Purge all BeeGFS services and data
sudo python3 beegfs_control.py purge

# Purge nodes added with the join command
sudo python3 beegfs_control.py purge_join <mgmtd_ip>

# Purge only Pacemaker resources
sudo python3 beegfs_control.py purge --pcs
5.3 Checking Version Information
To check the version of the BeeGFS management script:
cd /opt/beegfs_setup_manager/
sudo python3 beegfs_control.py version
6. Troubleshooting
6.1 Log Files
Check the following log files for troubleshooting:
- BeeGFS Manager Log:
/var/log/beegfs_manager.log - BeeGFS Services Logs:
- Management:
/var/log/beegfs-mgmtd.log - Metadata:
/var/log/beegfs-meta[N].log - Storage:
/var/log/beegfs-storage[N].log - Client:
/var/log/beegfs-client.log - Helper:
/var/log/beegfs-helperd.log
- Management:
- Pacemaker Logs:
/var/log/pacemaker.logand/var/log/corosync.log
Or download the graid-log-collection tool to get more details logs from it
- Download the
graid-log-collectiontoolwget https://download.graidtech.com/misc/tools/graid_log_collector/linux/graid_log_script.tar.gz - Extract the
graid-log-collectiontooltar -xvf graid_log_script.tar.gz - Execute
graid-log-collectiontoolcd graid-logs-tool/ bash graid-log-collector.sh -k
6.2 Common Issues
SSH Connection Failures
- Check SSH service status:
systemctl status sshd - Verify SSH key permissions:
chmod 600 ~/.ssh/id_rsa - Check for host key verification: Add
StrictHostKeyChecking=noto SSH options
Drive Group Issues
- Verify drive group status:
graidctl ls dg - Check drive group details:
graidctl desc dg <dg_id> - Import failed drive groups:
graidctl import fd <uuid>
Pacemaker Resource Issues
- Check resource status:
pcs status - Cleanup failed resources:
pcs resource cleanup - View constraints:
pcs constraint show
Mount Point Issues
- Check mount status:
df -hormount | grep beegfs - Verify fstab entries:
cat /etc/fstab | grep beegfs - Check filesystem:
fsck -N /dev/<device>
6.3 Verifying Environment
Run verification to ensure all prerequisites are met:
cd /opt/beegfs_setup_manager/
sudo python3 beegfs_control.py verify
7. Reference
7.1 Configuration File Structure
The main configuration file (beegfs_manager_config.yaml) contains several key sections:
- Basic Configuration: SSH password, log file, auth file path
- BeeGFS Configuration:
- Management service (mgmtd)
- Metadata services (meta)
- Storage services (storage)
- Client configuration
- Pacemaker Configuration:
- Cluster setup
- STONITH/fencing devices
- Resource groups
7.2 Command Reference
Command Reference of create_bgfs_raid.py
| Command | Description |
|---|---|
create | Creates RAID groups for the BeeGFS setup. The --hotspare option is available. |
purge | Purge all the RAID configuration |
query-dg | query the DG's UUID |
Command Reference of beegfs_control.py
| Command | Description |
|---|---|
deploy | Deploy BeeGFS packages on all nodes |
setup | Set up BeeGFS services and Pacemaker resources |
start | Start BeeGFS services (pcs_bgfs) |
stop | Stop BeeGFS services (pcs_bgfs) |
purge | Remove BeeGFS data and configuration |
purge_join | Remove BeeGFS(join_node) data and configuration |
join | Add nodes to an existing BeeGFS cluster |
version | Display the version of the BeeGFS management script |
8. Security Considerations
- Use key-based SSH authentication rather than password-based when possible
- Implement appropriate network security measures (firewalls, VLANs)
- Regularly update the BeeGFS software to the latest version
- Change default passwords for all services, especially Pacemaker's hacluster user
- Restrict physical and remote access to the management nodes
9. Backup and Recovery
- Regularly back up the BeeGFS configuration files
- Document the cluster setup including network topology, hardware, and configuration
- Periodically test recovery procedures
- Consider implementing a snapshot-based backup strategy for critical data