Setting Up SupremeRAID™ Volume as a VMware Datastore Using SPDK
In order to establish an effective storage system for virtualized environments, one can configure SupremeRAID™'s volume as a VMware Datastore using the Storage Performance Development Kit (SPDK). This will allow for the management of the volume as a dedicated VMware Datastore.
This document would guide the user step by step to set up the VMware datastore with SupremeRAID™.
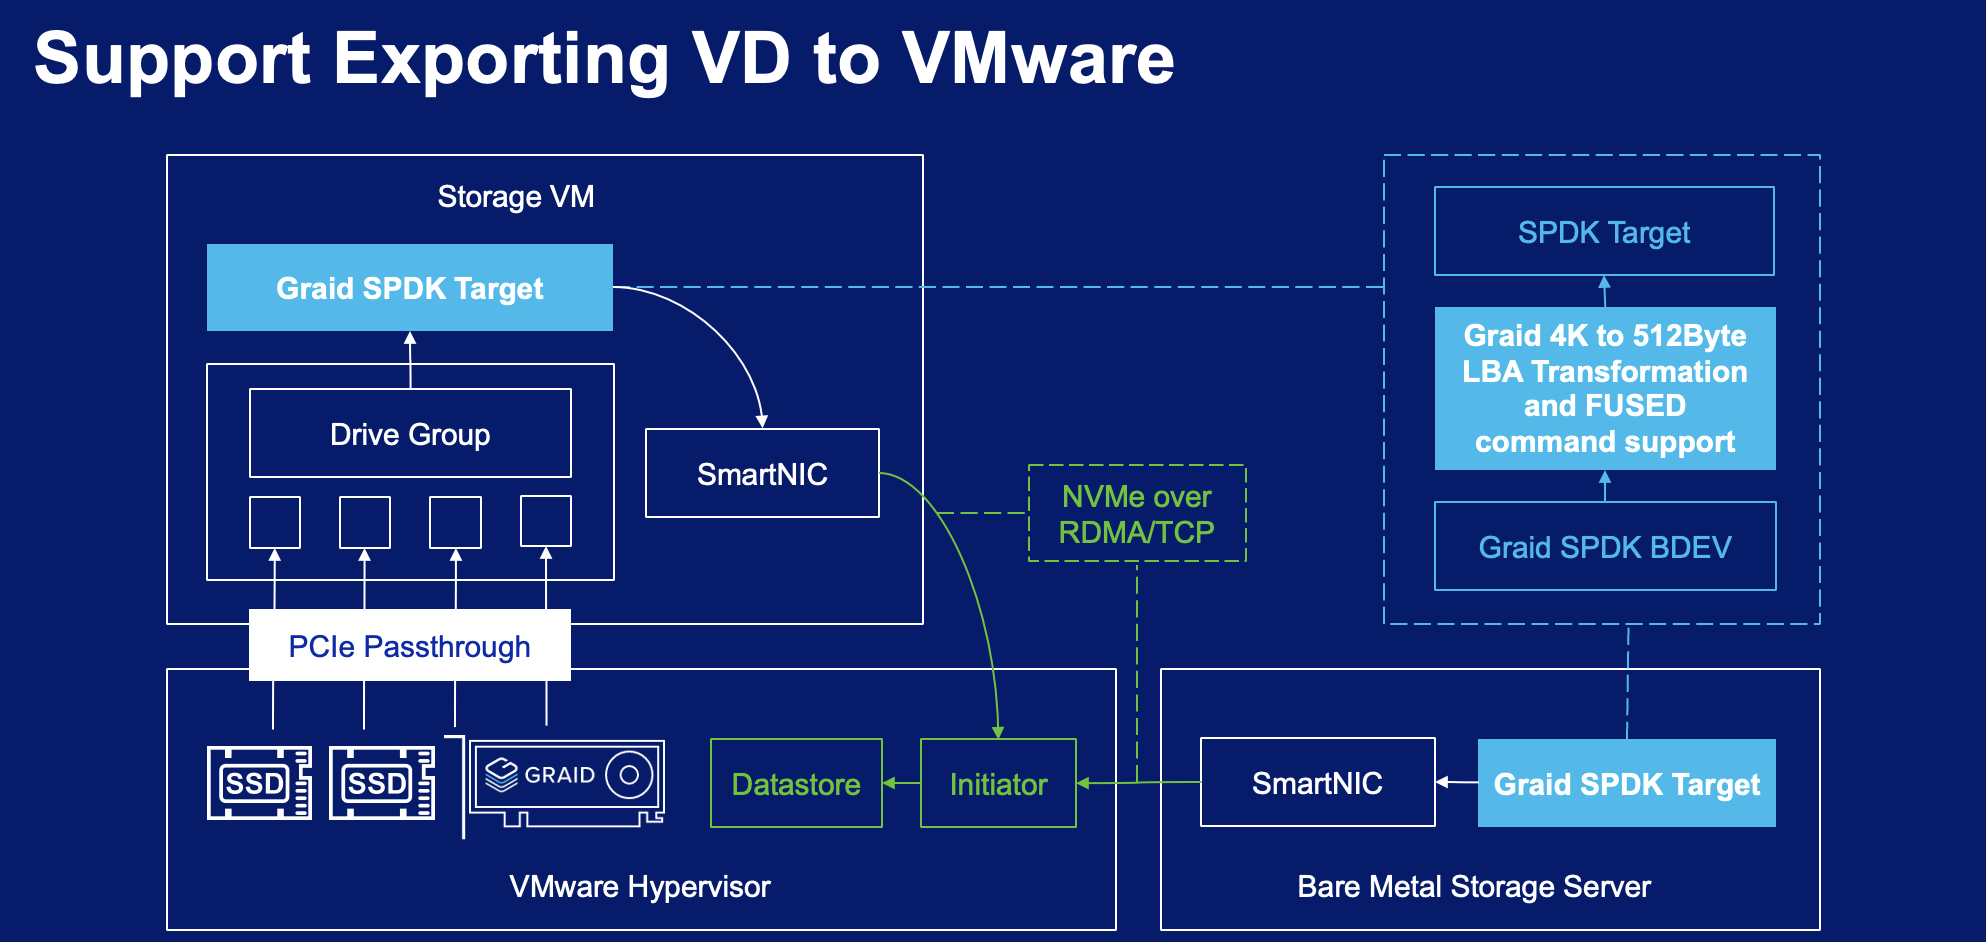
Block Diagram of SupremeRAID™'s Volume as VMware Datastore
Flowchart
Install SupremeRAID™ driver and create SupremeRAID™'s virtual drives.
Install SupremeRAID™ driver
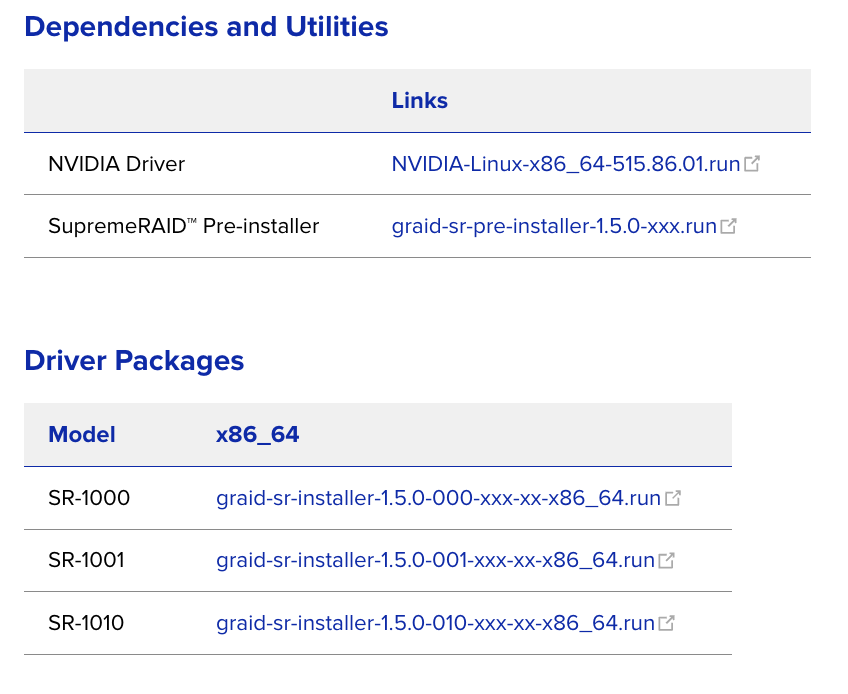
From the Graid Technology Inc. website, download the latest version of the pre-installer and make it executable.
Execute the pre-installer and follow the instructions to complete the pre-installation process as shown.
$ sudo chmod +x <filename>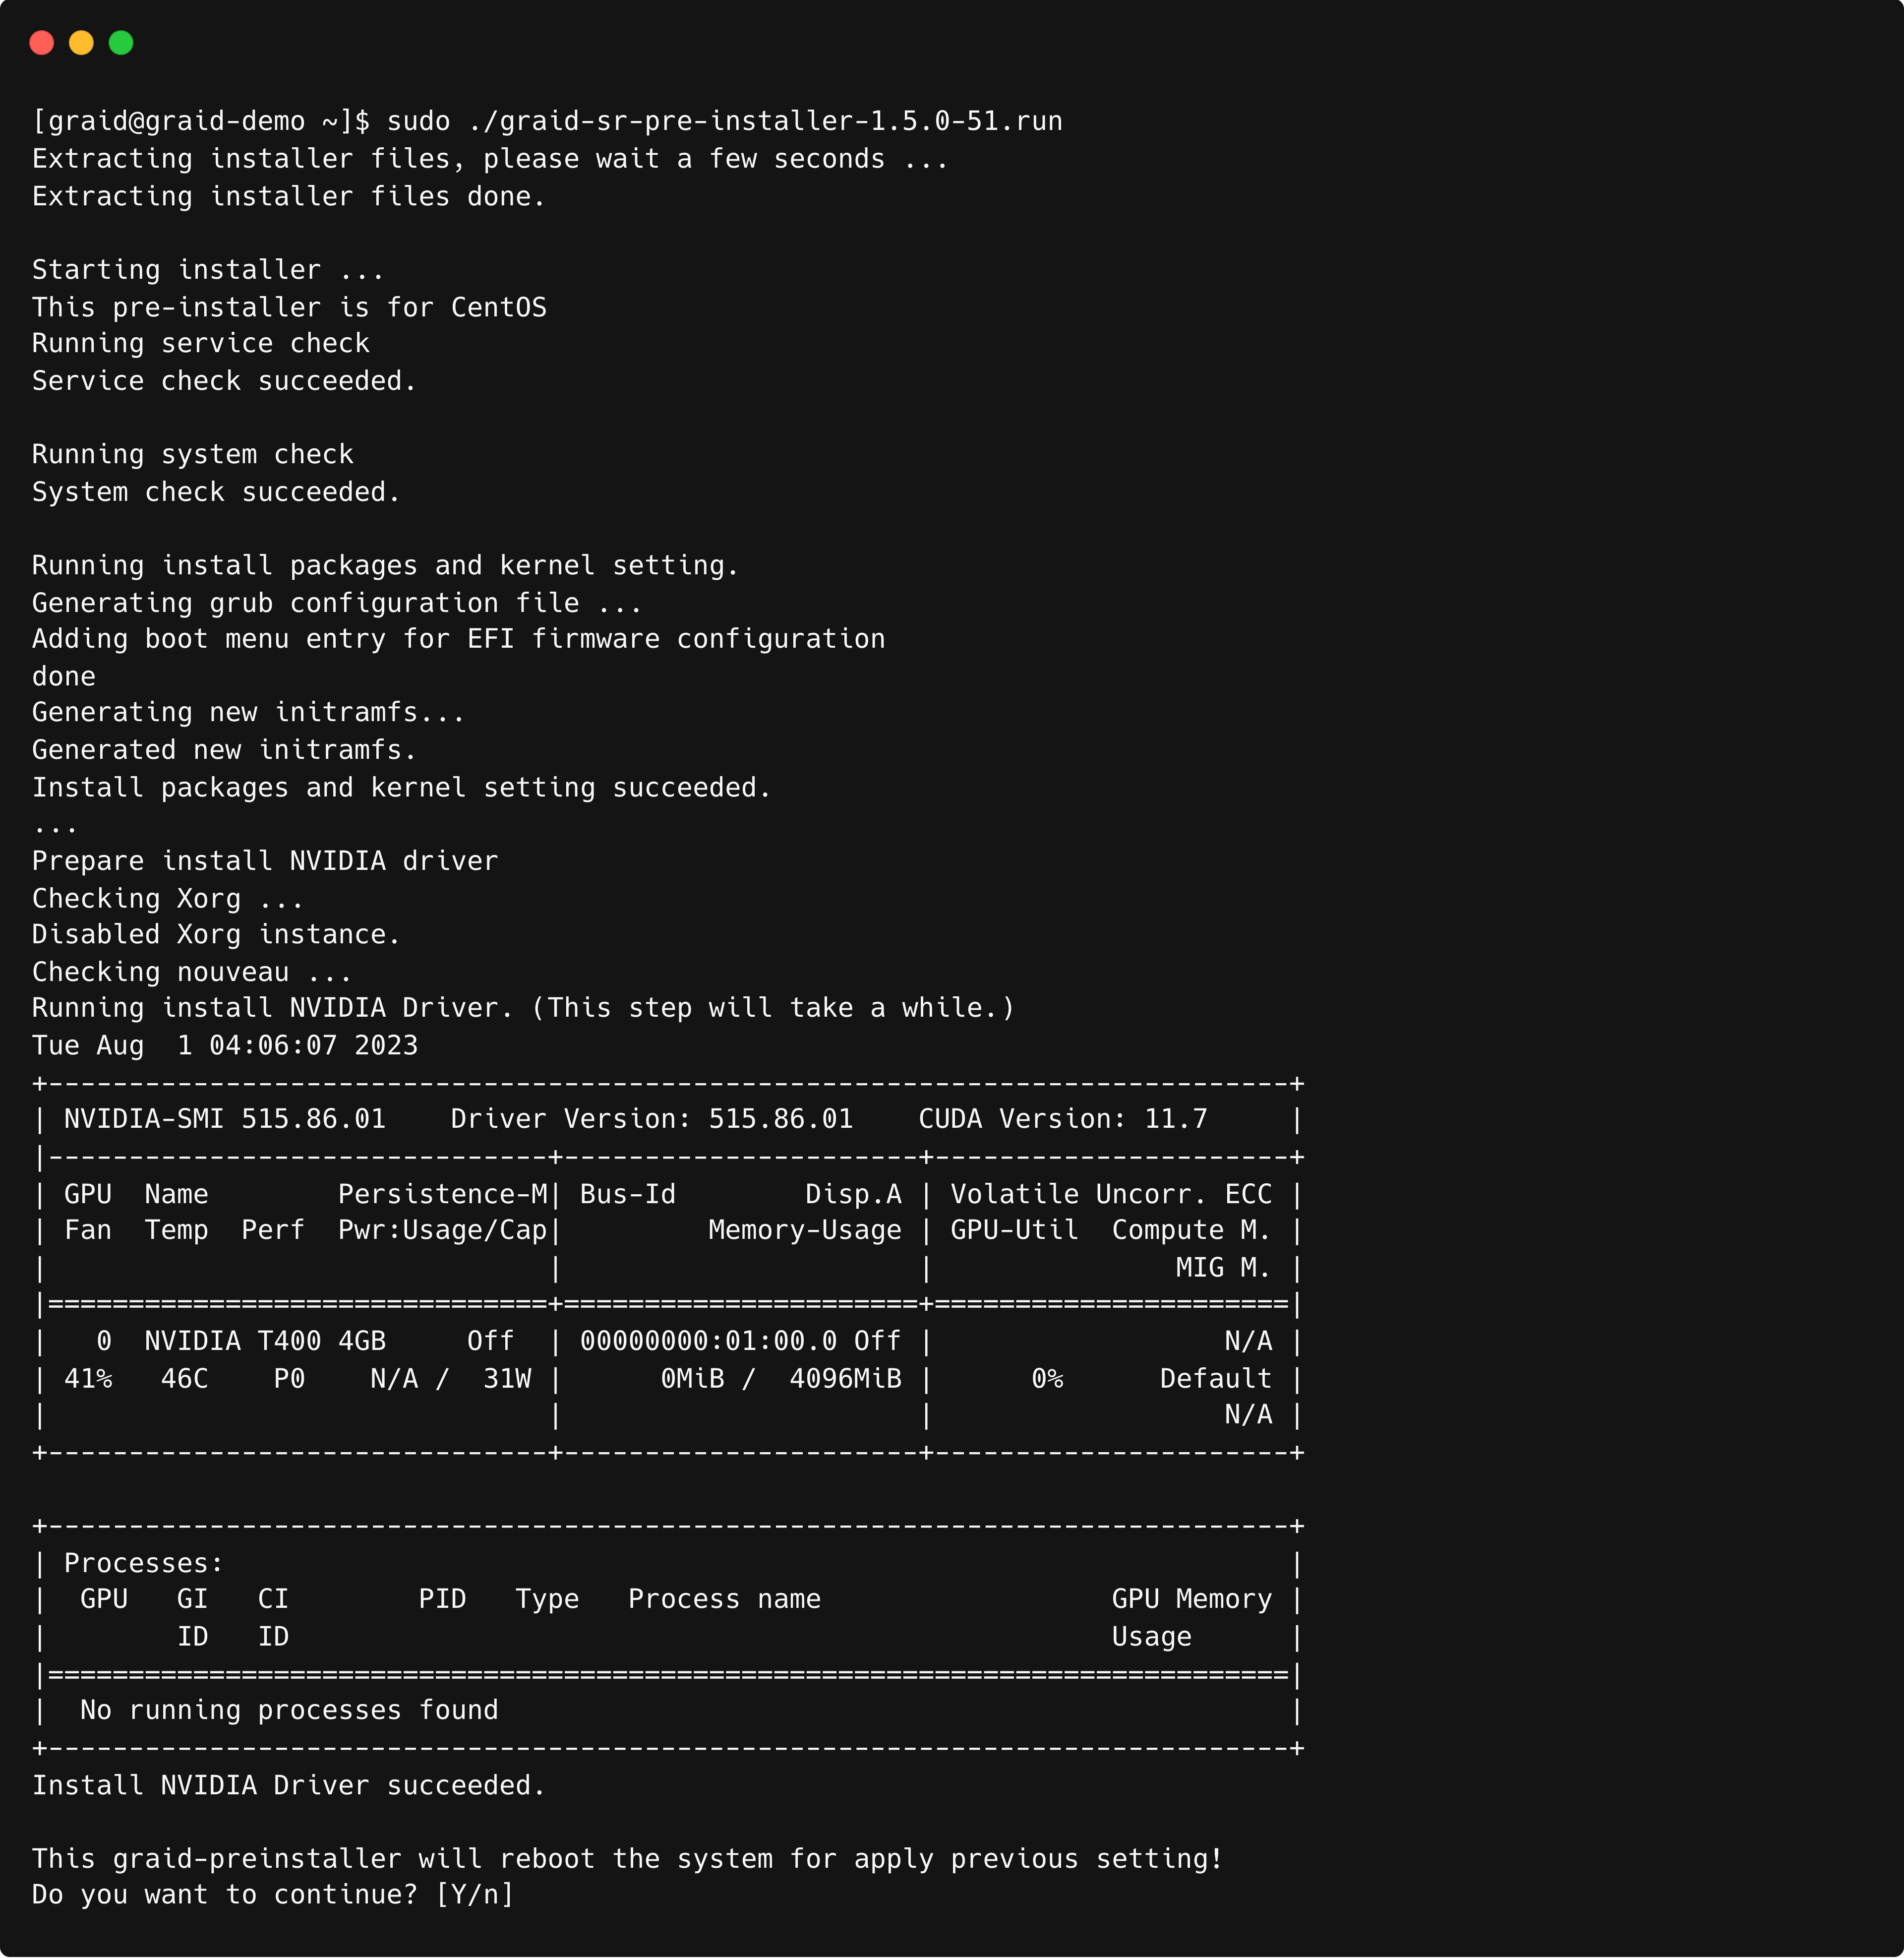
The system must be rebooted after running the pre-installation script. When prompted, type Y to reboot the system.
Execute the install package and and follow the instructions to complete it.
To activate the software, apply the SupremeRAID™ license key
$ sudo graidctl apply license <LICENSE_KEY>
Creating SupremeRAID™'s virtual drives
- Create a physical drive.
$ sudo graidctl create physical_drive <nqn or devpath> # Example: $ sudo graidctl create physical_drive /dev/nvme0-4 - Create a drive group.
$ sudo graidctl create drive_group <Mode> <PD_ID> # Example: $ sudo graidctl create drive_group raid5 0-4 - Create a virtual drive with full space volume size.
$ sudo graidctl create virtual_drive <DG_ID> [size]
# Example:
$ sudo graidctl create virtual_drive 0
Build and Install the SPDK
This is an example of how to download, build, and install the SPDK package. Please ignore this section if you already have an existing SPDK application.
$ git clone https://github.com/spdk/spdk.git --branch v23.01.1 --single-branch
$ cd spdk
$ sudo git submodule update --init --recursive
$ sudo scripts/pkgdep.sh --rdma
$ sudo ./configure --with-rdma --with-shared \
--without-idxd --without-crypto \
--without-vhost --without-virtio \
--without-ocf --without-uring --without-fuse \
--without-nvme-cuse --disable-unit-tests
$ make
OPTIONAL: Build and Install the FIO
The source code of fio is required when building the SPDK package with the fio_plugin.
$ git clone https://github.com/axboe/fio
$ cd fio
$ ./configure
$ make
$ make install
Note: If installed FIO from github the configure parameter need to add the FIO path
$ sudo ./configure --with-fio=[path to fio source] --with-rdma --enable-debug --with-shared \
 --without-idxd --without-crypto \
--without-vhost --without-virtio --without-ocf --without-uring --without-fuse \
--without-nvme-cuse --disable-unit-tests
Enable SPDK bdev function in the Linux Driver
Check /usr/lib/graid/ must to have these two files -> libspdk_bdev_graid.so and graid_rpc_plugin.py
$ ls /usr/lib/graid/Output example:

Stop SupremeRAID™ driver
$ sudo systemctl stop graid
$ sudo rmmod graid_nvidia graid
Edit /etc/modprobe.d/graid.conf and modify allow_spdk_bdev=0 to allow_spdk_bdev=1
$ vim /etc/modprobe.d/graid.confOutput example:

Reload the kernel module
$ sudo systemctl restart graidVerify the value of /sys/module/graid/parameters/allow_spdk_bdev; it should be Y
$ cat /sys/module/graid/parameters/allow_spdk_bdevOutput example:

Create PDs, DGs, VDs, check the section of Creating SupremeRAID™'s virtual drives
Enable the bdev function in the created Drive Group
$ sudo graidctl edit drive_group <dg_id> spdk_bdev enable
# Example:
$ sudo graidctl edit drive_group 0 spdk_bdev enable
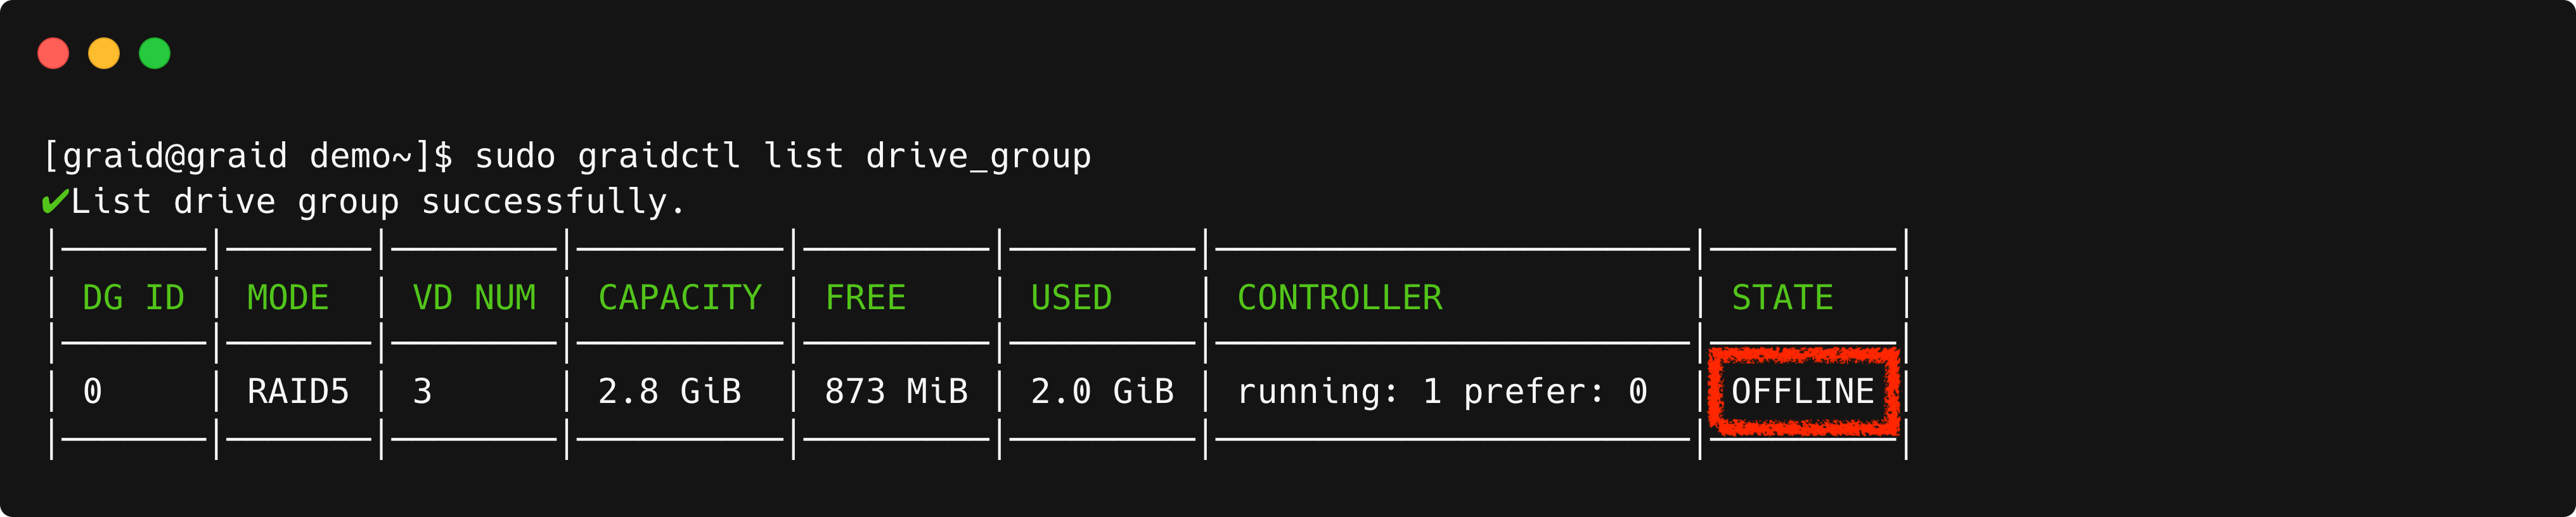
Please verify the Drive Group status. It should be offline once bdev is enabled and the description in the drives_group shows that the bdev function is enabled.
$ sudo graidctl list drive_groupOutput example:
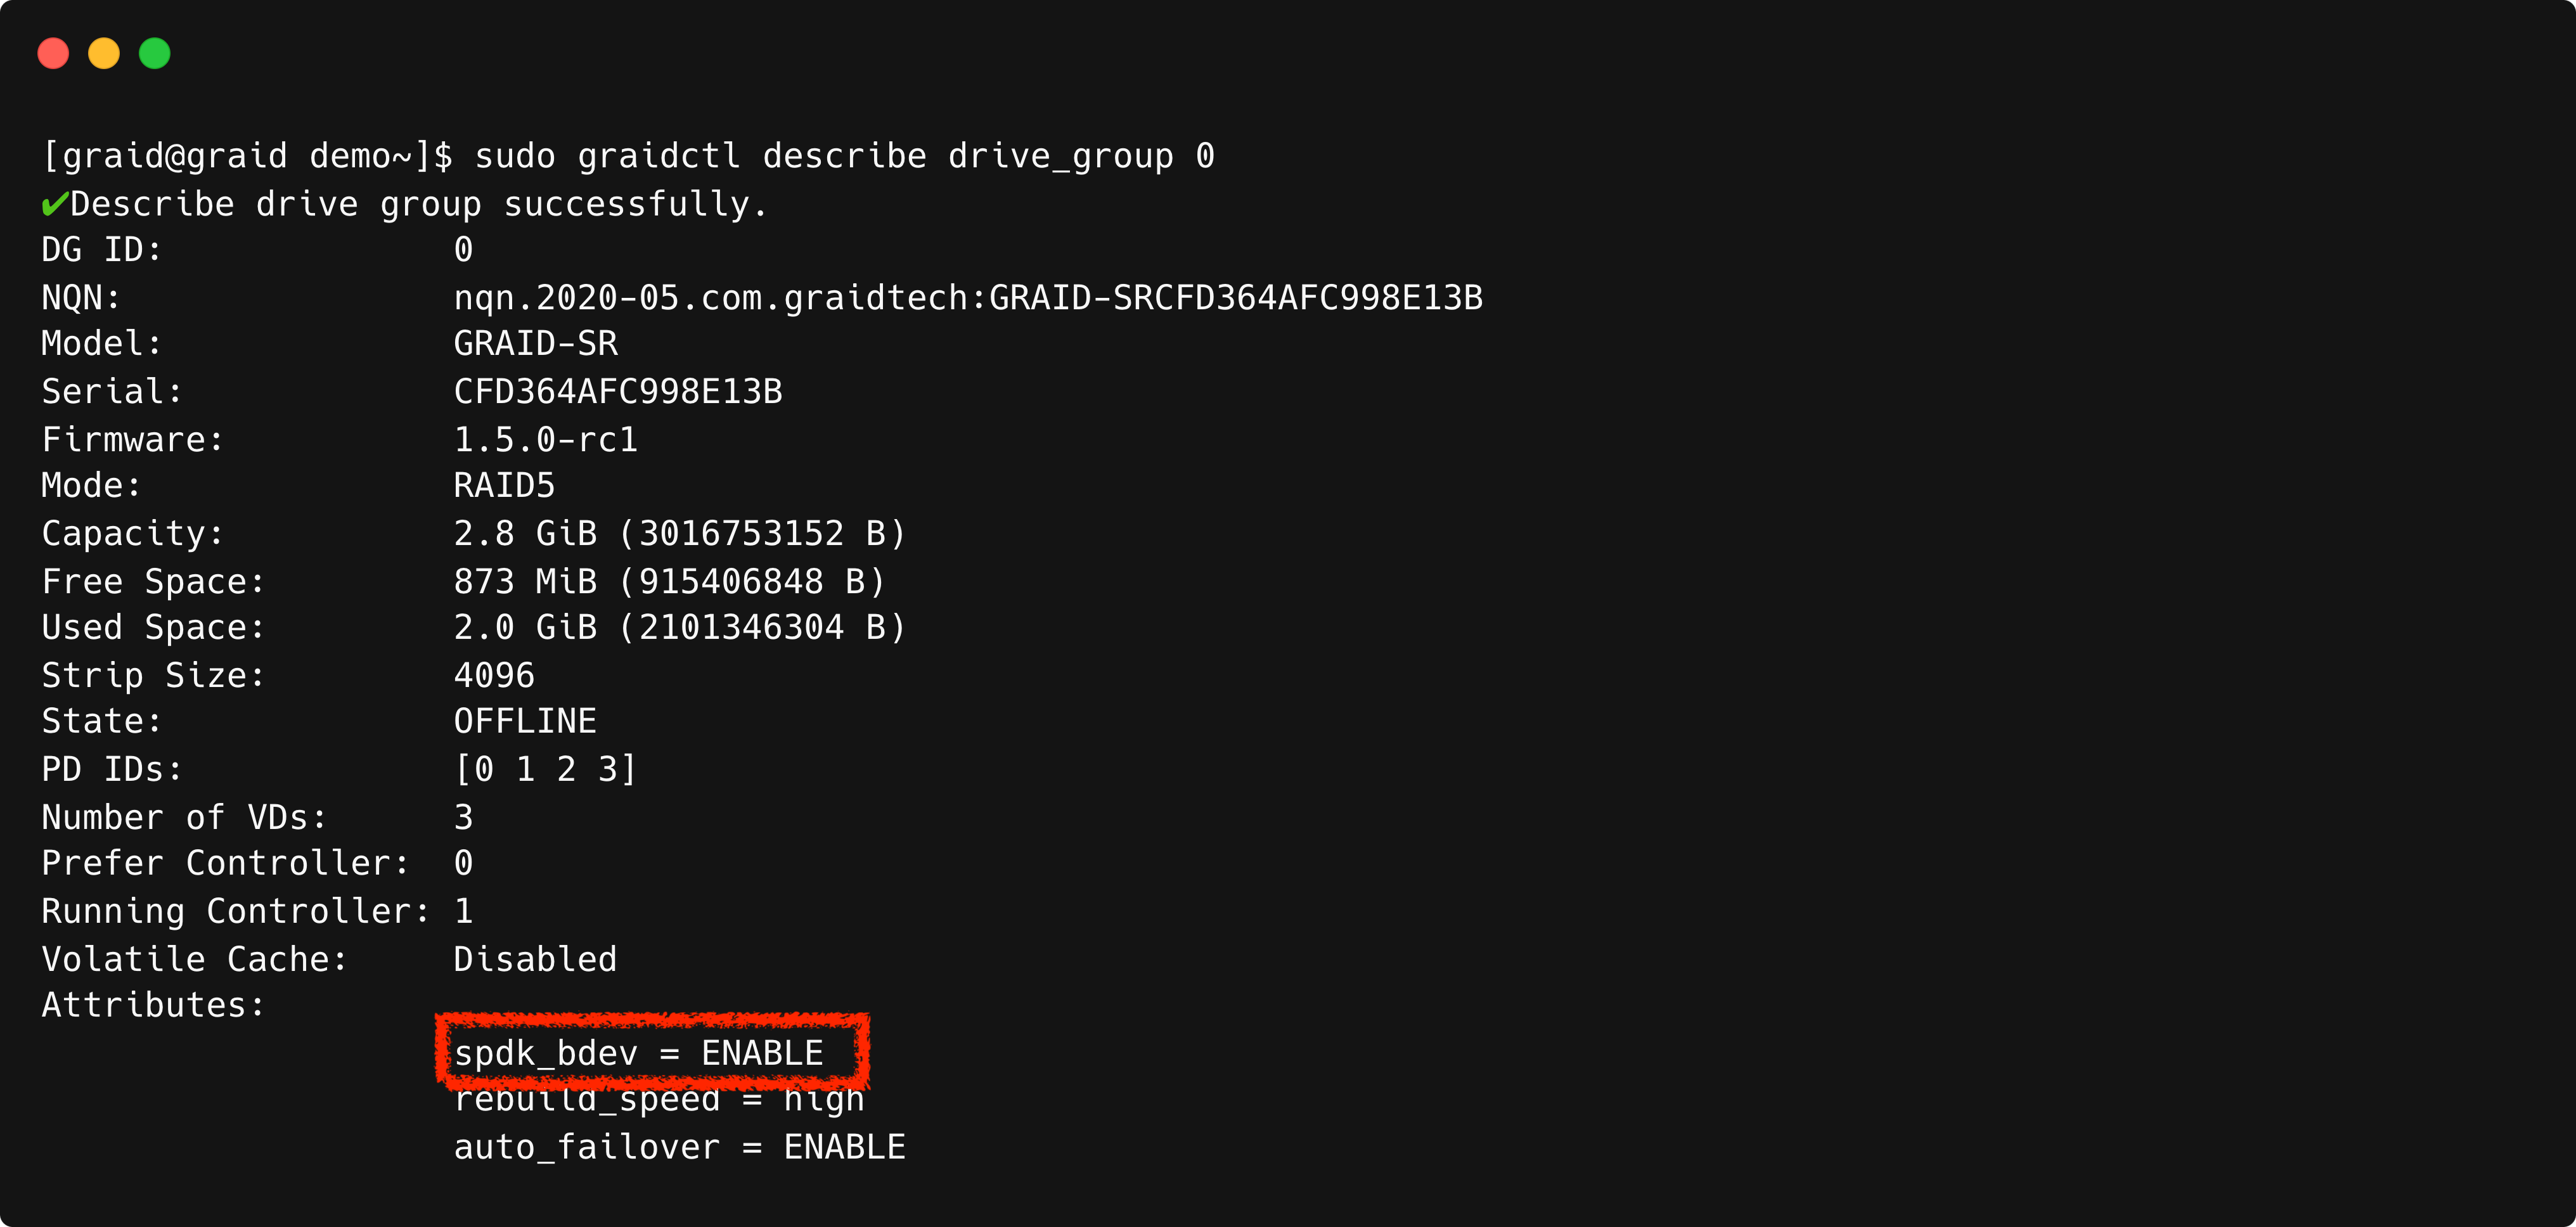
$ sudo graidctl describe drive_group <dg_id>
# Example:
$ sudo graidctl describe drive_group 0
Output example:
Note: Enabling the bdev function will restrict the creation of a Virtual Drive through graidctl. Only deletion will be possible until the Drive Group is taken over by the SPDK application.
Additionally, partners can also save the following script (ex: setup_spdk_fio.sh) to setup the environment, and run the script.
$ sudo ~/setup_spdk_fio.sh
$ sudo bash ~/setup_spdk_fio.sh
Context of setup_spdk_fio.sh, Copy the code provided below and paste it.
#!/bin/bash

# Ensure the script is run as root
if [ "$(id -u)" != "0" ]; then
   echo "This script must be run as root"
   exit 1
fi

install_elrepo() {
    # Import the ELRepo GPG key
    rpm --import https://www.elrepo.org/RPM-GPG-KEY-elrepo.org

    # Determine the RHEL version and install the appropriate ELRepo RPM
    VERSION_ID=$(grep -oP '(?<=^VERSION_ID=).+' /etc/os-release | tr -d '"')
    case $VERSION_ID in
        9*)
            yum install -y https://www.elrepo.org/elrepo-release-9.el9.elrepo.noarch.rpm
            ;;
        8*)
            yum install -y https://www.elrepo.org/elrepo-release-8.el8.elrepo.noarch.rpm
            ;;
        7*)
            yum install -y https://www.elrepo.org/elrepo-release-7.el7.elrepo.noarch.rpm
            ;;
        *)
            echo "Unsupported RHEL version for ELRepo. Skipping..."
            return
            ;;
    esac

    # Modify the elrepo.repo file
    sed -i '/^mirrorlist=/s/^/#/' /etc/yum.repos.d/elrepo.repo
}

check_and_install_git() {
    if ! command -v git &> /dev/null; then
        # Determine OS type
        . /etc/os-release
        case $ID in
            ubuntu|debian)
                apt install -y git -qq
                ;;
            rhel|centos|rocky|almalinux|ol)
                yum install -y git -q
                install_elrepo
                ;;
            suse|opensuse*|sles)
                zypper -n install git
                ;;
            *)
                echo "Unsupported OS. Please install git manually."
                exit 1
                ;;
        esac
    fi
}

install_fio() {
    export LC_ALL=C
    if [ -d "fio" ]; then
        echo "fio is already configured. Skipping..."
        return
    fi
    "clone fio branch"
    git clone https://github.com/axboe/fio &> /dev/null
    cd fio/
    ./configure
    "make and install"
    make
    make install
    cd ..
}

install_spdk() {
    export LC_ALL=C
    if [ -d "spdk" ]; then
        echo "spdk is already configured. Skipping..."
        return
    fi
    FIO_PATH=$(pwd)/fio/
    "clone SPDK 23.01.1 LTS branch"
    git clone https://github.com/spdk/spdk.git --branch v23.01.1 --single-branch &> /dev/null
    cd spdk
    git submodule update --init --recursive &> /dev/null
    "install packages"
    scripts/pkgdep.sh --rdma
    ./configure --with-rdma --with-shared --without-idxd --without-crypto --without-vhost \
    --without-virtio --without-ocf --without-uring --without-fuse --without-nvme-cuse \
    --disable-unit-tests --with-fio=$FIO_PATH
    "make"
    make
    cd ..
}

configure_graid() {
    if grep -q "allow_spdk_bdev=1" /etc/modprobe.d/graid.conf; then
        echo "graid is already configured. Skipping..."
        return
    fi
    systemctl stop graid &> /dev/null
    rmmod graid_nvidia graid &> /dev/null
    sed -i 's/allow_spdk_bdev=0/allow_spdk_bdev=1/' /etc/modprobe.d/graid.conf &> /dev/null
    systemctl restart graid &> /dev/null
    graidctl edit drive_group 0 spdk_bdev enable &> /dev/null
}

main() {
    echo "checking...."
    check_and_install_git
    echo "install_fio"
    install_fio
    echo "install_spdk"
    install_spdk
    echo "configure_graid"
    configure_graid
    echo "All done!"
}

main
Setup SPDK Hugepages
This is an example of how to set up hugepages for the SPDK application.
- Edit [HUGEMEM] in ~/setup_hugepages.shCopy the code provided below and paste it (note that you can customize the HUGEMEM as per your application needs)
$ vim ~/setup_hugepages.sh#!/usr/bin/env bash # NOTE: you can decide this, which is the total size of hugepages for SPDK : ${HUGEMEM:=2048} # Find hugepage size from meminfo HUGEPGSZ=${HUGEPGSZ:-$(grep Hugepagesize /proc/meminfo | cut -d : -f 2 | tr -dc '0-9')} if [[ ! -e /sys/kernel/mm/hugepages/hugepages-${HUGEPGSZ}kB ]]; then echo "ERROR: ${HUGEPGSZ}kB is not supported by the running kernel, aborting" >&2 unset -v HUGEPGSZ exit 1 fi HUGEPGSZ=${HUGEPGSZ:-$(grep Hugepagesize /proc/meminfo | cut -d : -f 2 | tr -dc '0-9')} HUGEPGSZ_MB=$((HUGEPGSZ / 1024)) # Calculate number of hugepages : ${NRHUGE=$(((HUGEMEM + HUGEPGSZ_MB - 1) / HUGEPGSZ_MB))} echo "Setup $HUGEMEM MB hugepages : HUGEPAGE_SIZE=${HUGEPGSZ_MB}MB, HUGEPAGE_NR=$NRHUGE" # Setup hugepages echo "$NRHUGE" > /proc/sys/vm/nr_hugepages - Setup SPDKOutput example:
$ sudo bash ~/setup_hugepages.sh
Configure NVMeoF Target
This is an example of how to export the Virtual Drive via SPDK target.
Target Side
Run nvmf_tgt
$ SPDK_BASE_DIR=[spdk build path]; \
LD_LIBRARY_PATH="$LD_LIBRARY_PATH:$SPDK_BASE_DIR/build/lib:$SPDK_BASE_DIR/dpdk/build/lib" \
LD_PRELOAD="/usr/lib/graid/libspdk_bdev_graid.so" $SPDK_BASE_DIR/build/bin/nvmf_tgt \
 -m [<cpu_core>]
# Example:
$ SPDK_BASE_DIR=/root/spdk;\
LD_LIBRARY_PATH="$LD_LIBRARY_PATH:$SPDK_BASE_DIR/build/lib:$SPDK_BASE_DIR/dpdk/build/lib" \
LD_PRELOAD="/usr/lib/graid/libspdk_bdev_graid.so" $SPDK_BASE_DIR/build/bin/nvmf_tgt \
 -m [0,1,2,3,4,5,6,7]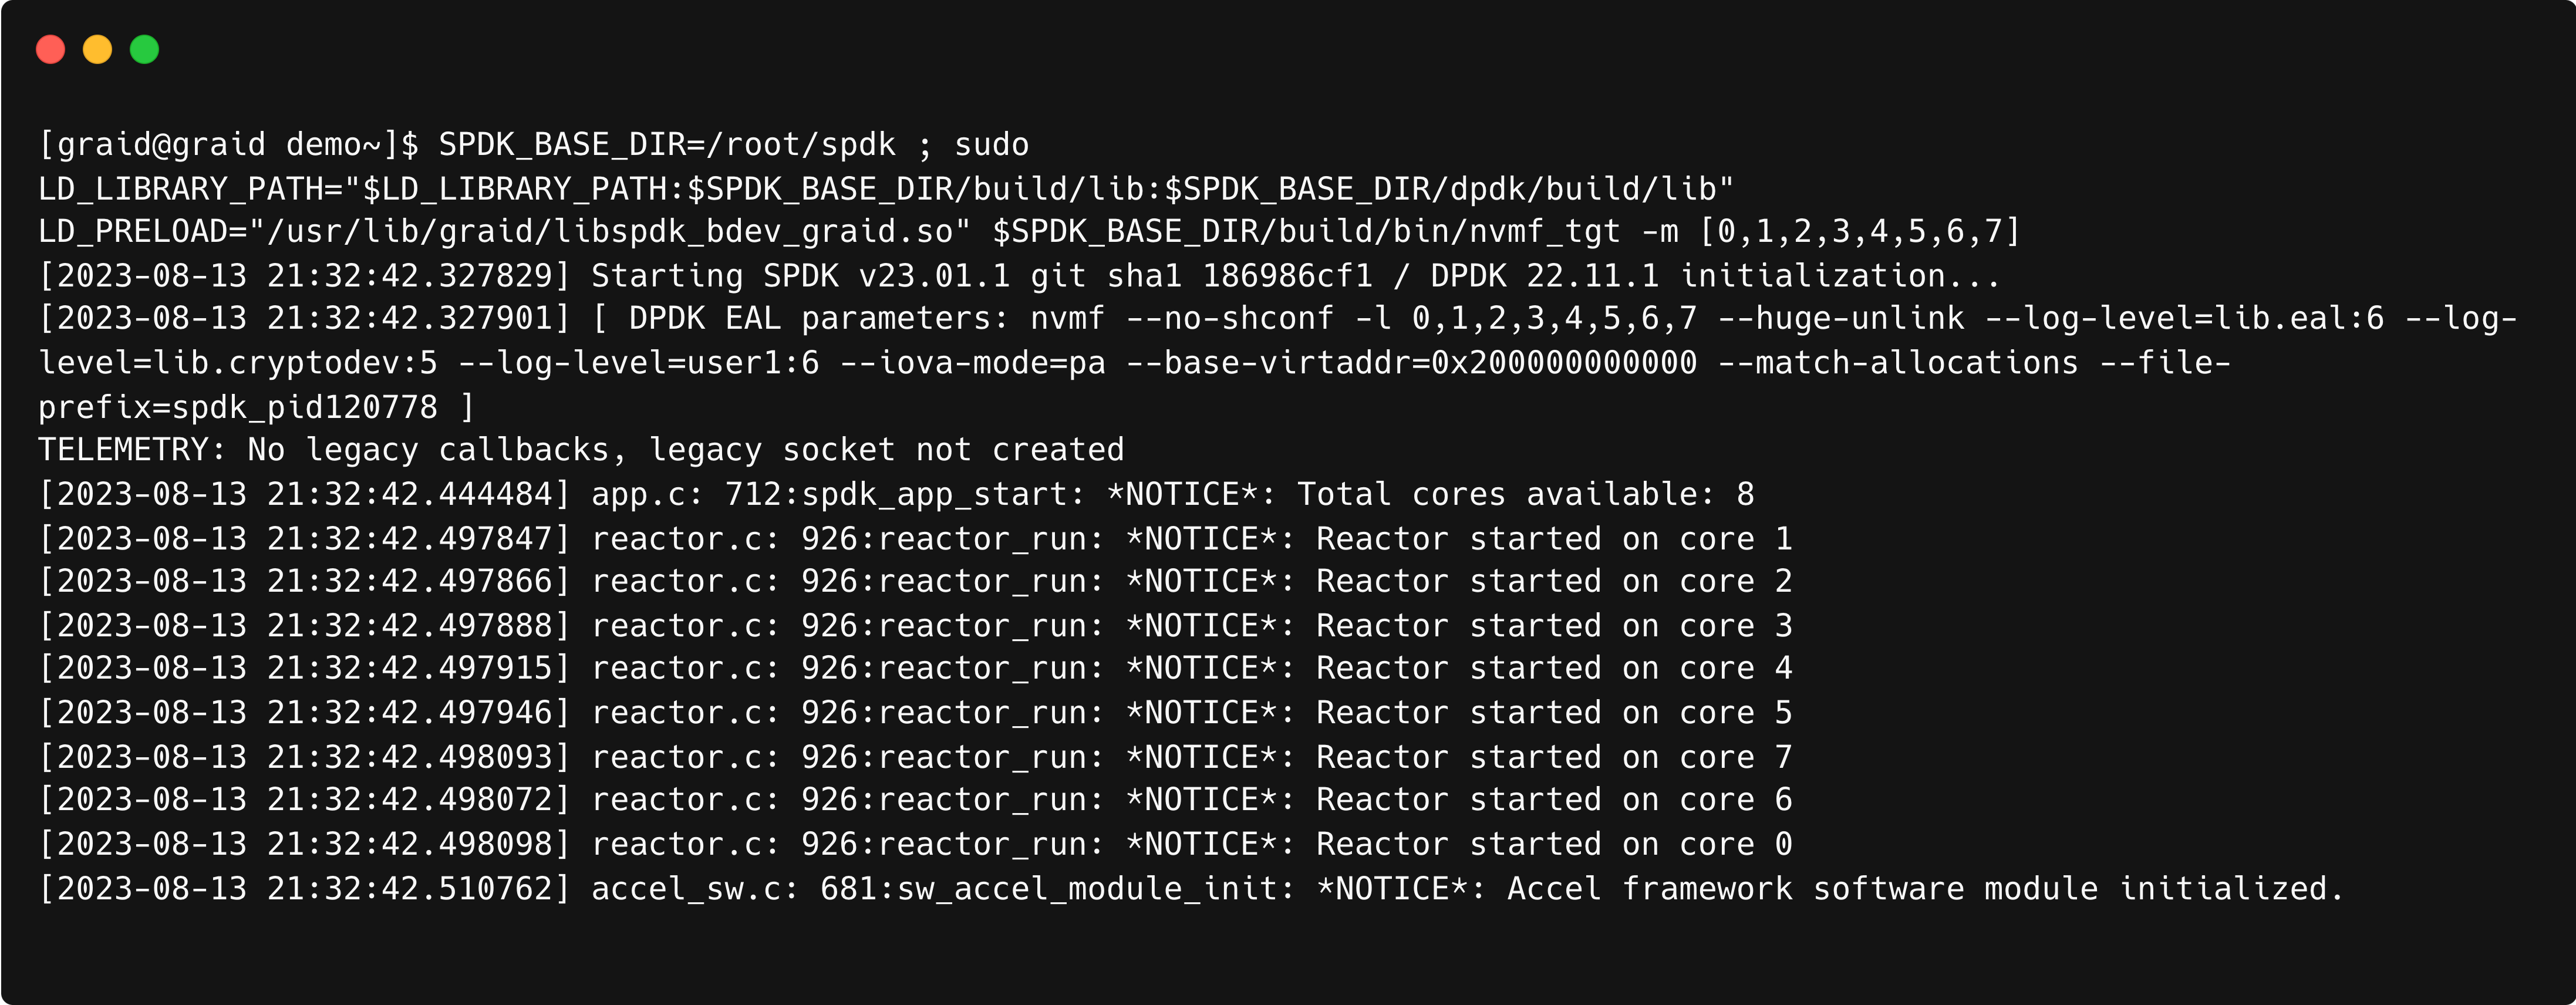
Note: Avoid closing or terminating the console while nvmf_tgt is running, as doing so may render the target invalid.
Open a new window/terminal and access (ssh)
Go to your spdk path, then register DGs
$ SPDK_BASE_DIR=[spdk build path]
$ sudo PYTHONPATH=/usr/lib/graid/ $SPDK_BASE_DIR/spdk/scripts/rpc.py --plugin graid_rpc_plugin \
bdev_graid_register_dg <dg_id>
# Then you can check bdevs by:
$ sudo $SPDK_BASE_DIR/scripts/rpc.py bdev_get_bdevs
# Example:
$ SPDK_BASE_DIR=$(pwd)/spdk
$ sudo PYTHONPATH=/usr/lib/graid/ $SPDK_BASE_DIR/spdk/scripts/rpc.py --plugin graid_rpc_plugin \
bdev_graid_register_dg 0
$ sudo $SPDK_BASE_DIR/scripts/rpc.py bdev_get_bdevs
Check that VD and DG STATE are OPTIMAL now:
$ sudo graidctl list drive_group
$ sudo graidctl list virtual_drive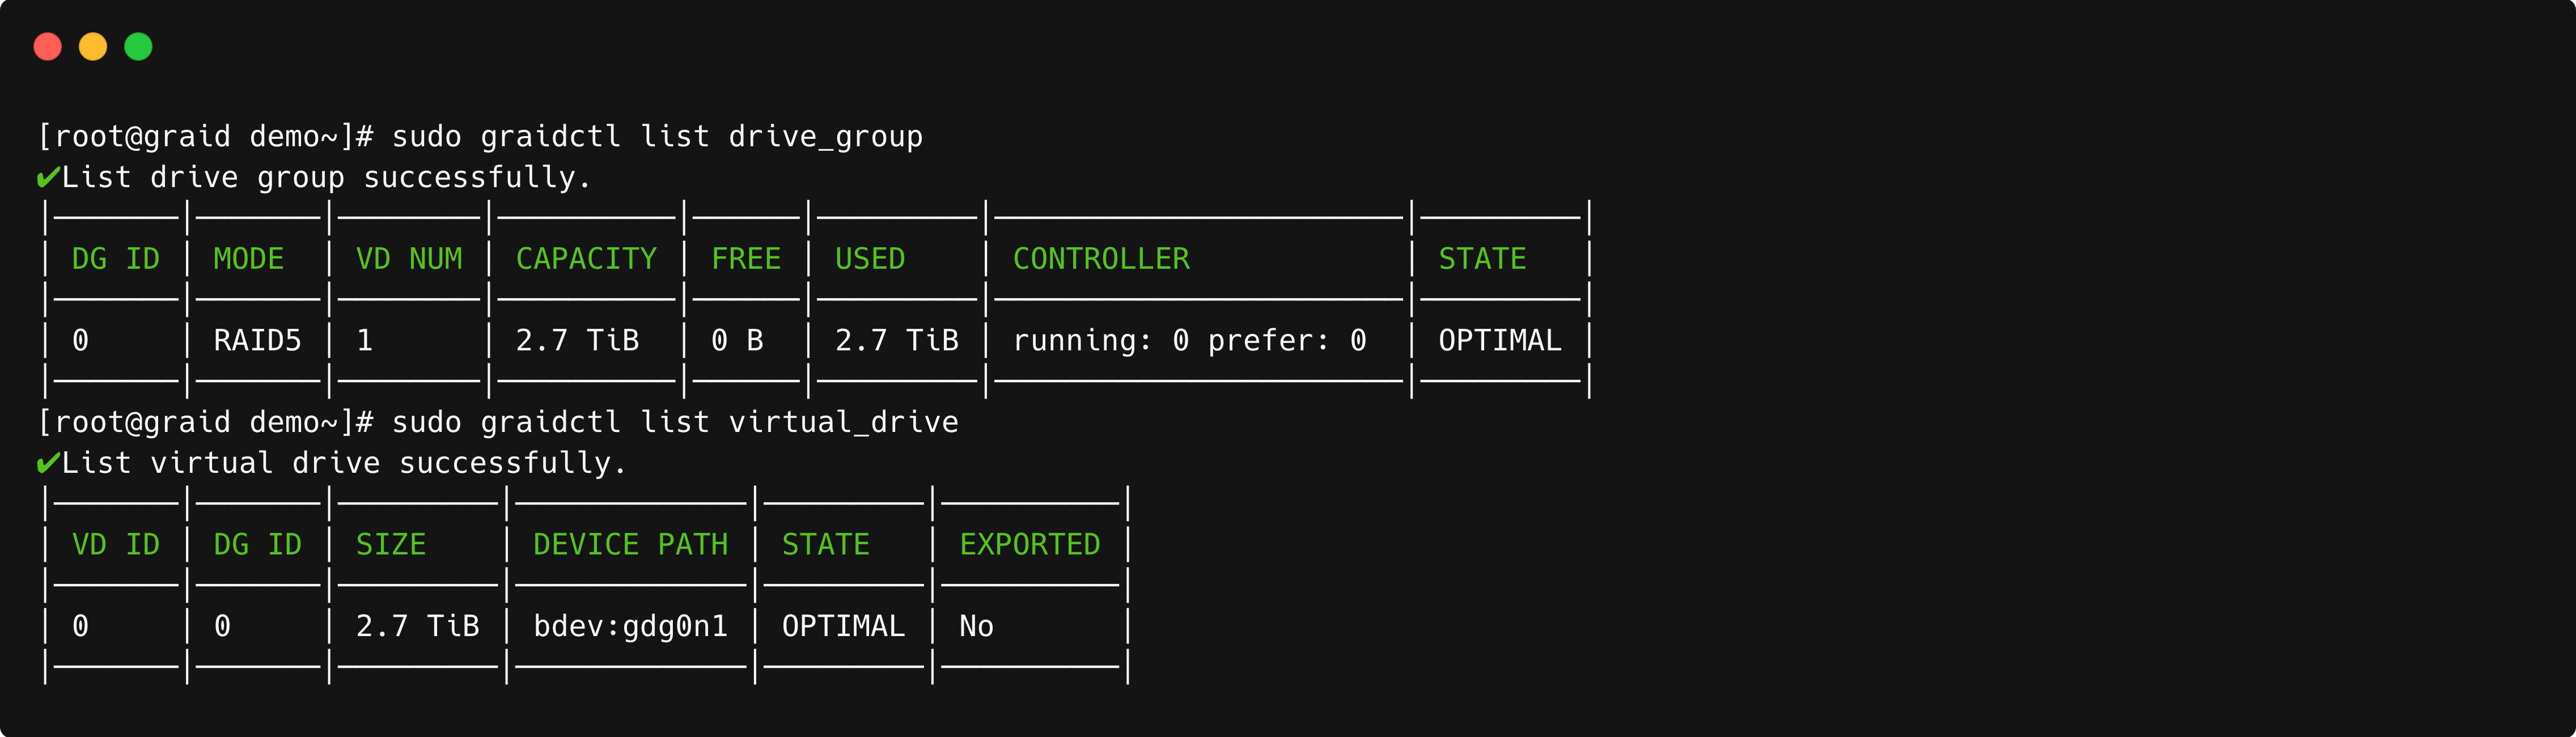
Export bdevs as targets (remember to change the parameters)
# Using RPCs
$ SPDK_BASE_DIR=[spdk build path]
$ sudo $SPDK_BASE_DIR/scripts/rpc.py nvmf_create_transport -t <Transport type: TCP/RDMA> \
 -u <IO_UNIT_SIZE> -m <MAX_IO_QPAIRS_PER_CTRLR> -c <IN_CAPSULE_DATA_SIZE>

# Assigning subsystem
$ sudo $SPDK_BASE_DIR/scripts/rpc.py nvmf_create_subsystem <NQN> -a -s <SERIAL_NUMBER>\
-d <MODEL_NUMBER>
$ sudo $SPDK_BASE_DIR/scripts/rpc.py nvmf_subsystem_add_ns <NQN> <bdev_name>
$ sudo $SPDK_BASE_DIR/scripts/rpc.py nvmf_subsystem_add_listener <NQN> \
-t <Transport type: TCP/RDMA> -a <TRADDR> -s <TRA PORT#>
# Example
$ SPDK_BASE_DIR=$(pwd)/spdk
$ sudo $SPDK_BASE_DIR/scripts/rpc.py nvmf_create_transport -t RDMA -u 8192 -i 131072 -c 8192
$ sudo $SPDK_BASE_DIR/scripts/rpc.py nvmf_create_subsystem nqn.2016-06.io.spdk:cnode1\
 -a -s SPDKGRAID0000001 -d 'SPDK bdev_graid Ctrl'
$ sudo $SPDK_BASE_DIR/scripts/rpc.py nvmf_subsystem_add_ns nqn.2016-06.io.spdk:cnode1 gdg0n1
$ sudo $SPDK_BASE_DIR/scripts/rpc.py nvmf_subsystem_add_listener nqn.2016-06.io.spdk:cnode1\
-t rdma -a <ip_address> -s 4420
Check that bdevs are available
$ sudo $SPDK_BASE_DIR/scripts/rpc.py nvmf_get_subsystems
Note: Please ensure that the path to rpc.py is correctly directed to the SPDK build directory.
# Parameters of nvmf_tgt
#  -m, --cpumask <mask or list>    core mask (like 0xF) or
#                       core list of '[]' embraced (like [0,1,10]) for DPDK
# Parameters of nvmf_create_transport
# -t TRTYPE, --trtype TRTYPE
#                        Transport type (ex. RDMA)
# -u IO_UNIT_SIZE, --io-unit-size IO_UNIT_SIZE
#                        I/O unit size (bytes)
# -p MAX_QPAIRS_PER_CTRLR, --max-qpairs-per-ctrlr MAX_QPAIRS_PER_CTRLR
#                       Max number of SQ and CQ per controller. Deprecated, use max-io-qpairs-per-ctrlr
# -c IN_CAPSULE_DATA_SIZE, --in-capsule-data-size IN_CAPSULE_DATA_SIZE
#                        Max number of in-capsule data size

# Parameters of nvmf_create_subsystem
# -a, --allow-any-host  Allow any host to connect
#                        (don't enforce allowed host NQN list)
# -s SERIAL_NUMBER, --serial-number SERIAL_NUMBER
#                        Format: 'sn' etc Example: 'SPDK00000000000001'
# -d MODEL_NUMBER, --model-number MODEL_NUMBER
#                        Format: 'mn' etc Example: 'SPDK Controller'

# Parameters of nvmf_subsystem_add_listener
# -t TRTYPE, --trtype TRTYPE
#                         NVMe-oF transport type: e.g., rdma
# -a TRADDR, --traddr TRADDR
#                         NVMe-oF transport address: e.g., an ip address
# -s TRSVCID, --trsvcid TRSVCID
#                         NVMe-oF transport service id: e.g., a port number
#                         (required for RDMA or TCP)
Initiator side
- On the initiator sideCleanup on the target side:
# load the nvmet module $ sudo modprobe nvme-rdma $ sudo modprobe nvme-tcp # via nvme-cli $ sudo nvme discover -t tcp -a <ip_address> -s 4420 $ sudo nvme connect-all -t tcp -a <ip_address> -s 4420 $ sudo nvme connect -t tcp -n "nqn.2016-06.io.spdk:cnode1" \ -a <ip_address> -s 4420 # via graidctl[option] $ sudo graidctl connect remote_target tcp <ip_address> ipv4 4260 # cleanup $ sudo nvme disconnect -n "nqn.2016-06.io.spdk:cnode1"$ SPDK_BASE_DIR=$(pwd)/spdk $ sudo $SPDK_BASE_DIR/scripts/rpc.py nvmf_subsystem_remove_listener nqn.2016-06.io.spdk:cnode1 -t tcp \ -a <ip_address> -s 4420 $ sudo $SPDK_BASE_DIR/scripts/rpc.py nvmf_subsystem_remove_ns nqn.2016-06.io.spdk:cnode1 1 $ sudo $SPDK_BASE_DIR/scripts/rpc.py nvmf_delete_subsystem nqn.2016-06.io.spdk:cnode1 - Mount the driveOutput example:
$ mkdir /mnt/graid_test
$ sudo nvme list
$ sudo mkfs.ext4 /dev/nvme0n1
$ sudo mount /dev/nvme0n1 /mnt/graid_test
Setup 4k LBA to 512bytes LBA Transformation Bdev Layer
This is an example of how to setup 4k LBA to 512bytes LBA transformation bdev layer.
Run nvmf_tgt
$ SPDK_BASE_DIR=[spdk build path] ;\
LD_LIBRARY_PATH="$LD_LIBRARY_PATH:$SPDK_BASE_DIR/build/lib:$SPDK_BASE_DIR/dpdk/build/lib" \
LD_PRELOAD="/usr/lib/graid/libspdk_bdev_graid.so:/usr/lib/graid/libspdk_bdev_graid512e.so" \
$SPDK_BASE_DIR/build/bin/nvmf_tgt -m [<cpu_core>]
# Example:
$ SPDK_BASE_DIR=$(pwd)/spdk ;\
LD_LIBRARY_PATH="$LD_LIBRARY_PATH:$SPDK_BASE_DIR/build/lib:$SPDK_BASE_DIR/dpdk/build/lib" \
LD_PRELOAD="/usr/lib/graid/libspdk_bdev_graid.so:/usr/lib/graid/libspdk_bdev_graid512e.so" \
$SPDK_BASE_DIR/build/bin/nvmf_tgt -m [0,1,2,3,4,5,6,7]
Note: Prior to executing the aforementioned command, ensure that both libspdk_bdev_graid.so and libspdk_bdev_graid512e.so are present within the /usr/lib/graid/ directory.
Note: Avoid closing or terminating the console while nvmf_tgt is running, as doing so may render the target invalid.Open a new window/terminal and access (ssh)
Register your DG(s)
$ SPDK_BASE_DIR=[spdk build path]
$ PYTHONPATH=/usr/lib/graid/ ~/spdk/scripts/rpc.py --plugin graid_rpc_plugin \
bdev_graid_register_dg <dg_id>
# Example:
$ SPDK_BASE_DIR=$(pwd)/spdk
$ PYTHONPATH=/usr/lib/graid/ $SPDK_BASE_DIR/spdk/scripts/rpc.py --plugin graid_rpc_plugin bdev_graid_register_dg 0
Create a graid512e bdev (named gdg0n1_512e) on top of the base bdev (gdg0n1).
$ PYTHONPATH=/usr/lib/graid/ ~/spdk/scripts/rpc.py --plugin graid512e_rpc_plugin \
bdev_graid512e_create gdg0n1_512e gdg0n1
Export bdevs as targets (remember to change the parameters)
# Using RPCs
$ SPDK_BASE_DIR=[spdk build path]
$ sudo $SPDK_BASE_DIR/scripts/rpc.py nvmf_create_transport -t <Transport type: TCP/RDMA> \
 -u <IO_UNIT_SIZE> -m <MAX_IO_QPAIRS_PER_CTRLR> -c <IN_CAPSULE_DATA_SIZE>

# Assigning subsystem
$ SPDK_BASE_DIR=[spdk build path]
$ sudo $SPDK_BASE_DIR/scripts/rpc.py nvmf_create_subsystem <NQN> -a -s <SERIAL_NUMBER> \
-d <MODEL_NUMBER>
$ sudo $SPDK_BASE_DIR/scripts/rpc.py nvmf_subsystem_add_ns <NQN> <bdev_name>
$ sudo $SPDK_BASE_DIR/scripts/rpc.py nvmf_subsystem_add_listener <NQN> \
-t <Transport type: TCP/RDMA> -a <TRADDR> -s <TRA PORT#>
# Example
$ SPDK_BASE_DIR=$(pwd)/spdk
# RDMA
$ sudo $SPDK_BASE_DIR/scripts/rpc.py nvmf_create_transport -t RDMA -u 8192 -i 131072 -c 8192
# TCP
$ sudo $SPDK_BASE_DIR/scripts/rpc.py nvmf_create_transport -t TCP -u 16384 -m 8 -c 8192
$ sudo $SPDK_BASE_DIR/scripts/rpc.py nvmf_create_subsystem nqn.2016-06.io.spdk:cnode1 \
 -a -s SPDKGRAID0000001 -d 'SPDK bdev_graid Ctrl'
$ sudo $SPDK_BASE_DIR/scripts/rpc.py nvmf_subsystem_add_ns nqn.2016-06.io.spdk:cnode1 gdg0n1_512e
$ sudo $SPDK_BASE_DIR/scripts/rpc.py nvmf_subsystem_add_listener nqn.2016-06.io.spdk:cnode1 \
-t rdma -a <ip_address> -s 4420
Check the bdev_status
$ sudo $SPDK_BASE_DIR/spdk/scripts/rpc.py bdev_get_bdevsNote: Please ensure that the path to rpc.py is correctly directed to the SPDK build directory.
# Parameters of nvmf_create_transport
# -t TRTYPE, --trtype TRTYPE
#                        Transport type (ex. RDMA)
# -u IO_UNIT_SIZE, --io-unit-size IO_UNIT_SIZE
#                        I/O unit size (bytes)
# -p MAX_QPAIRS_PER_CTRLR, --max-qpairs-per-ctrlr MAX_QPAIRS_PER_CTRLR
#                       Max number of SQ and CQ per controller. Deprecated, use max-io-qpairs-per-ctrlr
# -c IN_CAPSULE_DATA_SIZE, --in-capsule-data-size IN_CAPSULE_DATA_SIZE
#                        Max number of in-capsule data size

# Parameters of nvmf_create_subsystem
# -a, --allow-any-host  Allow any host to connect
#                        (don't enforce allowed host NQN list)
# -s SERIAL_NUMBER, --serial-number SERIAL_NUMBER
#                        Format: 'sn' etc Example: 'SPDK00000000000001'
# -d MODEL_NUMBER, --model-number MODEL_NUMBER
#                        Format: 'mn' etc Example: 'SPDK Controller'

# Parameters of nvmf_subsystem_add_listener
# -t TRTYPE, --trtype TRTYPE
#                         NVMe-oF transport type: e.g., rdma
# -a TRADDR, --traddr TRADDR
#                         NVMe-oF transport address: e.g., an ip address
# -s TRSVCID, --trsvcid TRSVCID
#                         NVMe-oF transport service id: e.g., a port number
#                         (required for RDMA or TCP)
Output example: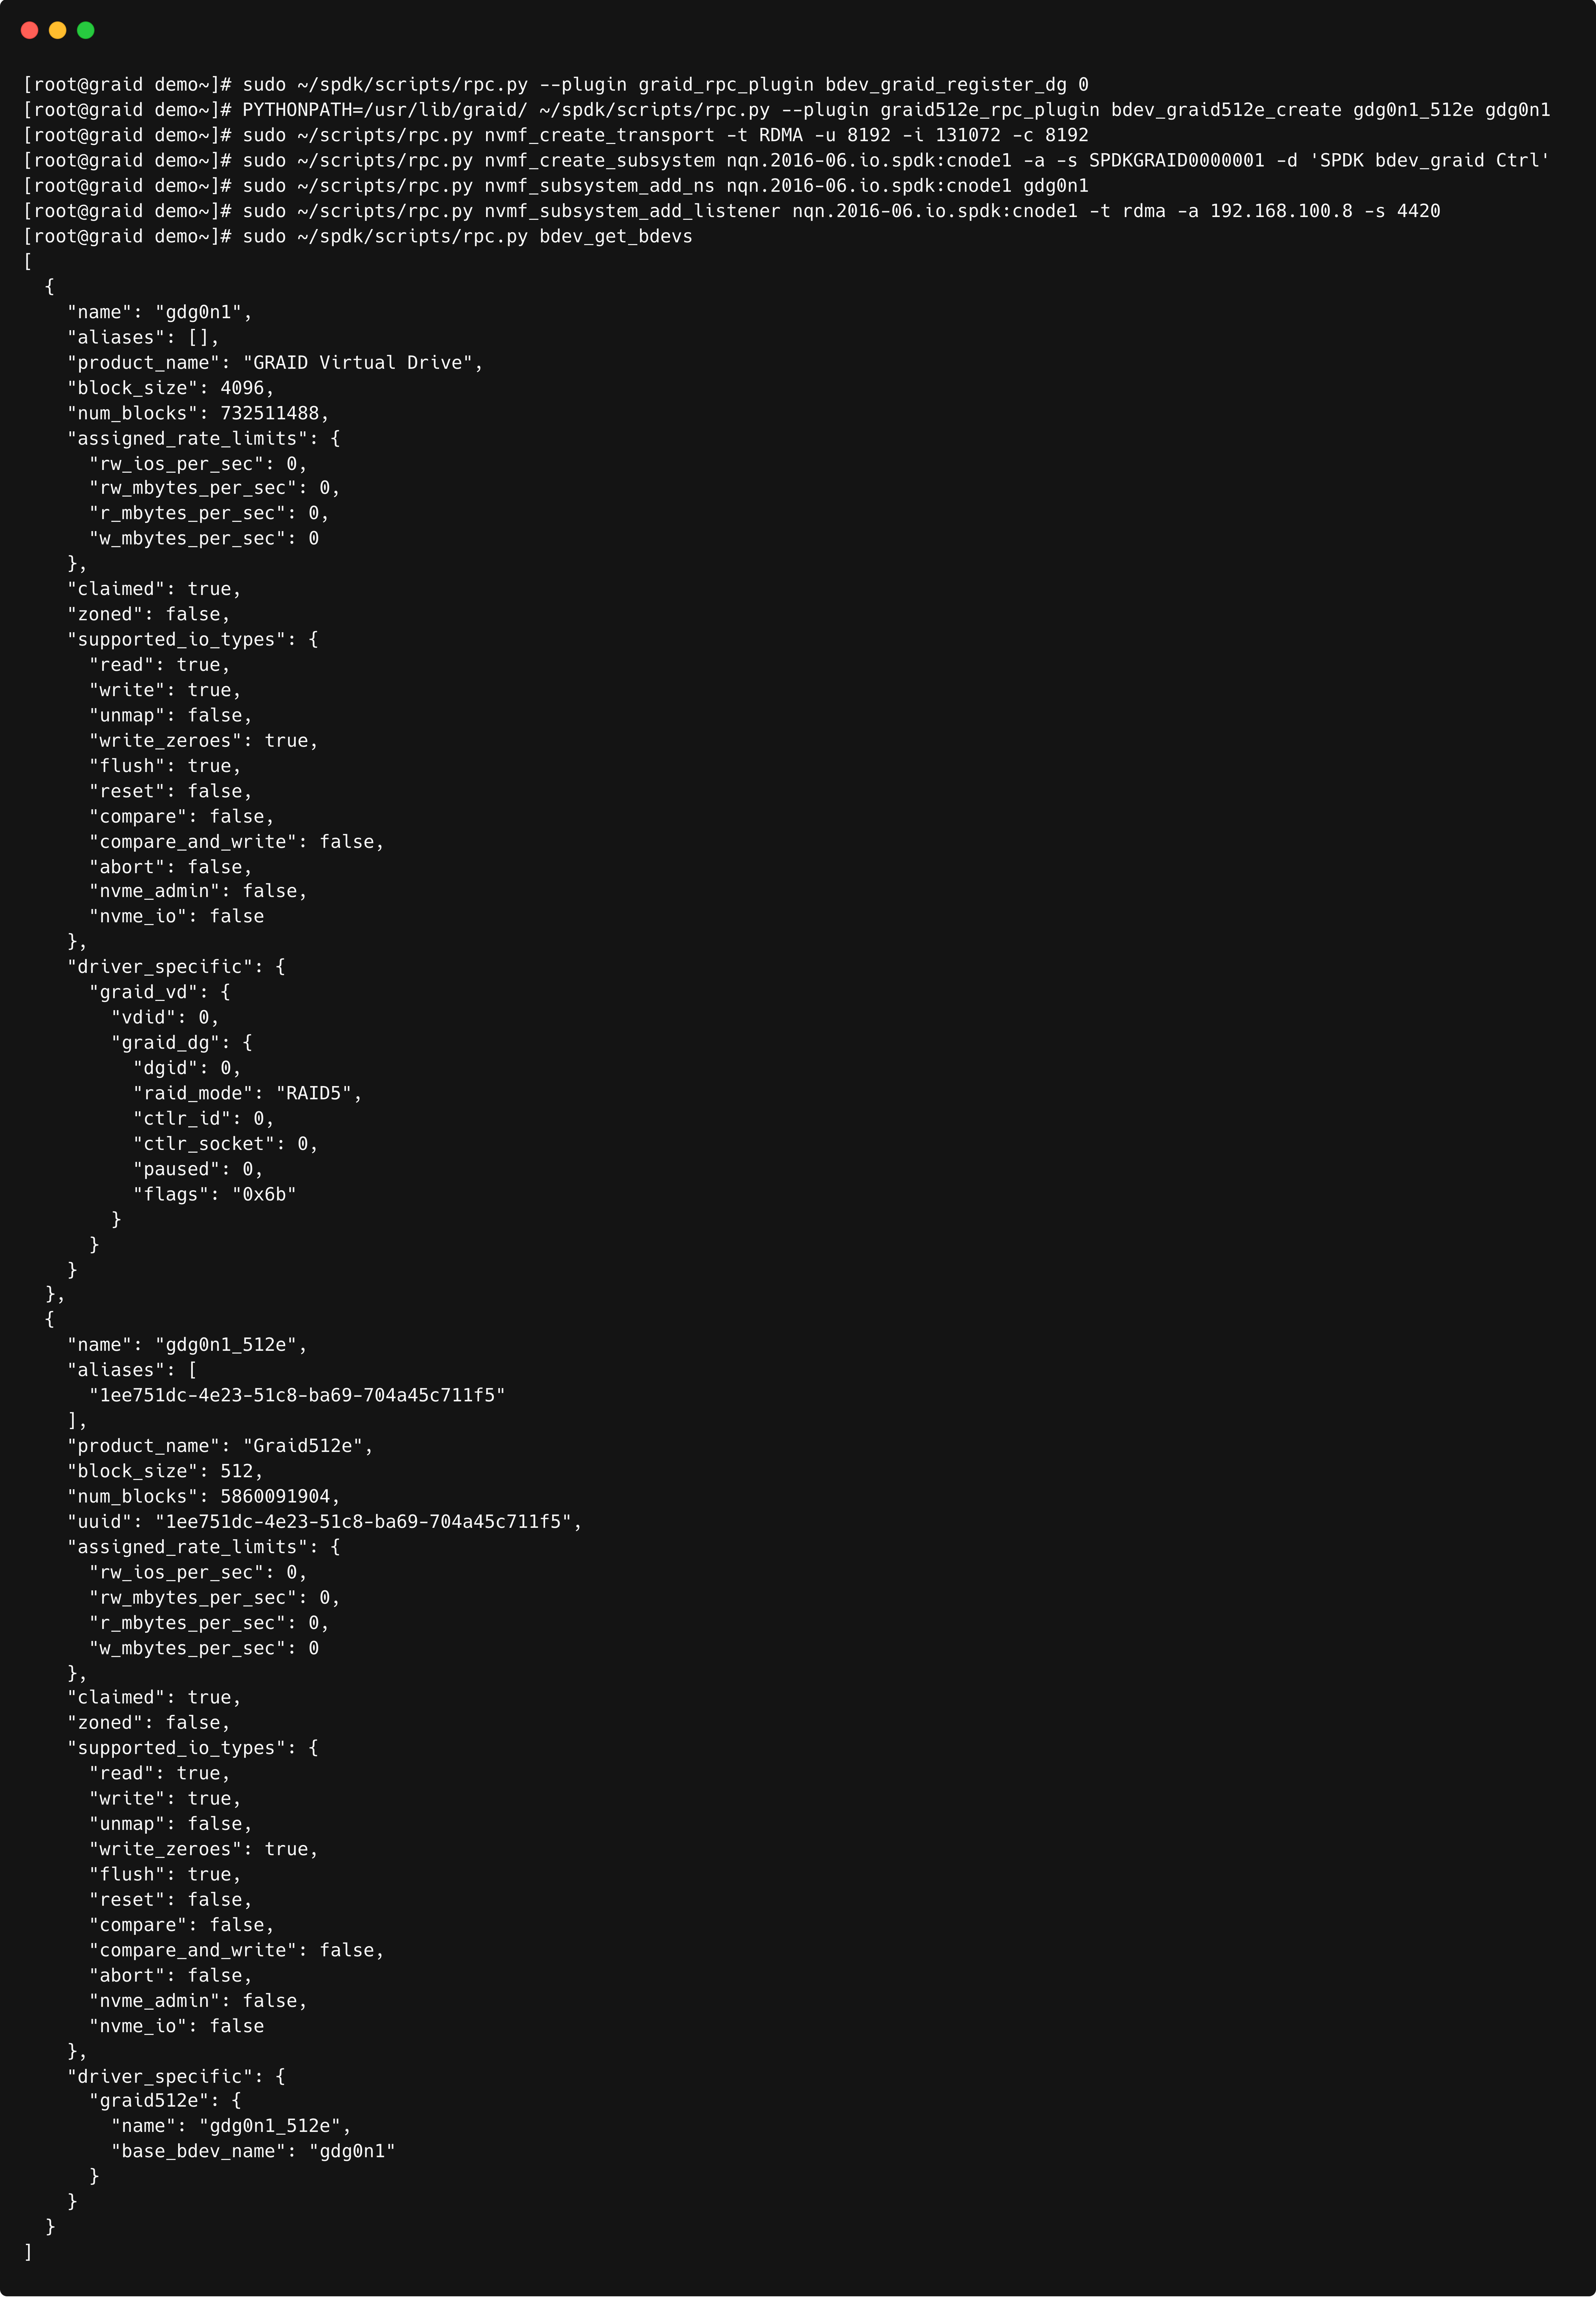
Configuring SupremeRAID™ VD as a Datastore in VMware
Note: To configuring SupremeRAID™ VD as a Datastore in VMware, user need to follow the VMware this section to enable the NVMe oF RDMA or TCP "Configure Adapters for NVMe over RDMA (RoCE v2) Storage"
This serves as an illustrative example for configuring SupremeRAID™'s NVMe-oF device as a VMware Datastore. For a more detailed setup, including guidance on enabling NVMe over RDMA/TCP storage, it's recommended to seek assistance from your VMware consultant.
- Access your vCenter to manage your VM host.

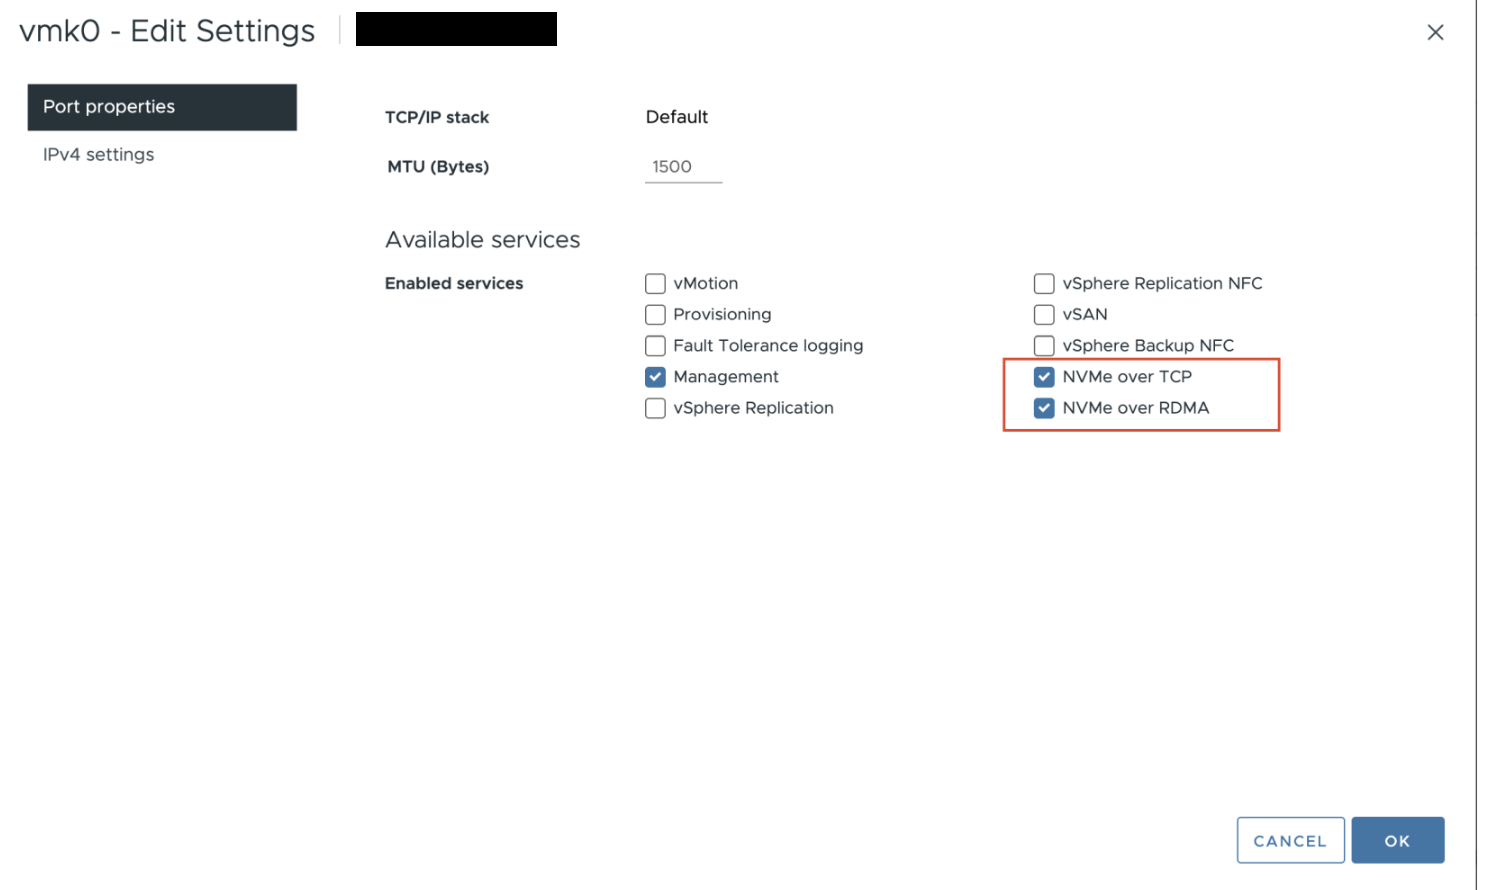
- Navigate to Configure > Networking > VMkernel adapters and ensure that the NVMe over TCP and NVMe over RDMA options are selected.
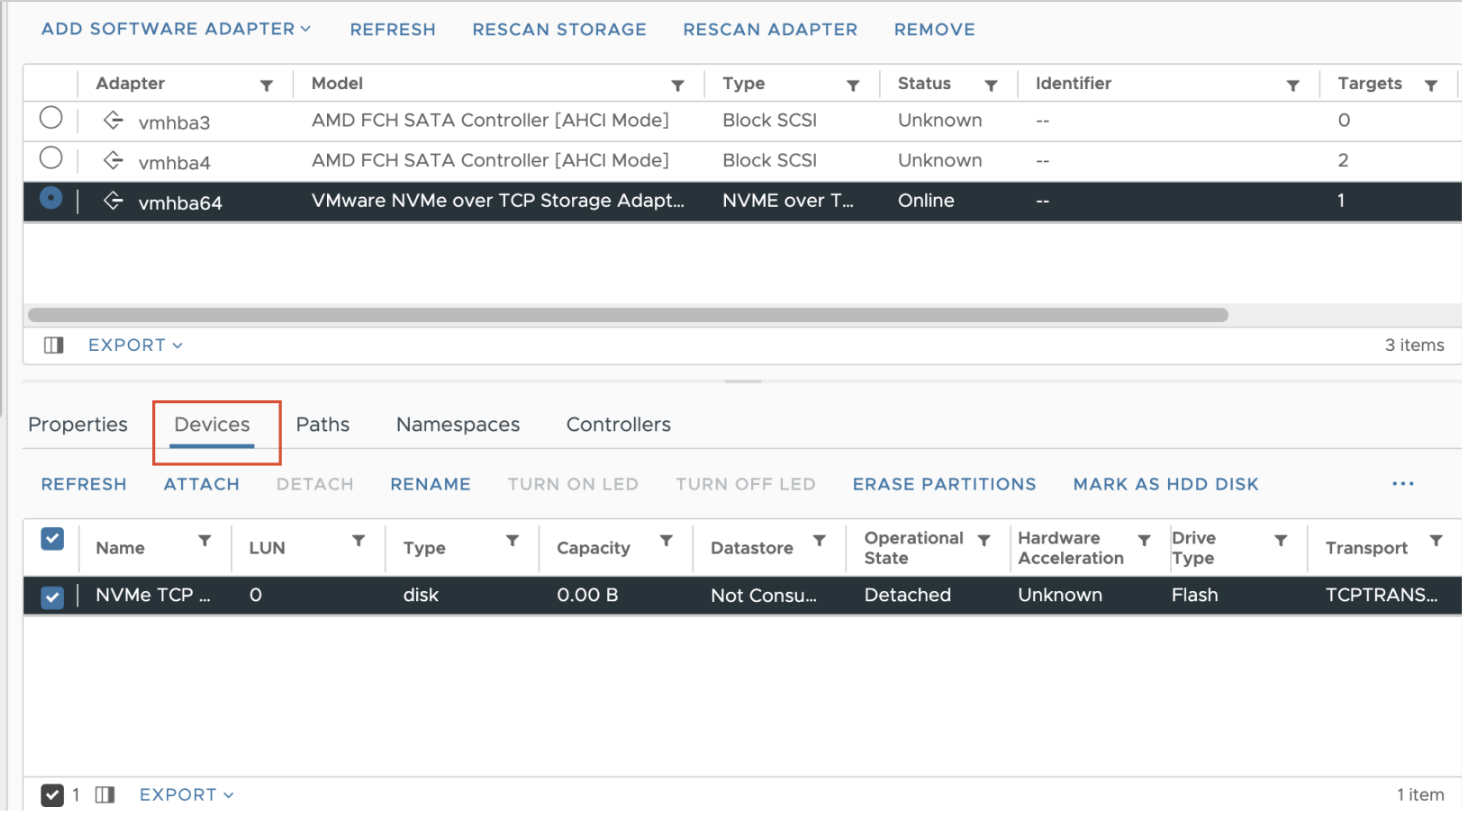
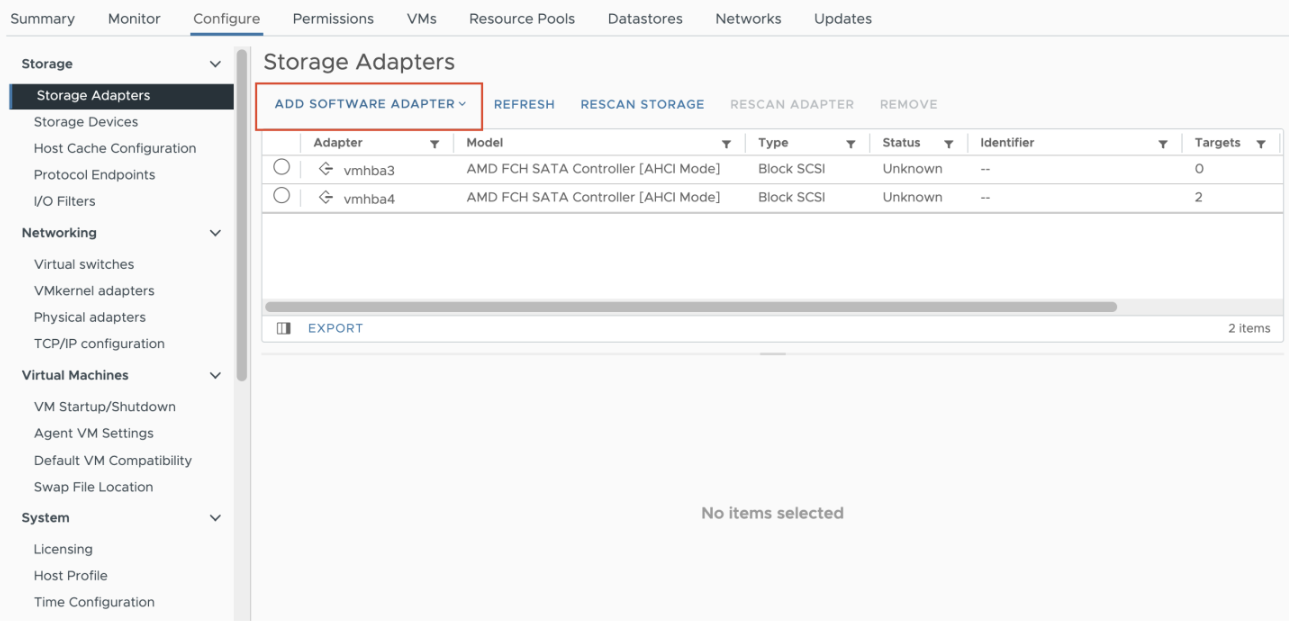
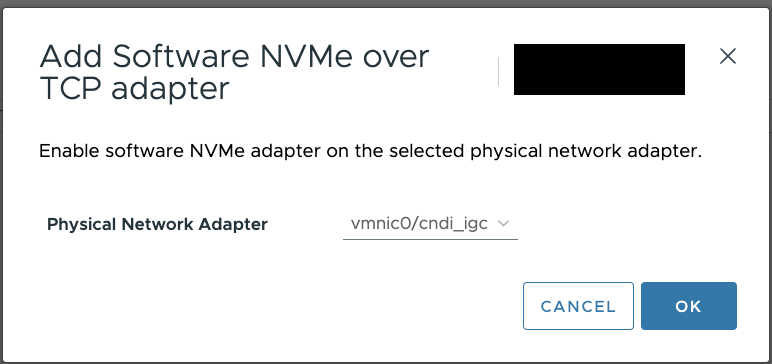
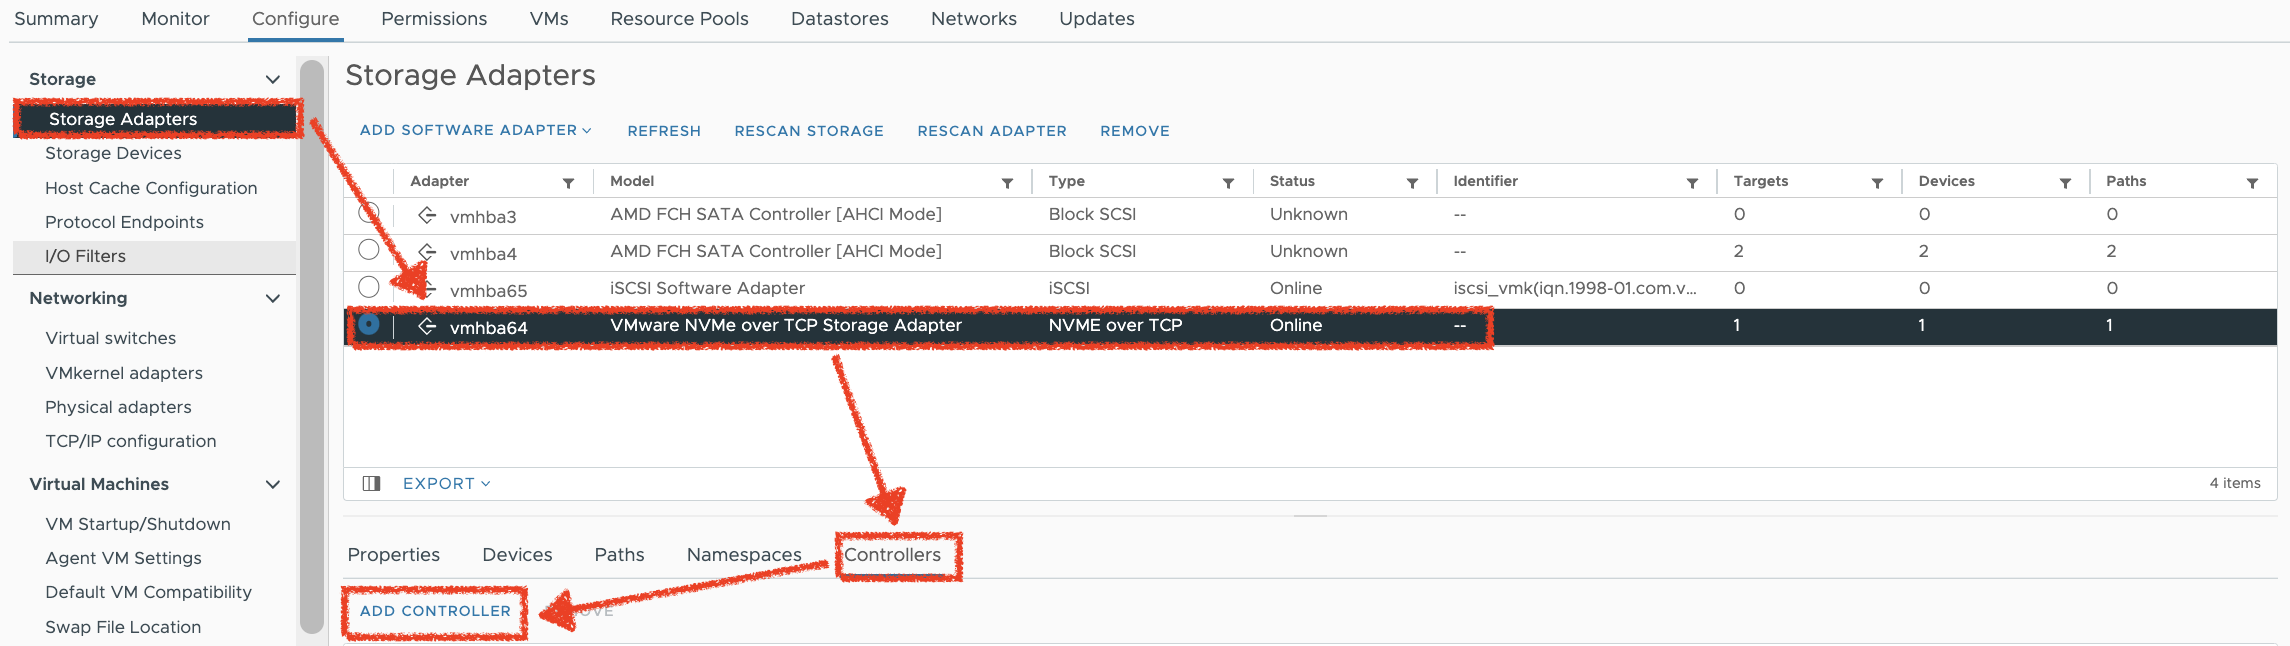
- Navigate to Configure > Storage Adapters > ADD SOFTWARE ADAPTER, to add a adpater.
- Navigate to Configure > Storage Adapters > Adpter(NVMe-of ADAPTER) > Controllers > ADD CONTROLLER, then configure the SupremeRAID™'s target server details to initiate device discovery.
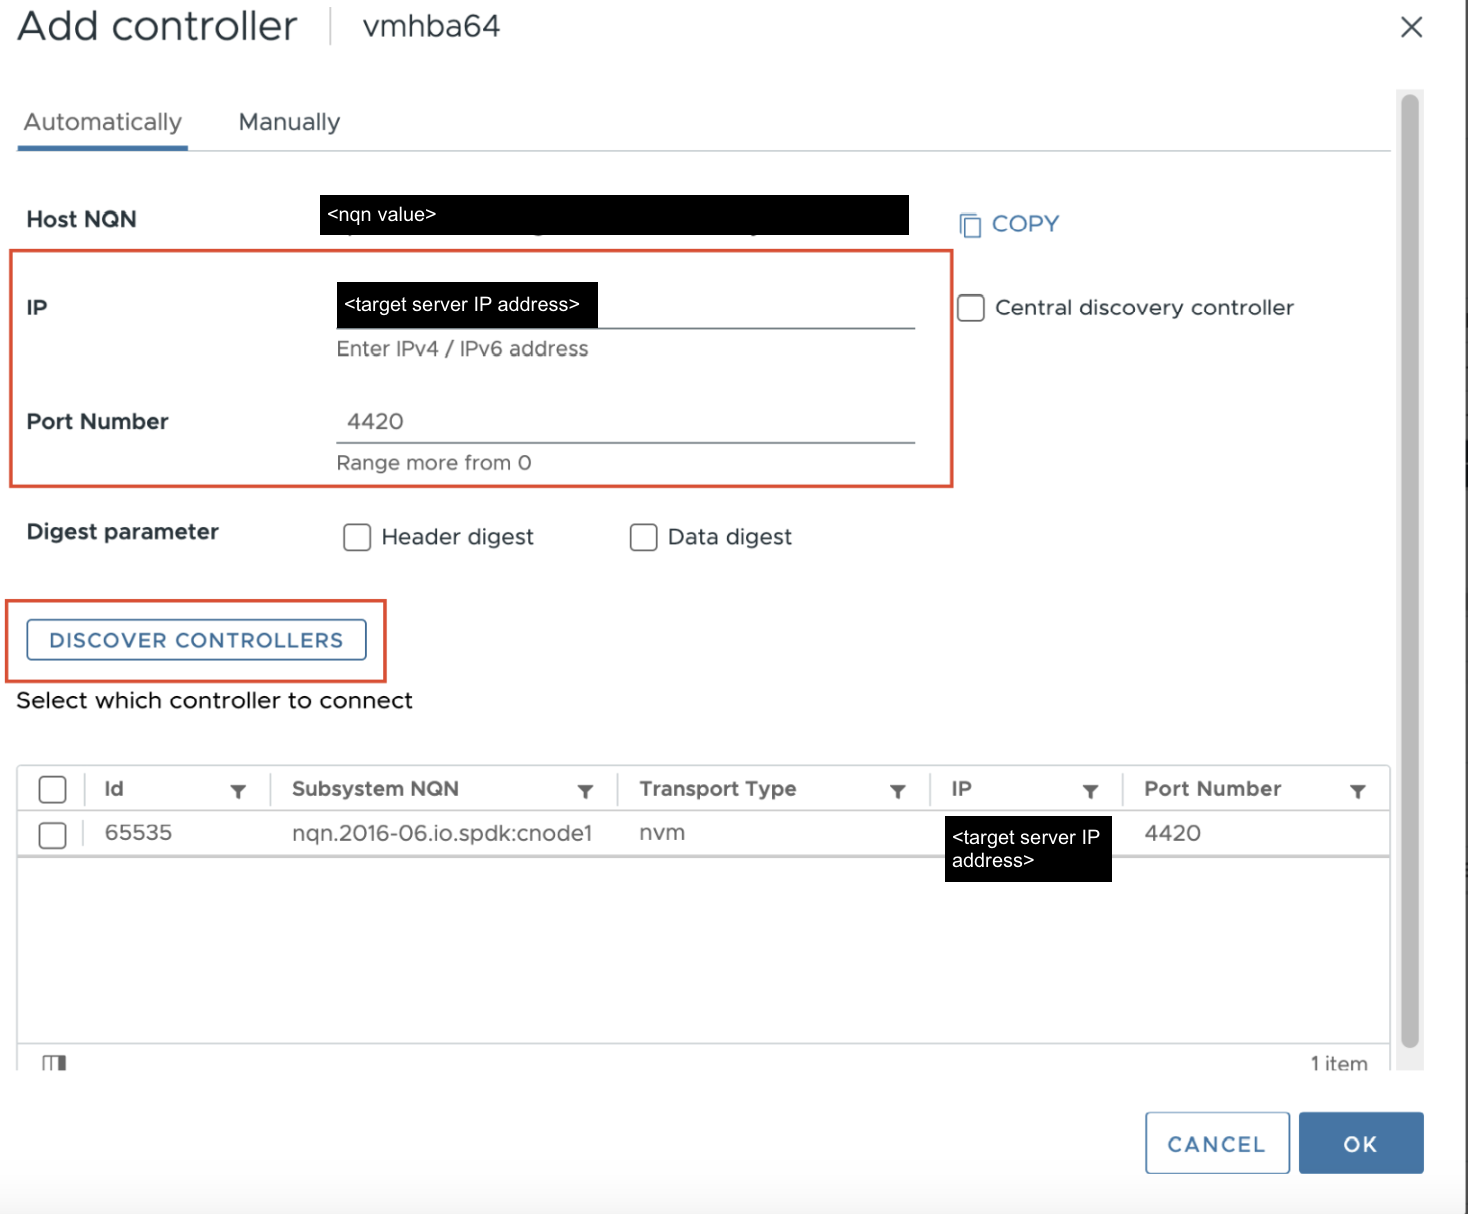
- After successful discovery by VMware, you will find the target listed on the Devices page.